Do you have any questions or comments about How to Edit Sunrise & Sunset Photos in Lightroom? Just leave us a comment below – we would LOVE to hear from you! And PLEASE SHARE this post using the social sharing buttons (we really appreciate it)!
Sun Salutation Illustrated Step-by-Step Instructions
Ann Pizer is a writer and registered yoga instructor who teaches vinyasa/flow and prenatal yoga classes.
Updated on July 13, 2022
Reviewed
Verywell Fit articles are reviewed by nutrition and exercise professionals. Reviewers confirm the content is thorough and accurate, reflecting the latest evidence-based research. Content is reviewed before publication and upon substantial updates. Learn more.
Sara Clark is an EYT 500-hour certified Vinyasa yoga and mindfulness teacher, lululemon Global Yoga Ambassador, model, and writer.
Table of Contents
View All
Table of Contents
Sun salutations are a key part of any vinyasa flow style yoga practice. You may not even realize you are doing them, but many teachers use them as a warm-up at the beginning of class or even base whole classes around them.
If you learn this sequence, it will really help you if you ever want to practice at home, since one of the biggest obstacles to doing yoga on your own is figuring out what to do when you first get on your yoga mat. Sun salutations are often a great choice.
We’ve tried, tested, and reviewed the best yoga mats. If you’re in the market for a mat, explore which option may be best for you.
Watch Now: A Beginner’s Guide to Sun Salutations
The Breath
The breath is a very important part of this sequence. Movement from one pose to the next is always done in conjunction with either an inhalation or exhalation of the breath. You can control the pace of the sequence by altering the number of breaths in each pose. Make sure to move to the next pose on the correct breath.
Step-by-Step Instructions
Follow these simple instructions to start practicing sun salutations at home. Warm up with a few Cat-Cow stretches first.
Begin in Mountain Pose

Exhale. Release your arms to either side and fold over your legs (as if you were doing a swan dive into a swimming pool) to come into a forward bend (Uttanasana). Alternatively, you can keep your palms together and pass them in front of your heart as you fold forward.
Place your fingertips in line with your toes. Flatten your palms, if possible, or tent your fingers. Place your hands on blocks if they don’t reach the floor when your legs are straight. You can also bend the knees a little if that makes you more comfortable.
Inhale. Lift your head as you come to a flat back (Ardha Uttanasana), coming onto your fingertips or placing your hands on your shins, whichever allows you to get your back really flat.
Plank Pose

Exhale. Plant your palms and step or jump back to a plank position. In plank, make sure your shoulders are over your wrists and your butt is neither sticking up nor drooping down. A straight line from the crown of your head to your heels is what you are going for. Take an inhale here.
As an alternative for more experienced yoga students, you can plant the palms in Uttanasana, jump back directly to Chaturanga Dandasana on an exhalation, and go through your vinyasa from there.
Knees, Chest, and Chin or Chaturanga Dandasana

If You’re a Beginner
Inhale. Come forward to a low Cobra (Bhudjangasana). Anchor your pelvis and the tops of your feet to the floor, but try not to press into your hands as you come up into the backbend.
For More Advanced Yogis
Inhale. Roll over your toes (if possible) to come into an Upward Facing Dog. Bend your elbows out to the sides at first in order to bring your shoulders down and away from your ears. Then straighten your arms. Make sure your legs are straight and your knees are lifted off the floor.
Downward Facing Dog

Exhale. Push back to Downward Facing Dog. You can come through hands and knees on the way if necessary. Stay here a few breaths (or more) if you need to take a break. If you are going at a brisk pace, just stay one breath.
Step or Jump to a Forward Bend

Exhale. Step the right foot next to the right hand and then bring the left foot to join it in standing forward bend (Uttansana). You may also choose to jump forward instead. To do this, bend the knees on an exhalation and jump your feet to meet your hands.
Try to land with your toes in line with your fingertips. Inhale up to a flat back and then exhale back to Uttanasana.
Finish the Sun Salutation

Inhale. Lift your arms out to the sides and up, reversing the swan dive to return to raised arms pose. Exhale. Come to stand in mountain pose with your hands in a prayer position at the heart
Common Mistakes
There are a lot of moving parts to the sun salutation sequence, which can make it easy to break good form and place stress on the joints or cause injury. Be extra mindful of these poses, in particular.
Misaligning Plank Pose
Core strength and engagement are crucial to maintaining a neutral spine in Plank. Avoid collapsing into the shoulders or sagging in your hips by actively pressing the floor away from you with your hands as you pull your abdominals in. Try adjusting your hand and foot placement to hold you steady. You should also avoid tilting your head up or down—your neck should be in line with the rest of your body.
Collapsing Into Chaturanga
Chaturanga Dandasana is one of the trickiest poses to master. Remember to keep your elbows hugged in close and only lower about halfway or three-quarters of the way down to avoid collapsing into a “banana back.” If you’re still building core and upper body strength, use the knees-chest-chin method to lower yourself down before transitioning to Upward Facing Dog.
Dropping the Head Back in Upward Dog
The key to a well-aligned spine in Upward Facing Dog is to avoid dropping your head back, which compresses the cervical spine at the back of the neck. It’s better to stay lower to the ground, similar to Cobra Pose to ensure length in your spine.
Rounding the Spine in Downward Dog
A common cue for Downward Dog is to straighten the legs and press the heels to the floor. But the problem with that is it can cause a tendency to round the spine, especially if the hamstrings are tight and it’s difficult to straighten the legs. To achieve the desired V-shape in the pose, rather than a U-shape, bring a slight bend into the knees. Maintaining a neutral spine is more ideal than striving for straightened legs and heels touching the floor.
Step 1: Make Global Adjustments: Tone, Presence, and Sharpening
Let’s start with this unedited photo of Bryce Canyon at sunrise (note these same techniques can be used for editing an image taken at sunset):

Go ahead and access Lightroom’s Develop Module.

- I set Highlights to -100. This may seem excessive, but it significantly lowers the brightness of the sky and the snow in the bottom third of the photo while leaving the rest of the areas alone. This will also redirect the focus back to where the sky and rock formations are.
- I adjust the Shadows (+32) and Blacks (+60) settings to brighten up the lower two-thirds of the image.
- Increase Clarity (+20) and Sharpening(10) (under the “Details” tab) to enhance the overall sharpness of the landscape and the definition of the rocks to look more 3D.
- I find that Dehazeoften brings out the color of a scene (when used in moderation). It does exactly what it sounds like; if your photo has a slight overcast or fog – whether in terms of composition (e.g. boat in a misty lake) or photo quality – Dehaze can help decrease its intensity to bring out certain subjects in the photo. This is especially helpful for sunrise/sunset photos since the main focus is on the colors of the sky. Beware of increasing it too much; it can make the colors look artificial.
- The rocks still look dull and dusty, so I will increase Vibrance and Saturation to introduce a flush of color.
- I leave Tempand Tintalone because my image already exhibits a warm-red tone to match the color of the natural sunlight during sunrise.

With just these few adjustments, the image is already looking so much more colorful and dynamic!

However, since the sky and foreground are of different exposures, we now need to split them off and edit them separately.
Step 2: Make Background Adjustments (Sky)
As a result of the edits in Step 1, the blue in the sky now looks too artificial for my preference. I want to lighten it to a softer, more natural blue by changing Hue to +52 and Aqua to -43.
Note that I did not adjust the other colors:
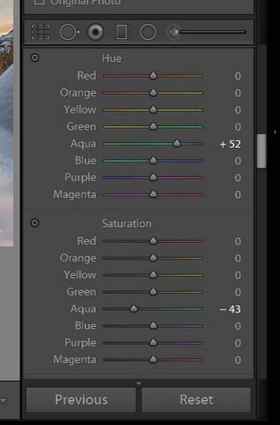
Close up of the sky before and after my color adjustments:

To make the clouds pop out even more against the sky, I use the Adjustment Brush/Mask to select, slightly darken and define the area with increased Dehaze settings.

I also modify Tint and Saturation to balance the color intensity resulting from an increase in the Dehaze setting. A good rule of thumb is to readjust saturation, vibrance, and coloring each time after using Dehaze.
Make sure to turn on Show Selected Mask Overlay at the bottom of the screen to see which areas are being masked. The Erase function is helpful for times I accidentally “overpaint.” It will erase masked areas, such as (for demonstration purposes only) the pale blue spot in the top left.

However, I find that the brush mask gives me more control and flexibility over which areas I want to edit. With the gradient mask, part of the mountains to the top right is covered and becomes darkened with the new settings.

One of the things I really enjoy about Lightroom is that it is a powerful tool that allows users to create similar effects using different methods.
Here are the results after this step:

Step 3: Make Foreground Adjustments
The rock columns still look dim in contrast to the sky, so I will now use the Adjustment Brush/Mask to select JUST THE MIDDLE AREA.

Accordingly, I adjust the Exposure, Contrast, Highlights, Shadows, and Clarity to illuminate this area.
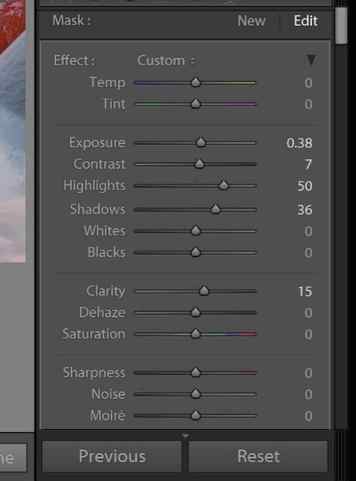
Here are the results after this step! As you can see, the lighting now evenly guides our attention to BOTH the sky in the background and rock columns in the foreground.