Learn to paint with Acrylics Step by Step with The Art Sherpa. There are 600+ free video art lessons for beginners. You CAN paint this. Begin YOUR art Journey today by finding the perfect acrylic painting on canvas to follow along with. With the #1 beginners acrylic painting channel on YouTube, there is something you will be excited to create, and can hang on your wall today. We have Big Art Quest lessons that will take you through every beginner step and lessons to get you painting your own masterpieces. Join our art family for Live streaming video lessons on YouTube and Facebook. Take your art to go with Mobile! Why are these art lessons free? So YOU can save for more art supplies and have fun!
Videos » Emotional Eye with Water effect step by step Acrylic Tutorial | TheArtSherpa

The Art Sherpa is a participant in the Amazon Services LLC Associates Program, As an Amazon Associate I earn from qualifying purchases.
*** Acrylic Paint Colors ***
| Emotional Eye Step by step | |
| Emotional Eye With Water 3-16 YT.pdf, 19.7MB ∞ |
If you have any trouble with printing these out email [email protected]
CANVAS
Not a fan of Amazon ? My Teacher shopping list Dick Blick
- Sta-wet palette on show – https://amzn.to/3b5cd0L
- Sta-wet Paper Refills – https://amzn.to/2MUGEz3
- Sta-wet Sponge Refills – https://amzn.to/3dbHjH4
CretaColor Pencil White : https://amzn.to/3pqWlv5
T Square Ruler – https://amzn.to/38hjOWX
Golden Glazing Liquid For Blending – https://amzn.to/2M0ND8t
Saral Paper: http://amzn.to/2zBrLbN
Artist Tape : https://amzn.to/2qZTywt
The Pioneer Woman Turning Table : https://amzn.to/3nJ5pLw
Brushes –
Brushes: Please use these as a guide of what I am planning to use. These are brushes I use very often. You do not need to have the exact brand of brushes that I use. When it comes to a Bright you might be able to use a single bright as one way to save money. My students often paint with different tools. I believe you use what you have and are comfortable with until it doesn’t work for you. This list of brushes and information should be used as a guide and I highly recommend you make this work within your own personal budget or painting process.
- Brights in a Firm Synthetic
- Brights in Bristles
- Rounds with Good point
- Blenders
- Details
- Filbert or Cats Tongue for Acrylic
You may do like to go back and review:
How I mix Color –
05:19 Step 1 Colored Ground
10:05 Step 2 Transfer Image
16:43 Step 3 Block in the Eye 1
21:25 Step 4 Block in the Eye 2
30:05 Step 5 Refining the Eye
38:17 Step 6 Fine white Eye Details
46:05 Step 7 First Layer of Skin Tone
59:56 Step 8 Blending in the Glow
1:14:00 Step 9 Refining More Glow
1:27:14 Step10 Smudgy Eye Makeup
1:45:42 Step11 Brows and Lashes
1:55:55 Step12 Sketch in Water Drips
1:59:42 Step13 Shadows of Dripping Water
2:08:00 Step14 Defining Water Drips
2:20:30 Step15 Water Highlights
2:33:06 Step16 Wispy Hair
2:38:06 Sign and Farewell Tour
Follow The Art Sherpa
PLEASE note there are many other places to buy materials and I support you shopping and finding your best deal.
Please let me know if a link is broken. [email protected]
About The Art Sherpa:
Artwork and video is the sole property of The Art Sherpa™ and intended for the students personal education and Enjoyment. For questions regarding using any Art Sherpa painting in a commercial setting contact us [email protected] for all other questions [email protected]
03/18/21 03:47:27PM @brendala :
I am calling this “Loss”. I designed this as a tattoo, after losing my Army Battle Buddy to suicide only 5 months after returning home from deployment. I am still devastated by her loss and wish I was a better painter to really do justice to the loss I am trying to convey. The sun definitely stopped shining the day I lost my friend. Thank you for teaching how to paint the sad eye. I know mine isn’t even close to yours but way better than I would have done if I hadn’t seen your video. Thank you
Tags
The Art of Painting Water
✓ Showcase your talent and win big in Artists Network prestigious art competitions! Discover competitions in a variety of media and enter for your chance to win cash prizes, publication in leading art magazines, global exposure, and rewards for your hard work. Plus, gain valuable feedback from renowned jurors. Let your passion shine through – enter an art competition today!
Enjoy this article by guest authors and artists John Hulsey and Ann Trusty, who are discovering the joys of painting water and what to do when challenges present themselves.
4 Plein Air Tips
Water is perhaps one of the more challenging subjects to paint convincingly in a plein air landscape painting. Whether one is inspired by the ocean, a river, or a pond or lake, each subject requires a studied familiarity and often distinctly different paint handling. Here are a just a few tips that we consider helpful when painting water:
1: The sky and the water generally share the same colors, although the water will be darker in value. Draw a solid horizon or shore line and block them in at the same time to make sure they have shared colors.
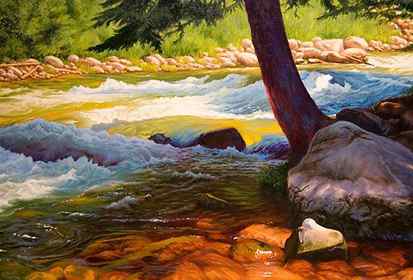
2: Ocean waves in constant motion present a challenge for the plein air painter because you want to capture the movement and the light effects that occur in breaking waves. The wave changes color and value as it gains height and thins out just before breaking. Until a wave begins to break, it shares the color of the sky. As it rises, it becomes a transparent window into the wave itself, and so turns greenish, and may even pick up the color of the sand for an instant just as it breaks. A great way to quickly get proficient at painting waves is to paint with only a palette knife.
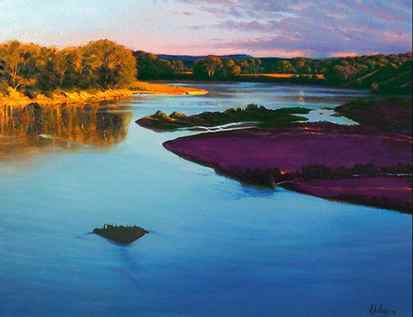
3: Still water on lakes, ponds and even placid rivers presents the challenge of painting reflections, often filled with sunrise or sunset colors. Maxfield Parrish used to build a model landscape on a mirror in order to get his reflections right in his realistic studio paintings. In plein air, however, we must analyze on the spot, and render those reflections in a much looser, more gestural way. Unless the reflection is your subject, try rendering it as a large tonal mass of color, rather than a lot of individual strokes. Keep in mind that reflections are always darker than the object itself. Water surfaces scatter light and therefore are not perfect mirrors. It gets really complicated when a reflection is combined with transparency effects in shallow water, where the bottom can show through to the surface.

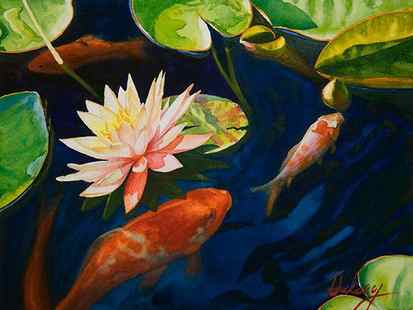
4: Painting water-lilies or leaves floating on water adds an object and therefore a shadow onto a reflective surface, interrupting what could otherwise be a smooth expanse of color. A good approach with opaque mediums is to paint the water first and add the reflections, objects, and shadows, later. Watercolor requires an entirely different approach and multiple techniques–carefully painting the surface colors around any objects or reflections, leaving “holes” to fill in later. There isn’t much room in watercolor to fix mistakes and perhaps that’s why we like it. But there is something very synergistic about using watercolors to paint water that just feels right.
For more in-depth articles on plein air painting, visit John and Ann at The Artist’s Road. Save Save


