Next, tape off any parts of the shoe you don’t want to paint. Like the insoles or the Nike Swoosh if you want to leave that unpainted. It’s important to tape it off because you might accidentally hit it with your paintbrush.
How to Paint Shoes: Best Guide to Customizing Shoes
Fashion trends can often seem exhausting. Keeping up with the world of fashion can become overwhelming at times. But every once in a while, a trend comes around that isn’t going anywhere any time soon. A recent trend that’s popped up is painting shoes.
Customizing shoes is a great way to express yourself, your interests, and your style. But almost nobody knows how to paint shoes correctly. Read on to learn how to correctly paint your shoes and stun everyone around you (including yourself!).
Materials You’ll Need
Painting your shoes is a much cheaper option than buying custom ones from the manufacturer. But you’ll still need to invest in some materials. The materials you’ll need aren’t too pricey and you can always use them again for future projects.
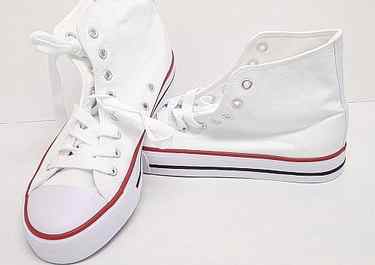
If you want a white, brand-name sneaker, we recommend getting a canvas shoe from Converse or Nike on Amazon.
Click here to check out the Converse pair on Amazon. These shoes have a black stripe on the midsole and around the ankle to add a bit of flair to the design.
Click here to check out the Nike shoes on Amazon. These white Air Force 1’s have been in style for a long time and that isn’t changing anytime soon. Everything on the sneaker is white, so that gives you the most creative freedom. The shoes even have the iconic Swoosh.
If these shoes are a bit out of your budget, then you can get any pair of white shoes from Walmart and the finished result should still look fantastic.
You’ll also need:
- Acrylic primer. This primer from Mont Marte works great
- Acrylic paint. This paint set from Golden is a great option. Many colors are included and the paint is high-quality.
- Acrylic paint thinner. If you’d like to airbrush or thin your paint. Check one out here.
- Pencil.
- A Sharpie.
- Brush pens. For more detailed work and fine lines. This set is the best for the job.
- An acrylic paint brush. We made a guide on the best acrylic paintbrush sets. If you’re looking for a simple set, check out this one.
- Stuffing material. Something to put inside the shoes while you work on the exterior. Socks, newspapers, or a plastic bag should work fine.
- Painter’s tape. Vinyl tape should work fine, too.
- Acrylic finisher. To give the paint a matte finish. This should work perfectly.
Set Up Your Workspace
Before you begin painting your shoes, you should gather all your materials and set up your workspace.
Organize your supplies and keep them somewhere nearby. You can lay out newspapers or old shoe boxes to keep the area clean. Keep a jar of water around so that you can clean your paintbrushes if you want to switch colors.
Make sure that you’re working on a solid, stable surface. Precision is key when working with your shoes and you don’t want a rocky table to mess up your work.
How to Paint Custom Air Force 1’s with Angelus Acrylic Leather Paints & Finishers

If you are excited to start your first custom Air Force 1 project, take some time to read this quick & easy blog to make sure your project goes as smooth as possible.
Step 1 – Custom Shoes Preparation
Before we let our inner Van Gogh onto our custom shoes, we need to ensure the leather is prepared correctly. In this step we will be using Angelus leather prepper and deglazer & Sole all-purpose applicators. This first step removes the factory finish of the Nike shoe to ensure our new coats of paint adhere to the leather appropriately. The second step is optional (but highly recommended). If you don’t have a perfectly steady hand, use Sole premium masking tape to mask off the soles of the Nike Air Force 1. This will ensure a stress-free paint job (take it from the experts).
Before we get to the fun part, we require the right paint brushes for the job. If you are a beginner, we recommend the Angelus paint brush set . This set comes with the 5 most essential brushes for all styles and sizes. If you are looking for a more premium option check out our Princeton branded sneaker paint brushes. Now the fun begins! Grab your online inspiration and Angelus acrylic leather paints and start creating your Nike custom shoes. If you are looking for the perfect beginner kit, the Angelus Basics Kit includes the 5 brush set, 5 of the most essential colours to help with colour matching & mixing, and lastly a 1oz bottle of Angelus leather prepper and deglazer.
Step 3 – Painting Sneaker Fabrics
If you are looking to paint the back tab logo of the Air Force 1, we got you covered. This small area is made up of fabric compared to the rest of the sneaker which is made up of leather. You will need to mix your Angelus acrylic leather paint colour with Angelus 2-Soft. Mix at a 1:1 ratio to ensure the paint can adhere appropriately to the fabric.
Now before you can admire your masterpiece custom Air Force 1’s, there is one final step. We will by applying Angelus matte acrylic finisher onto the Air Force 1 to ensure the paint is protected. Apply the finisher in thin and even coats on all painted areas of your Nike custom Air Force 1. Congratulations, you are now an expert in painting Custom Air Force 1’s, create today!
INSTRUCTIONS
For best results, natural materials work best with fabric paints.
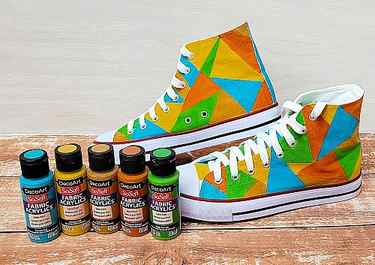
- Start with some new white canvas sneakers, or refresh an old pair with a geometric design.
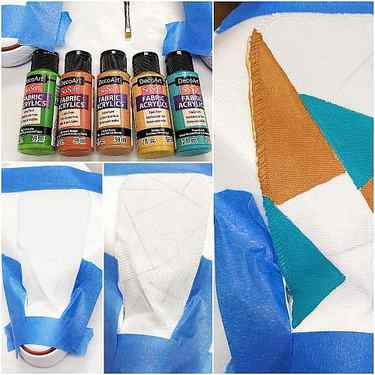
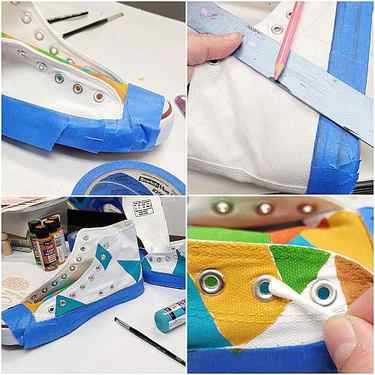
- I worked on the tongue first. Unlace the shoes and pull the tongues out. Gather your color palette of SoSoft Fabric Acrylics. Place something stiff behind the tongues and use masking tape to hold each in place. Mask off the toes of the shoes to minimize accidents. Take a straightedge and a light-colored pencil and begin to draw on geometric shapes. Begin painting some areas using a small flat brush, Peacock Teal, and Golden Brown.
- Place colors so they are evenly balanced. The shoes don’t have to match. It’s probably even be better if they don’t.
- Continue to fill in shapes using Bright Avocado, Bittersweet Orange, and Antique Gold. Allow to dry. Remove the masking tape.

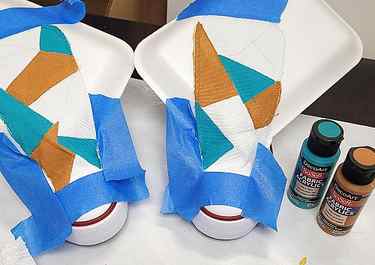
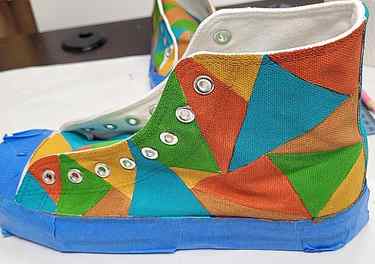
- Tuck in the tongues and use the same process to paint the outside of the shoes: Mask off the rubber parts of the shoes, draw on geometric shapes using a straightedge and a light-colored pencil, and paint the shapes with Peacock Teal, Golden Brown, Bright Avocado, Bittersweet Orange, and Antique Gold. (Tip: Use a cotton swab to remove any wet paint from the eyelets of the shoes.)
- Continue filling in shapes with color until the shoe is completely covered. Allow to dry.
- Remove the masking tape and wipe around the rubber edges with a baby wipe to clean up excess paint, if needed.
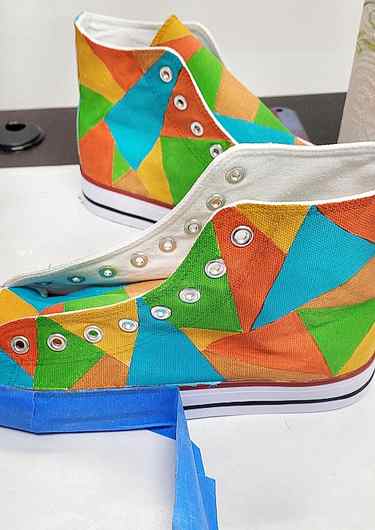
- Lace them back up and literally stand out from the crowd with upcycled back-to-school shoes that no one else will have.