[FONT=Book Antiqua] Create like the wind!
[FONT=Palatino Linotype] Roger College
Should I add water to acrylic paint?
well everyone i have to say that i was skeptical at first but good news is it works. the key is to use thin fluid like acrylics. I was reccomended fluid acrylics by golden and I have to say that they are right, they are VERY much like watercolors!! thus why they work so well. no beading what so ever. the absorbancy is still there!! but i am going to apply some workable fixative over each layer to maybe prevent bleeding or go the egg emulshion route. the only thing though is that the heavier the water color the more lifting you will encounter. thus always apply a medium to light consitency glaze, in other words few to four drops of water or a BIT more go a long way I am also trying the fixative over each layer of watercolor glaze as well, which is to prevent bleeding/mixing of the colors and to preserve eachlayer. thanks also for christines link it is AMAZING. will post pictures of the results (which i did in swatches) later
October 24, 2007 at 9:52 pm #1091793
Default
I wanted to see if Cobalt watercolor could successfully enhance an acrylic blu, so tried this the other day. As the whole dried the two paints pulled up in parts and never completely dried. Use a Golden lt modeling paste. When it’s dry paint a layer of Golden Matte Medium and let it dry, then paint away. Use the Matte Medium between layers of your acrylic. Did you navigate over from mixed media?
nope i always look for “short cuts” since i love water color and want to use it primarily. but it can be limited in its uses unfortunatly
October 24, 2007 at 11:38 pm #1091789
Default
nope i always look for “short cuts” since i love water color and want to use it primarily. but it can be limited in its uses unfortunatly
Interesting comment. In my short experience when looking at past and modern “masters” of the medium I have found no limits in its uses. I have found limits in my ability to use it and for me thats the wonderful challenge. However in support of your question and experiements I think its great to try all types of things. If they work for you thats great, and look forward to seeing what you come up with.

Mike ——- see my progress through the work that I share on my website
Newbie Help Posting Guidelines User Agreement Watercolor Handbook
GIMP Article
October 25, 2007 at 1:25 am #1091791
Default
If you are trying to isolate paint layers…then here’s the varnish for watercolors…http://naturalpigments.com/detail.asp?Product_ID=540-1201
and don’t forget to check out the tube watercolors…different for sure. I would be interested in the effect you are trying to achieve…I understand all mediums have thier limitations…so I would like to know which limitation you are referring to please.
[FONT=Book Antiqua] Create like the wind!
[FONT=Palatino Linotype] Roger College
Can You Hydro Dip with Acrylic Paint?
Yes! Many people think spray paint is required for hydro dipping, but it’s just the liquid form of what’s inside the cans that matters. Knowing this, you can avoid the toxicity of spray paint, and all the extra gear such as gloves and respirator masks. This also means you can hydro dip with kids indoors using these safer methods.
Acrylic paint is usually heavier and needs to be thinned by mixing with water before adding it into your dipping water. Depending on the paint you’re using, you may need to add some cornstarch or borax to add density to your water. However, your water might not need anything at all — experiment to find out what works!
In the next sections, we will talk about some different techniques for how to hydro dip with acrylic paint.
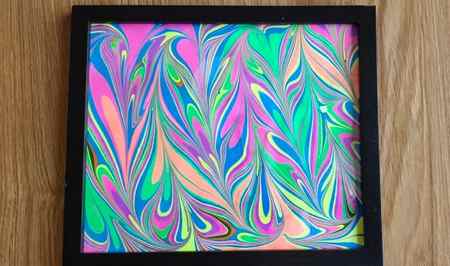
Marbling 3D Objects

Paper marbling (AKA Suminagashi) is a centuries old printing method in which inks are transferred from the surface of water onto a sheet of paper laid upon it.
You can use this method to make paper art (such as with the Aitoh Origami Marbling Kit), but here we’re going to try a variation where you can dip 3D objects. Preferably, you should use something small, flat, thin, and made of wood. You can use wood scraps, or make your own wood pieces to dip!
Supplies
For this method, you will need:
- A piece of wood to dip (use sandpaper for best results!)
- A container large enough to dip the piece of wood (try a bucket or storage bin)
- Cornstarch and water
- Acrylic paints
- Pipettes, toothpick, brush (anything to lay paint on the water and manipulate it)
Steps
- Make a cornstarch slurry by combining 2 parts cold water with 1 part cornstarch. Here, use a quarter cup of cold water and add 2tbsp of cornstarch. Keep aside.
- Heat 3 cups of water on the stove. When it begins to boil, add the cornstarch slurry. Stir until thick.
- Take the thickened water off the stove and let it cool down completely.
- Choose your paint colors. Take a bean sized amount of each into separate containers. Each color will have a different consistency so thin them with water till they are all equal. Not too thin and not too thick.
- Start laying the paints onto the cooled water one by one. If they sink, they’re too heavy, so try thinning them again. If they don’t show, they’re too thin, so add some more paint. With the right consistency, they should float on the surface of the water.
- Use a toothpick to gently swirl the paint into patterns you like.
- Take your piece of wood and gently dip it in at an angle.
- Lift up the paints ever so gently with the piece of wood, and out of the water.
- Let your piece dry. Acrylics are pretty fast drying so this shouldn’t take longer than 20 minutes tops!
That’s it! You don’t need aerosols of any kind. This is a quick, safe, and non-toxic method to having fun with hydro dipping.
Paper Marbling

Marbling can be used to make some beautiful art on paper. If you’d like to give paper marbling a try, all you need is:
- A tray
- Borax or liquid detergent
- Acrylic paints
- Paintbrush
- Paper
- (Or) Paper marbling kit
To make it more professional, try:
- Japanese Calligraphy Rice Paper
- Chinese Calligraphy Brush
The steps will be similar to those for 3D marbling. Here there are:
- Mix water and borax in a 1:3 ratio in the tray
- Choose acrylic colors and in separate ramekins. Thin each color separately using water. Different colors have different consistencies, so try and get them all to the same consistency.
- Take a paintbrush, dip into a color, and tap the handle on your palm about an inch away from the water. Let the paint splatter onto the water (if it doesn’t float, thin it even further).
- You can also gently dip the brush into the water and let the paint float away from the brush..
- (Optional) Swirl the paint around delicately with the other end of your paintbrush if you wish to create patterns.
- Lay the paper onto the water. The paint should transfer onto the paper. Peel back a corner and lift it off.
- Lay it out to dry and admire your work!
So what can you do with this paper? Well, you can hang it of course. But you can also cut it up and use it for a journal or gift wrapping. You can use it for origami and anything you’d use regular paper for. That’s another acrylic hydro dipping technique for you.
Watering down paint
All paint contains water. In fact, acrylic latex paint is about 40% water. This is what makes paint a liquid that can be applied to a surface. Too little water, and the paint would be thicker and less pliable. You’d be unable to get it onto your brush, much less apply it to the outside of a home. It’s helpful to think of the water in paint as the delivery mechanism that carries the pigment in paint to the surface being painted.
Painting the exterior of a stucco home requires a lot of paint, and high-quality paint can be expensive. It’s one of the largest overhead costs in an exterior painting project. In an effort to cut costs and increase their own profits, some less-than-honest exterior painters try to make their current paint supplies stretch further by watering down paint. To do this, they add significantly more water to the paint, increasing the volume they have on hand.
As you might expect, this leads to subpar results. When you water down exterior paint, it changes the color by making it lighter. This means that the end result often differs from the sample patches or the digital renderings, if the contractor provided them at all.
Watered-down paint also causes inconsistencies, especially when the water and paint are poorly mixed. Finally, watered-down paint is less UV-resistant, adheres poorly, is more prone to chalking, and—just generally speaking—isn’t going to last as long as the manufacturer intended.
Thinning paint
In contrast to watering down paint, “thinning” paint is a regular practice for all painters and is recommended by the paint manufacturer. To “thin” paint, an exterior painter will add water to the paint bucket, increasing the paint’s workability and slowing down the speed with which it dries.
This is especially helpful in hot climates, including summers in the Sun Belt. In temperatures above 85 degrees, an exterior painter will need to thin paint to slow down the drying process.
So, what’s the difference? It really comes down to scale. When a painting contractor waters down paint, they are typically adding a significant amount of water to it. Think two gallons of water for every five gallons of paint. In contrast, the process of thinning paint involves a relatively small amount of water: 2-4 cups for every five gallons of paint. This small amount of water improves the workability of the paint without diluting it or leading to negative results.
When an experienced and trusted painting contractor thins paint, they’re doing so within the manufacturer’s specifications. If they add too much water to the paint as part of this process, it’s commonly known as “over-thinning.”
The difference between the “over-thinning” paint and “watering down” paint is one of intent: “over-thinning” typically is a correctable mistake made by an otherwise well-intentioned contractor, while the act of “watering down paint” implies that the contractor is intentionally trying to stretch their paint—and the truth.
How to know if paint is being watered down
Start by asking your contractor about their paint. You’ll want to get detailed information about the exact paint they’re using and the quantity they’re purchasing. Double-check with them to make sure they don’t water down paint as part of their painting process.
Of course, contractors can lie, or plead ignorance in the event their employees are caught watering down the paint that’s about to go on your home’s exterior. Get to the truth by asking them about their warranty. How long are they willing to stand by their work? If that contractor only offers a 1-2 year warranty—or, worse, no coverage at all—be careful. That’s a good sign that they themselves are not entirely sure how long your paint is going to hold up. Otherwise, they’d be willing to guarantee their paint.
A final tip: ask your contractor if they know the difference between watering down and thinning paint. If they don’t, you might want to find a more experienced contractor.
We do things the right way
At Crash of Rhinos Painting, we back our exterior paint with a 7-year warranty—far longer than state requirements. We’re that confident in the quality of our paint and our work.
Want to learn more about our painting process and get a free proposal? Or, do you have other questions about exterior paint? Click the button below to get started.


