Pin It
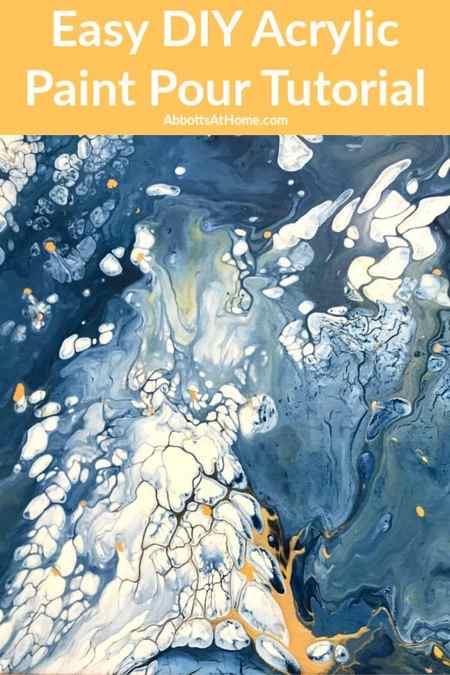
Fun & Easy DIY Acrylic Pour Tutorial – Dutch Pour
This Fun & Easy Dutch Style DIY Acrylic Pour Tutorial is a great way to make unique, pretty, and low cost art. With video to show you how!
I’m such a sucker for acrylic pour videos. How about you? They’re fun to watch, right? But, guess what? They’re more fun to do.
Here’s my Easy DIY Acrylic Pour Tutorial to help you get started.
AND, you can easily turn these into wall art, tabletops, or even colorful and pretty drawer bottoms.
Today, I’ll walk you through the pour tutorial first. Then show you how to add these to your drawers.

Some links on this post are affiliate links. As an Amazon Associate I earn from qualifying purchases at no additional cost to you.
- Acrylic Paints – I love this Big Variety Pack
- Art Canvas or 1/4″ Plywood
- Some Cups and Craft Sticks for Mixing
- Drop Cloth
- Water
- Blow Dryer – This might get paint on it. So, use a cheap one.
- Spray Polyurethane
Easy DIY Acrylic Pour Tutorial – Pour Videos
For this first pour I used mainly blues with a touch of white, yellow, and gold.
Abstract Acrylic Fluid Art Painting Technique – Pour Painting With Blue, White, Yellow and Gold
The second pour went heavy on yellow with blue and gold as the accent.
Abstract Acrylic Fluid Art Painting – Blue, White, Yellow Gold Paint Pour With Blow Dryer

Easy DIY Acrylic Pour Tutorial – Pour Setup
Step One
Prep your canvas or wood for the pour by applying a base coat of paint. White acrylic will work fine on a canvas. Wood needs a coat of a good latex primer to protect it from water. Let that base coat dry.
Step Two
Pick 4 to 8 paints to use in your pour. Use more of the color that you want to be dominate. Mix each color in a cup with enough water to make it flow off the craft stick when you pick it up out of the cup.
I eyeballed it. But it might be a 2 parts water, 1 part paint ratio. Mix one cup of enough white or slightly off white base too. You need enough of this white to cover the whole piece.
It’s hard to tell exactly how much paint you need. But too much is always better than not enough. You want to have so much paint that it can be moved across the canvas with a blow dryer. You can always save leftovers for another pour.

Step Three
Set your canvas or wood on top of something to keep it from touching your drop cloth. Make sure the canvas or wood is still flat.
Pour the watered down white base across the whole surface. Use a craft stick or other stiff flat edge to spread it across the surface and on the 4 edges.
Leave that white layer kinda thick. Thicker than if it was brushed on. See both of my videos to see the base I started with.
Step Four
Now, it’s the fun part of this easy DIY acrylic pour tutorial when you get to be creative. Pour the main color in random circles, lines, drips, etc. across the canvas. Follow that up with the each color. Adding some wherever you feel like it should go.
Once every cup has been poured and the surface is full of wet paint, you’re ready for the blow dryer. Turn it on high and blow across the surface from any direction to find a look you love. You can see how I did it in the videos above.
Step Five
Let your new masterpiece dry for 24 to 36 hours. When it’s completely dry, set the paint with a spray on polyurethane. And, you’re done!
Acrylic Pour Painting

I have a gorgeous selection of rainbow colour Dixie Belle Chalk Mineral Paint. You really only need the smallest amount of paint for the size of canvas I’m using. So if you happen to have leftovers of chalk paint from another project, this art piece is a great way to use them up. The 8 oz. size is more than enough for this project. And you’ll still have plenty left over for other fun projects! Or more paint pours!
Before you read the tutorial, watch this video to see this paint pour for beginners project in action!
Paint Pour Materials
This post is sponsored by Dixie Belle Paint. All opinions are our own. Rest assured that we would not share these products with you if we weren’t absolutely thrilled with them!
We may earn a small commission on qualified purchases sold through affiliate links which helps support this blog at no additional cost to you. In purchasing supplies we use and recommend, you help to support our free DIY tutorials. Read our full disclosure here.

Dixie Belle Chalk Mineral Paints:
-
- Pure Ocean
- Bunker Hill Blue
- The Gulf
- Colonel Mustard
- Midnight Sky
- Amethyst
- Peacock
- Fluff
- Honky Tonk Red
- Evergreen
- Gloss Clear Coat
- Water mister bottle
- Mini Angle Brush
- Measuring/mixing cups with lids (we’re using Pebeo)
- #10 bead chain (3/16″) (4×18″ lengths). Note: this is heavier than a standard lamp pull chain
- Pallet Knife set
- Film canisters
- Floetrol
- 8″ x 10″ Canvas
- Eye droppers (ours are upcycled)
- Flux bottles
- Adhesive Liner
Acrylic Pour Technique

Finally, after finding a whole spool of ball chain at our local ReStore, I have a use for it! Cut four pieces into 18″ lengths.

When you’re ready to start, fill a container with water to drop the ball chains (and eye droppers) into as the work progresses.

Actually, this is my first time painting with a pallet knife; it’s great for quickly spreading the paint after pouring it on. But even a plastic scraper or credit card will do in a pinch. You really don’t need the fancy tools. As for me, I’ll take a new tool over flowers any day!


Paint Pour Medium
Mix all your paint colours at a ratio of 2 part Floetrol to one part Dixie Belle Mineral Chalk Paint.

If you want a colour you don’t have (such as orange), mix red and yellow chalk paint together before adding the Floetrol.


I mix in a larger container, then transfer to air tight film canisters I’ve been saving. For all colours, except the black and white, I only mix an ounce because I’ll need only a few drops of each.


Mix at least double the quantities of Midnight Sky and Fluff for the outline and middle of the butterfly respectively. Because it’s nice to have more control over the flow, these two colours should go into a squeeze bottle, like this flux bottle. The needle tip is handy for controlling the amount on paint.

Making an Upcycled Acrylic Pour Painted Side Table

Here’s a really fun (and satisfying) project to try using any left over paint samples you may have laying around!
The other day I was organising my paint cabinet and pulled out a bunch of half empty paint samples (I have a habit of keeping my paint pot samples regardless of how much paint is actually left) There wasn’t quite enough in each to use for separate projects, and instead of just throwing them out, I decided to use them as a part of my third #foundthenflipped project, this upcycled acrylic pour painted side table!

Pin It
Before

Pin It
What is acrylic pouring?
If you’ve never heard of acrylic pouring, it’s essentially exactly what it sounds like. The process in which the acrylic paint is poured into each other or tilted onto the canvas (in this case a piece of furniture) and disseminated by tilting the painting surface. This technique creates a really unique design element, almost giving the piece a marbled effect. I’ve been dying to try this method and I figured it was a great solution to my half used paint sample situation lol.
I knew in order to get the look I wanted, I needed to find a piece of furniture with multiple flat surfaces. So when I came across this geometric side table at the op shop, I knew it needed to come home with me!

Pin It
Materials You’ll Need to make an upcycled pour painted side table
- Side Table (I found this one at the thrift store for $5 and replaced the legs because they weren’t very sturdy)
- British Paints 250ml White Sample Pot
- Drop Cloth
- Wooden panel (this is only needed if you’d like to replace the legs like I did)
- Feast Watson 1m² Glass Finish
- Stir Sticks
- Gloves
- Safety Glasses
- Mask
- Liquid Nails (if you’re replacing the legs)
1
I began by unscrewing the legs and using a rubber mallet to remove the pieces of wood which were glued on. I decided to remove the legs because they weren’t in great condition and I also thought that the poured paint effect on all surfaces would look the best!

Pin It
2
After dismantling the side table, I prepared my work space. I knew this project was going to be messy so I chose to use an old drop cloth to cover my work table in the studio. In retrospect I should have done this outside on concrete as the resin did seep through the drop cloth and ended up ripping up a layer of paint on my work table. Ah well, you live and you learn I guess!

Pin It
3
Placing the table top onto the drop cloth, I then began the pouring process! I found the best technique was to pour the colours on top of each other and then titling the piece so they would run over the rest of the table. This is a bit of an experimenting step, I would pour a little more of certain colours in certain places if I felt like it needed it. Just take it slow during this part, I found it to be a very therapeutic process!

Pin It
4
The best way to finish off the edges, I found to be was to place the table top onto a paint can and pour a bit of paint in the spots that needed to be filled. Your drop cloth will get very messy, but that’s half the joy of this project!

Pin It
5
Using a jigsaw, cut the wooden plank into 2 smaller pieces of wood to be the T shaped legs (measure your table top and cut the pieces accordingly). Then repeat the pouring process on these pieces (you’ll have to let the first side dry before doing the back side).

Pin It
6
One thing I forgot to mention at the start is that this project takes time. If you want a really good outcome, it’ll require a lot of patience! You’ll need to let this coat of poured paint dry for at least 24 hours, it may even need a solid 72 hours to dry before doing the other sides.

Pin It
7
Once you’ve completed both sides and all the pieces are completely dry, it’s time to apply the resin. The application process may differ depending on what kind you use, so I’d suggest just very carefully following the instructions on the label of your chosen resin. It’s also super important to wear PPE for this – gloves, mask and goggles and do it in a well ventilated space. As I mentioned before, the kind I used seeped through my drop cloth and stuck the drop cloth to make work table so I had to get Ben’s help to rip it off.

Pin It
8
The final step was to let the resin dry and use liquid nails to attach the legs.

Pin It

Pin It
Pin It
Pin It

Pin It
I’m so happy with the way this turned out and I’d definitely like to try it again with some other projects in the future! I feel like this idea with a bunch of different hues in the same colour could be really cool!
The project is in collaboration with Bunnings.


