In conclusion, these three completed canvases make a cute addition to a holiday display. If kids make them, they make a great gift for kids to give to family. I am not a trained artist, but I do enjoy drawing and painting especially with my son. All things considered, I think these paintings turned out well. Most importantly we had the opportunity to explore a famous artist and bond over a fun activity.
Beautiful Snowy Winter Scene Using Van Gogh’s Starry Night Style

My son and I recently had a great time creating 3 different winter and Christmas scenes using Van Gogh’s Starry Night style. Starry Night is perhaps Van Gogh’s most famous works of art. Without a doubt it is one the most recognized paintings in the world. The waving spiraling lines through the night sky create the perfect backdrop for a whimsical wintery scene using the Starry Night style.
This post may contain affiliate links. Please read our disclaimer for more info.
Wintery Village Scene using the Starry Night Style

In this scene the pine tree stands prominently in the foreground in the place of Van Gogh’s original cypress tree. I chose to keep my tree natural while my son opted to add decorations and lights adding to the festiveness of the scene. The village below appears cozy and warm nestled into the snow covered hills. While the villagers sleep, the blustery winter sky swirls and spirals in like fashion to the original Starry Night. For this piece I opted to use 8×10 stretched canvas and acrylic craft paint.
A Grinch Starry Night
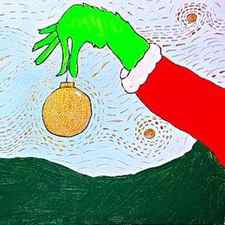
My son absolutely loves the Grinch, and he wanted to paint a Christmassy picture that included him. For that reason, and me being on my Starry Night kick, I decided to combine the Starry Night style using the ornament in the place of the moon, and the bough of a Christmas tree in place of the sleepy village. I opted for gold swirls using a gold metallic Sharpie to represent the sparkle of a beautifully decorated Christmas tree and finally finished the image by outlining the Grinch with Black Sharpie.
Modeling a Winter Scene
Modeling a winter scene is somewhat challenging primarily because it is often difficult to find the right material to make believable snow. Rather than bore you with a lot of things that don’t work, I’m going to cut right to the chase and tell you what the Master of Scenery Dave Frary does as detailed in his book, called “How to Build Realistic Model Railroad Scenery, Third Edition (Model Railroader Books)√

Railroading Through a Winter Wonderland
The first thing to know is that you can’t take a layout that has already had the scenery developed for fall, spring or summer and just add “snow” to it and expect it to look like a winter scene – mostly because the colors that are already there will show through.
You have to start by removing any existing scenery and then paint the terrain with full-strength white latex paint. If you’re starting from scratch, build the scenery base and terrain as you normally would, insert whatever rock formations you want to use, paint the rocks as usual, but leave the rest white (or if it isn’t already white, paint it white).
If you wish to have only a thin layer of “snow”, you could add a little earth color and dirt texture here and there to the white base to show through as dirt patches.
Before adding the “snow”, you may wish to incorporate your structures, fences and even some of the larger trees into the winter scene, since you will probably want to add some snow to these items as well.
Trees can be modeled as evergreens or deciduous varieties without leaves. A light dusting of gloss white paint on the upper halves of the branches, followed by a sprinkle of plastic sparkles or Woodland Scenics Snow will help create the effect of snow-covered trees.
Snow Goop for a Winter Scene
Dave then uses a special blend of stuff he calls “snow goop”, consisting of acrylic gloss medium, titanium white acrylic tube color and acrylic modeling gel in equal parts. Then add 1-2 drops of cerulean blue. Stir it all up so that it’s about the consistency of mayonnaise. You may need to add a little water if it seems too thick. If you’re not going to use it all in one setting, you can store it in an airtight container.
Once you have your “snow goop”, you can spread it over your landscape with a trowel. Try to simulate snowdrifts, create snow banks, and spread it smoothly over rooftops like icing on a cake; allow some of the snow to hang over the edge a little. Use a smaller knife to spread it on the tops of tree branches, create pathways of plowed snow, pile it up on one side of fences, etc. Use reference photos to help guide you.
Be extra careful when applying the snow goop around tracks and turnouts. Go ahead and brush the goop over the ties, but make sure the rail tops and flangeways remain clean and completely clear of any goop. Don’t get any of the stuff around the points or other moving parts of turnouts. If you do, clean the parts carefully, making sure they still work.
After the goop is shaped the way you want it, you can smooth out the surface by spraying with “wet” water (water mixed with a few drops of liquid detergent), and then smooth it out with a foam brush. You can also use a stream of air from an airbrush compressor to smooth out the snow using a circular motion well above the snow.
If you want to create big piles of snow, you can first make the pile with Sculptamold, then cover it with the snow goop.
Before the snow goop dries, sprinkle tiny plastic sparkles (that you can buy at craft stores) over the “snow” to make it sparkle. Let it all dry out for about 3 days before you touch it. You can then add small trees, bushes and other details as you wish, to complete your winter scene.
Distant trees and bushes can be simulated for your winter scene by stretching out white polyester pillow stuffing and painting it (off the layout and preferably outdoors) with brown or black automotive primer. After it’s dry, then pull apart the stuffing into small fluffy balls and glue them in the background on the snow base, mixed in with evergreens for variety. After the glue dries, tease the tops of the bushes to spread them out a little more to make them look like lots of tiny branches sticking up. You may optionally want to spray the tops of these bushes with hairspray or scenic glue spray and again sprinkle on some WS Snow, or just add a light dusting on the top with glossy white paint.
Icicles
Buy a tooth brush with clear nylon bristles, cut the bristles in different lengths, pick them up with tweezers, dip them in gloss medium as the glue, and then place them on the bottom of eaves and overhangs of buildings and on tree branches. After they dry, you can brush on a little more gloss medium to make the icicles look more tapered and realistic.
Another method of making icicles for your winter scene is to use Woodland Scenics Water Effects and dribble long thin ribbons of it on a Teflon-coated surface. After it dries, you can then use a hobby knife to cut out wedge-shaped icicles. Use the WS Water Effects gel or gloss medium to glue the icicles to the overhangs and downspouts of buildings or to the bottoms of trucks, trees or anywhere else you would find icicles in winter.
You can also brush the acrylic gloss gel onto the sides of water tanks, ending the vertical strips of gel at the bottom of the storage tank with icicles.


