- Draw a large Easter egg shape on one piece of card and cut it out.
- Using a range of colour cardboard/paper, cut long, skinny strips to quill with (approx 1cm wide).
- Wrap a strip around a pencil tightly.
- Slide the paper off the pencil and dip the bottom into your glue (or brush some glue on to the egg shape).
- Stick the rolled paper onto your card Easter egg and press down gently until it sticks.
- Cover the egg shape in rolled paper designs or create patterns and leave to dry.
Welcome!
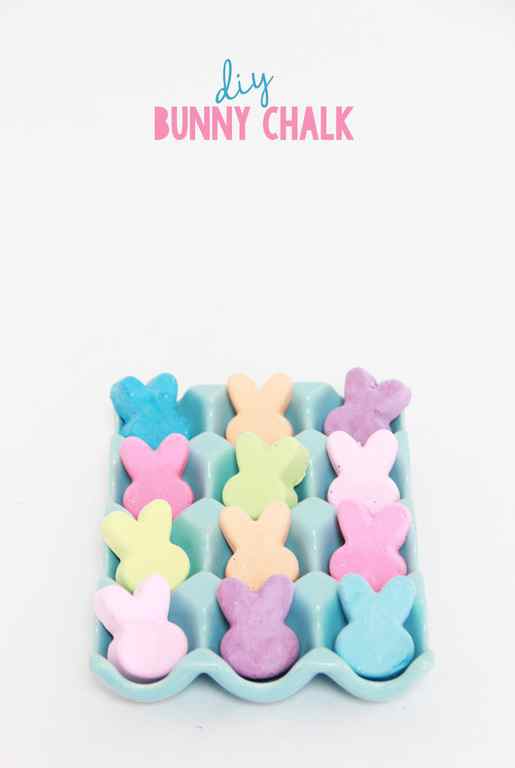
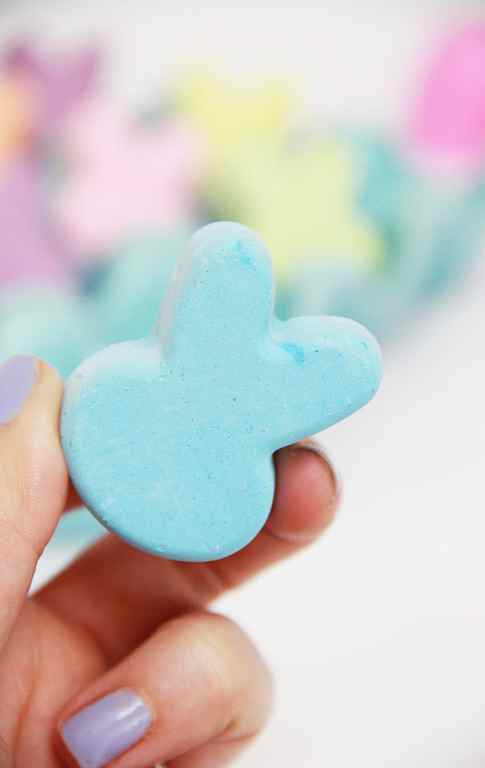
Easter is coming! And, once again, I am looking for non-candy items to fill my girl’s easter basket. Last year, I used the bunny silicone mold to make crayons. This year, I made chalk!
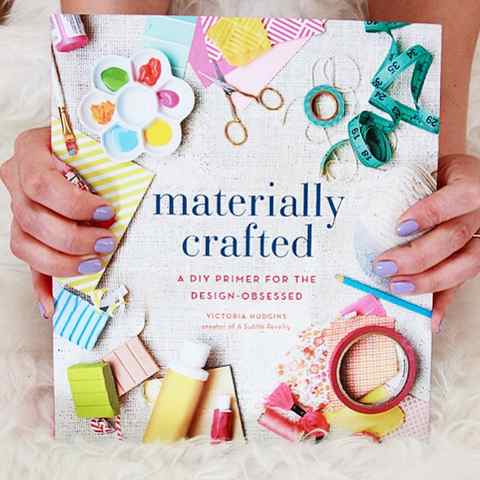
The chalk “recipe” is from Materially Crafted– the new DIY book from diy, party extraordinaire, Victoria Hudgins at A Subtle Revelry. (giveaway ended)
How to Make Chalk- Bunny Chalk for Easter
Directions:
Mix equal parts of plaster of paris and water in a cup, add paint and stir.
I used 1/4 cup plaster of paris and water and that made 3 crayons per color. The paint amount is up to you, the more paint you use, the bolder the color. (The pink and blue chalks in my photo are same paint color, just different amounts added to the mixture, so I have a bright and light version of both colors)
Some of my paint cups- I love how the process is also pretty.

Pour into your silicone mold and wait. I waited overnight, because I forgot about them (Seriously, my kids that day…) Materially Crafted recommends at least 4 hours before removing from mold and then 24 hours before using.

Just like last year’s crayon bunnies, they fit right into a plastic egg. A great alternative to candy (although she will have tons of candy as well, I am not that mean…)


Now, onto the giveaway!!
Win a copy of Materially Crafted: A DIY Primer for the Design Obsessed by Victoria Hudgins of A Subtle Revelry! The book is divided into categories based on a DIY material: glue, plaster of paris, wax and so much more!
All you need to enter is tell me your favorite material to craft with! My favorite material right now is copper (I have so many things in works but I could not craft pretty much anything without glue and I also love glitter and spray paint and sequins… I am undecided. Which is a perfectly acceptable answer for the giveaway.
Good Luck and Happy Easter.
This post is not sponsored (publisher is providing one book to a winner,however) but in full disclosure I am so, so, so incredibly grateful to have two projects of mine mentioned in the book. (Hey, Mom, I am in a book!!) P.S. Thank you Victoria for including me and congratulations on a beautiful book; also, I had no idea you could make your own chalk, so, my 3.5 year old loves the book too!
Two Adorable Easter Craft Ideas for Kids
Needing some Easter craft ideas to try between scoffing those cream eggs? We hunted high and low and even asked the Easter Bunny for some suggestions on his favourites to share with you here today. We managed to narrow it down to our two favourites, and we’re sure you and your kids will love them too!
We’ve got two Easter craft ideas for your family: a Paper Quilled Easter Egg and Chalk Pastel Bunny Art. Let’s get crafty!
Two of Our Favourite Easter Craft Ideas for Kids
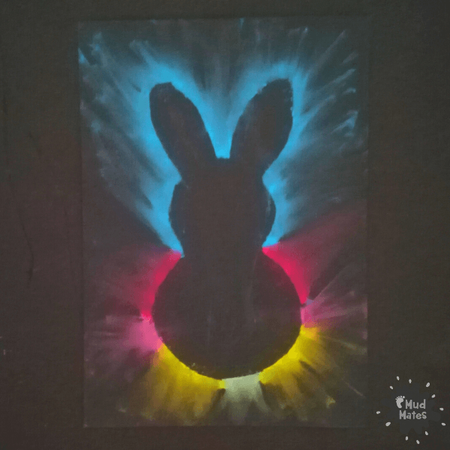
First, let’s jump into Easter craft mode with the instructions for a hopingly stunning piece of Chalk Pastel Bunny Art (sorry, not sorry for the puns!).
What you’ll need:
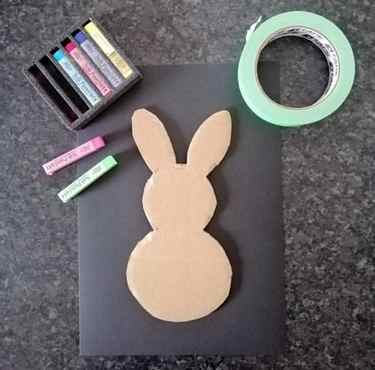
- thin black cardboard
- medium thickness cardboard (this is for the template so an old box will do)
- scissors
- chalk pastels
- painters tape/removable sellotape
Instructions:

- On the thicker cardboard, draw a bunny shape which is about 2/3 of the width and length of the black paper. Cut out the shape outline.
- Put tape on the back of the white cardboard and stick it to the middle of the black paper. This stops the shape from moving around as colours are added around the outside.
- Start colouring in around the outside of the cardboard template. Make sure that the lines made with the pastels around the template are wide.
- Once the template outline on the black paper has been coloured, use your fingers to smudge the colours outwards towards the edges of the paper. Keep your fingers moving outwards only when smudging to avoid the colours smearing together.
- Once the smudging is finished, take the cardboard template bunny shape off and ta-da – one of our Easter craft ideas is complete!

Paper Quilled Easter Egg
Next on our list is the Paper Quilled Easter Egg, but relax because we’re not saying it is an alternative for a chocolate egg! Rather, it can be something that the kids make to give to the Easter Bunny or decorate their Easter baskets with.
What you’ll need:
- one piece of plain or coloured cardboard
- few pieces of thin coloured cardboard or paper
- scissors
- pencil
- craft glue
Instructions:

- Draw a large Easter egg shape on one piece of card and cut it out.
- Using a range of colour cardboard/paper, cut long, skinny strips to quill with (approx 1cm wide).
- Wrap a strip around a pencil tightly.
- Slide the paper off the pencil and dip the bottom into your glue (or brush some glue on to the egg shape).
- Stick the rolled paper onto your card Easter egg and press down gently until it sticks.
- Cover the egg shape in rolled paper designs or create patterns and leave to dry.

While you’re here, take a look at our other Easter craft ideas too:
- Cotton Wool Easter Bunny Craft
- Rice Bubble Easter Eggs
- Crayon Resist Easter Eggs
And don’t forget to make clean-up a breeze with our Fitted Tablecloths and Craft Aprons too!
For messy play inspiration and kid friendly activities sign up to our newsletter.