I should know – after 3 years, Flounder still ranks as #1 on my 7-year old niece’s Disney favorites list.
12 Beautiful Mermaid Drawings for Kids

Mermaids are beautiful and mythical creatures that have enchanted lots of imaginative children over the years.
While there have been plenty of myths and stories written about mermaids around the world, there’s still no evidence that these half-human-half-fish exist.
Still, kids enjoy fantasizing about these wonderful ocean creatures, and so I’ve compiled 13 beautiful mermaid drawings and designs so kids can catch even just a tiny glimpse of them.
3 Simple Mermaid Drawings
The first 3 mermaid designs can be easily drawn by beginners because they have simple designs and a step-by-step guide.
And if you’re looking for actual projects for younger children, try making some of these mermaid crafts!
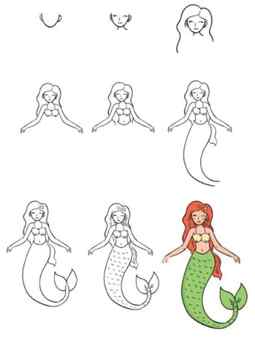
1. Simple Mermaid Drawing
Let’s start with a straightforward mermaid design. Pick this drawing if you want to keep your children busy. Iit allows kids to draw the mermaid from scratch and also color her in.
The Drawbot provides this excellent step-by-step mermaid drawing to imitate. It doesn’t have to be perfect, and it’s a nice starting point for anyone who is just beginning to draw.
2. “How to Draw a Mermaid” Cartoon Drawing
Mermaids are popular characters in kids’ TV shows and cartoons because they’re known to be great singers!
Channel your kids’ inner siren and vocalize with them while making this cartoon mermaid drawing from How To Draw Funny Cartoons.
If the 4-step written tutorial isn’t enough for you, there’s also a detailed video tutorial on their website.
It’s important for kids to discover their passion early on, so explore their love of music with these homemade instruments.
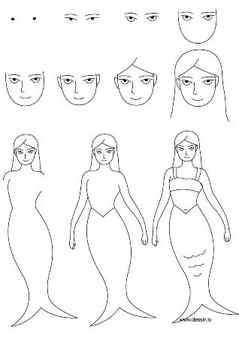
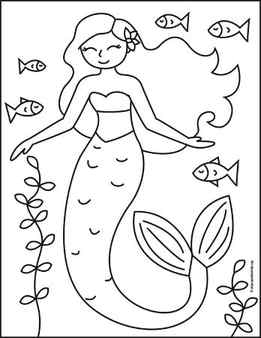
3. “How to Draw a Mermaid Princess” for Kids
Since they live in the ocean, mermaids are often depicted in habitats with other sea creatures, such as dolphins, turtles, and crabs, just like this mermaid drawing from Colorful Creative Kids.
Draw this mermaid swimming in the ocean and let your kids add details like rocks, algae, other creatures, and even sunken ships with treasures!
If your kids are interested in doing crafts and activities about sea creatures, then don’t miss these posts on jellyfish crafts and ocean crafts.
6 Cute Mermaid Drawings
Your children will find these next 4 mermaid drawings adorable because the artists have made the designs very cute and easy to draw.
4. Pretty Mermaid Drawing
Mermaids are known to be beautiful creatures, sometimes represented in other cultures as a deity or spiritual being. I Heart Crafty Things shows their appeal through this lovely mermaid drawing.
They start by drawing the mermaid’s pretty face and silky hair, then proceed to draw the mermaid’s body and tail.
All of the instructions and tips about the drawing, starting with initial sketches and finishing with the final touches, are included on their website.
5. Chibi Cartoon Mermaid Drawing
This video tutorial on Draw So Cute’s channel shares a chibi mermaid drawing.
The term chibi refers to the drawing style often seen in Japanese mangas. It’s a style that tends to exaggerate the proportions of the character’s body to make them cuter.
These chibi-style drawings are great for beginners because they’re easy and very forgiving. Any mistake your kids make would only make their mermaids cuter!
Speaking of easy designs, you should check out these easy animals to draw for kids!
6. Mermaid Drawing: Easy for Older Kids
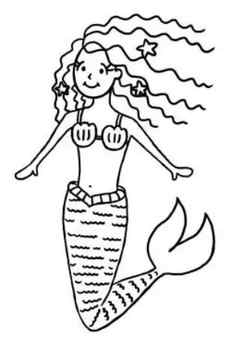
Mermaids come in all shapes and sizes, just like people do! Your kids can design their mermaids to be as diverse and as colorful as they want.
This mermaid by Felt Magnet, for example, has a sweet and amicable appearance. The artist designed their mermaid to have frizzy hair and a heart-shaped waist.
I love how they even added scribbled lines to create the scales on her tail!
7. Easy & Cute Mermaid Drawing
Is there a difference between mermaids and sirens? The answer is yes and no. While they both look similar in physical appearance, they are different in their attitudes towards humans.
Sirens are dangerous creatures who lure with their voice ships and sailors to their demise. In short, mermaids are the good gals!
Luckily, this design from Art Project For Kids looks like a friendly mermaid that your kids can easily draw!
8. Mermaid Tail Drawing
This video tutorial from Markcrilley’s channel is a great place to start for those looking to improve their sketching skills because they provide a comprehensive guide.
The video explains in detail the depth and ratios of the mermaid they’ve made and provides plenty of guidelines to draw a mermaid’s tail.
9. Mermaid Drawing From the Word “Mermaid”
This video tutorial from Let’s Draw is an interesting and clever display of how you can creatively draw a mermaid from the word “mermaid.”
You probably wouldn’t have expected that this beautiful mermaid design started from a word. I sure didn’t!
For other surprisingly wonderful art, learn how to tie dye a shirt and see what awesome patterns you can produce!
How to Create the Sketch
Step 1
We’ll start by creating a New Document. This can be found via File and then New.
There are a lot of options here (enough for an entire tutorial on its own!), but for the purpose of this tutorial, I’m going to draw at 8 inches wide by 10 inches tall. I’m also working at 300 dpi. Once you’re happy with your choices, select OK.

Step 2
Before we start drawing, let’s make sure we’ve prepared our document properly. There are two important things I like to do before I begin sketching.
Create a New Layer. I use layers very frequently when I’m drawing and painting in Photoshop, and you’ll need them in this tutorial.
To do this, make sure your Layers panel is open. If you don’t see it open by default, select Window and then Layers.
By default, you’ll notice that there’s only one layer here. It’s called Background, and we could draw on it, if we wanted to. However, I’m going to make a new layer by clicking on the Create a New Layer icon.
This new layer is the layer I’m going to draw on. This means it will be independent of the Background Layer (where the white, background color is located).

Step 3
Now, let’s choose a Brush to create our sketch. There are a lot of wonderful Photoshop brushes out there that you could use, but for this tutorial, we’re largely going to rely on the basic, default brushes included with the software. Note, these are just possible brush settings—there is no universally right or wrong choice, and the longer you use them, the more comfortable you will likely feel with them.
However, the default settings might not look or feel the way you want them to, straight out the box. Maybe they lack the sensitivity you’re more accustomed to seeing in real media like pencils or markers, for example. We’ll make a few simple adjustments here that will change how they look and feel in use.
You can view your Brush Settings via Windows and then Brush.
Try toggling on the Opacity Jitter and setting it to Pen Pressure.

This setting will increase and decrease the Opacity of your brush strokes, depending on the pressure you put on your pen.
Try setting the Size Jitter to Pen Pressure too.

You’ll notice in the preview that the ends of the brush taper off now, as opposed to staying at one uniform size. Again, this will be determined by the pressure you put on your pen. This may not be a setting that you want on throughout the entire painting process, but I recommend knowing where it is and what it does, especially for sketching.
Step 4
Now, let’s start drawing! I’m going to start with a basic Hard Round Brush.
Since a mermaid is both a human and a fish, I like to look at references of both, so I get a look and feel for how the body of each moves. Don’t be afraid to experiment with body types, too! In this case, I’m going to give the character a full figure.
I started by blocking out basic forms to define key parts of the body, such as the ribs and hip bones. When it comes to the tail, I chose to treat it as one long, flowing appendage. I’m going to pretend that there’s one long bone in there, for example.

Since this mermaid is going to be underwater, let’s also consider how water might affect the character. For example, the hair would likely flow with the water in some way, and the body’s weight might not be held in the same way as it would be on land. The tail, in this case, might also be flowy and light in weight.

Create a New Layer, as we did earlier in this tutorial, to draw on top of your initial sketch. I like to work this way when I want to preserve my initial sketch and use it as a guide.

How to Add the Initial Colors
Step 1
Now, let’s start working with colors! Personally, I like to paint on top of my lines. I start by creating a New Layer and setting the Blending Mode to Multiply. Then, I go ahead and paint on top. You’ll notice that this also alters the colors of my lines, based on the color I’ve placed on top.

Once I’m happy with my choices, I like to Flatten my artwork layers. Warning, this means that the sketch and the colors will all be combined on one layer! I often like to Save a Copy of my work prior to doing this, just in case I want to go back, prior to this step!
To select multiple layers, Click-Hold-Shift. Then, to merge them, Right-click, and select Merge Layers.

Step 2
Now, let’s add a basic Background Color. Choose a color via the Color Selector in the Tools panel, and then apply it to the Background Layer using the Paint Bucket Tool. If necessary, clean up any stray color around your artwork.

Since I’m going to use the background to inspire the shadows on the character, I’m going to block in some basic background elements. I know I want my mermaid to be underwater, and I’d like to have some light shining into the water, from above.

To achieve this look, I used colors lighter than the blue of the background, a Hard Round Brush, and both a Soft Round and Hard Round Eraser, to blend and shape my lines. I also used the Blur and Smudge Tools to help make the water lines at the top look more organic.
Step 3
To block in shadows on the character, I created a New Layer on top of my current artwork layer and set it as a Clipping Mask.
This means I can paint on top of it without going outside the boundaries of my work. To do so, select your newly created layer, right click on a PC or Control click on a Mac, and then select Clipping Mask.
Here is what a Layer with a Clipping Mask applied looks like. Note that I’ve also set the Blending Mode to Multiply.

How to Paint the Mermaid
Step 1
Now that we’ve established the basics of our drawing, we can start refining our work. This is the point where I often experiment with other brushes. For example, when rendering skin, I often use a brush with a softer edge. I used the default Soft Round Brush for this tutorial, with the same settings reviewed earlier, to make the shadows look softer on the skin.

But how do you get subtle changes in value? How do you blend out your lines and get things looking more painterly?
Experimenting with the Opacity (the amount of transparency) and the Flow (how much “paint” comes out) can help in areas that require subtle changes in value. This may vary depending on the amount of pressure you put down on your pen, stylistic choices, and how you prefer to draw.
Step 2
When rendering hair, I like to think about the direction it lies, flows, or moves. The direction of your strokes makes a big difference; haphazard lines will look chaotic. I recommend taking your time and creating strokes that go from the crown to the tips.

There will be variations in value (light and dark) within the hair too. Keep in mind that these value changes are not independent—they should generally be inspired by the same light source we blocked in earlier.

Step 3
I also like to add variation in the hair, so it doesn’t necessarily look like one uniform block. I experimented with placing stray strands on top, in a new layer, in a similar color. To unify them with the rest of the hair, I added contours in a dark color on the outermost edges.

Step 4
To achieve more than one color in the hair, I created a New Layer on top of the hair. I used a Clipping Mask, once again, so I don’t have to worry about coloring “outside of the lines”. I changed the Blending Mode to Color, and voila! Now the tips are blue!

You’ll notice that I also used this opportunity to add a touch of color to the eyes. I used a Soft Round Brush to add in some pinks and blues, again, with the same technique.