In this tutorial we’ll be creating a cute Easter bunny, holding a colorful egg. In ten easy steps, you will learn to work with geometric shapes, adjust Stroke settings, how to add details to a flat outlined image and how to turn an isolated icon into a finished composition by adding text. Let’s get started and make an Easter card!
Draw a Cute Easter Bunny in 10 Easy Steps
In this tutorial we’ll be creating a cute Easter bunny, holding a colorful egg. In ten easy steps, you will learn to work with geometric shapes, adjust Stroke settings, how to add details to a flat outlined image and how to turn an isolated icon into a finished composition by adding text. Let’s get started and make an Easter card!
- Program:Adobe Illustrator CS6-CC
- Difficulty: Beginner
- Topics Covered: Shape Building, Align Panel, Stroke panel, Type Tool
- Estimated Completion Time: 15 Minutes
Final Image: Cute Easter Bunny

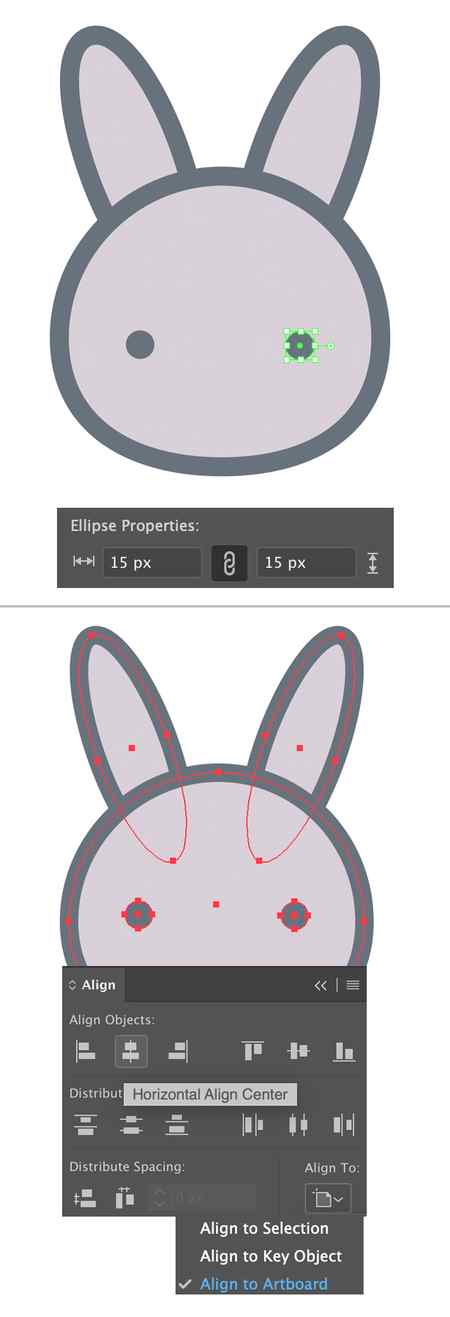
Let’s start from the head of our Easter bunny. Take the Ellipse Tool (L), hold Shift and make a 160 x 160 px circle.
Switch to the Direct Selection Tool (A) and select both left and right anchor points by holding Shift and clicking each of them. Drag the points a few pixels down to make the head more egg-like.
Set its Fill color to light-grey and its Stroke color to dark-grey in the Color panel.
Open the Stroke panel (Window > Stroke) and set the Weight to 10 pt, Align Stroke to Outside.

Step 2
Now we’ll add the ears by using the Ellipse Tool (L). Make a 40 x 130 px ellipse, applying the same Stroke and Fill settings as we had for the head.
Rotate the ear 20 degrees and place it behind the head by pressing Shift-Control-[ to Send to Back.

Step-by-step Video Tutorial in Procreate
As I was making the video tutorial, I fell in love with this design. So I decided to make into a t-shirt design that’s available for purchase from Amazon. You can get matching Easter Bunny t-shirts for the whole family! And support an independent artist. Thank you so much!

Step-by-step Cute Easter Bunny Drawing Tutorial
Here is the step-by-step tutorial. I made this drawing using a black felt-tip pen, and colored it with colored pencils (see materials list below). I like the slight texture created by the pencils. It makes the bunny look furry and fluffy.
BONUS! Download my essential Procreate brushes for FREE!
If you want to save this tutorial for later, use the red “Pin It” button to save it to Pinterest, or download a printable PDF below. I hope you have fun drawing this cute bunny!

Materials I Used
- Prismacolor Premier colored pencils
- Pink PC929
- 20% Cool Grey PC1060
- Canary Yellow PC916
- White PC938 (for blending)

Please enjoy this drawing and tutorial for personal use, and remember to give me credit and link back to this post if you share it with others.
Step 5: Bring on the Detail!
Bunny’s need fur, otherwise they look like scrawny, creepy, naked mole-rats. Not cute – at all.
Drawing fur requires many squiggly lines looking like curved continuous “W”s. It helps to break up the continuous ‘w’ squiggles with a few straight/curved lines. You can also do what I did for the tail, completely detached strokes that “sunburst” out looking like fluff! For reference, drawing the curves towards the ground emphasizes the idea of gravity or weightiness. Animal fur (and human hair) naturally tends to flow/grow in one direction on the body – so that can help with the realness.
Bunnies have that chest puff, which in this drawing helps balance the concept of cute fluffy bunny, and I drew in a few lines on the feet and hands (paws?) to separate the finger digits to add a bit of realism.
Also don’t forget the whiskers, buck-teeth and the upside-down ‘v’ for the mouth!
Add Tip Ask Question Comment Download
Step 6: Looking Good!
Ok, we have a really good looking E. Aster Bunny!
But what’s an Easter Bunny without some Spring flowers and Egg baskets?
*These are optional parts, you can stop with the bunny and finish the last paw, but if you want to see the finished product, please continue!*
Drawing a flower in steps:
1) Stem = curved line
2) Leaves = ovals with points
3) circle for center bud
4) Petals = tear-drop shaped or however you want it (heart, fat circles; Google them!)
5) Grass for the ground = same technique used to make bunny fur
Drawing a Basket:
1) rectangular body with rounded points and edges
2) “C” shaped handle
3) Eggs = eggs-aggerated “C” shapes (yeah, I just went there. )
4) Add the detail = get creative!
Add Tip Ask Question Comment Download
Step 7: Now to Finish It Off!
Last step is to add the egg Mr. E. Aster is holding and your bunny will be done!
Draw an egg like oval shape and finish off the paw fingers – we only need the thumb since we can’t see the others behind the egg. Begin sketching out the egg details and design and voila!
Add Tip Ask Question Comment Download


