Note! Both ovals may slightly overlap the circles. These construction lines will now represent the wings of your butterfly sketch.
Learn How to Draw a Monarch Butterfly in Five Easy Steps

Once you have learned how to draw flowers, there is no better way to accompany a bucolic garden than with a beautiful butterfly. These colorful insects go hand in hand with springtime and come in a variety of colors and patterns. The monarch butterfly is among the most recognizable with its striking orange and black pattern.
Want to learn how to capture a monarch butterfly in pen and ink? Don’t let the intricate wings deter you—in this tutorial we’ll break down how to draw a butterfly in five easy steps. So grab some paper and your favorite art supplies and let’s get started!
Learn How to Draw a Butterfly in 5 Easy Steps
Step 1: Find a reference photograph

Stock Photos from Butterfly Hunter/Shutterstock
It’s good practice to do a bit of research before beginning any drawing. In the case of butterflies, it’s especially important to have a few good photos of the specific species you want to draw, as the wing pattern can be hard to replicate accurately. Peruse different image sources, like Pinterest, until you find pictures that suit your purpose. Additionally, if you’re unfamiliar with drawing insects, or if you’re looking to make a realistic drawing of the butterfly’s anatomy, consider referencing a diagram illustration.
This tutorial will be looking at how to draw a monarch butterfly. Specifically, we’ll be illustrating a side view of the insect with its wings up in the air.

Stock Photos from Butterfly Hunter/Shutterstock
Step 2: Draw the body

Photo & Art: Margherita Cole | My Modern Met
Using your pencil of choice, begin sketching the body of the butterfly. Start with a small circle for the head and connect it to an oval-like thorax which should be twice the length of the head. Then, draw a long and thin abdomen that protrudes slightly at the end into a bulbous shape.

Photo & Art: Margherita Cole | My Modern Met
With the body in place, you can add the legs to the butterfly’s thorax. Move halfway down and draw the forelegs in three parts. Then, sketch the hind leg towards the end of the thorax—again in three parts. Once you’re satisfied with the legs, go ahead and draw one large eye on the butterfly’s head. This should take up most of the room in the circle.

Photo & Art: Margherita Cole | My Modern Met
Next, add two antennae at the top of the head, a little above the butterfly’s eye. Underneath the head, you can draw the curly, straw-like proboscis—this is how a butterfly feeds on flowers.
Step 3: Add the wings

Photo & Art: Margherita Cole | My Modern Met
With the body of the butterfly drawn, it’s time to add the wings. Beginning at the thorax, sketch a slightly rectangular forewing, which should measure a little longer than the butterfly’s body. Then, attach a more oval-like hindwing that ends in the abdomen. Afterward, sketch an indication of the other forewing, starting at the head and ending halfway into the more prominent wing.
Step 4: Draw the wing pattern
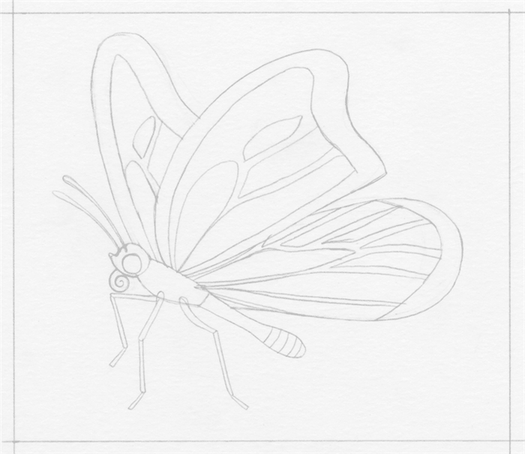
Photo & Art: Margherita Cole | My Modern Met
Now that you’ve drawn your butterfly, it’s time to flesh out the details. Monarch butterflies have a black and orange wing pattern that resembles stained glass. To emulate this in a pen illustration, start demarcating the orange and black parts of the butterfly’s wings.
According to the reference photograph, monarch butterflies have a black “border” around the wings, and within them are rectangular sections of different sizes that would be the orange areas.

Photo & Art: Margherita Cole | My Modern Met
Next, fill in the top borders of the butterfly’s wings with two rows of smaller rectangle shapes—these will be the white spots along the black border.
Step 5: Go over the illustration in ink

Photo & Art: Margherita Cole | My Modern Met
Once you’ve finished your pencil drawing of a monarch butterfly, you can find your favorite pens and begin going over the graphite lines with ink.

Photo & Art: Margherita Cole | My Modern Met
After you’ve gone over the outline in pen, slowly begin filling in the pattern with black ink. Remember to check back with your reference photograph often at this stage to ensure you’re capturing the design correctly.
Tip: If you want to add depth to a “white” area of a black and white illustration, consider using stippling or hatching. This is also a useful way to indicate the delicacy of the butterfly’s wings.

Photo & Art: Margherita Cole | My Modern Met
Want to embellish your monarch butterfly? An easy way to do this is by adding a simple black border and placing a few sparkles or bubbles around the body and wings—like fairy dust. Or, if you’re searching for a way to complete your illustration, you can learn how to draw a rose and other types of flowers that your butterfly would love to visit.
Looking for others who love drawing? Join our Art, Design, Photography, and Drawing Club on Facebook!
Margherita Cole
Margherita Cole is a Contributing Writer at My Modern Met and illustrator based in Southern California. She holds a BA in Art History with a minor in Studio Art from Wofford College, and an MA in Illustration: Authorial Practice from Falmouth University in the UK. She wrote and illustrated an instructional art book about how to draw cartoons titled ‘Cartooning Made Easy: Circle, Triangle, Square’ that was published by Walter Foster in 2022.
Ready to draw a butterfly? Share
Like My Modern Met on Facebook
Become a
My Modern Met Member
As a member, you’ll join us in our effort to support the arts.
Ready to draw a butterfly?
Let’s Connect
Want to advertise with us? Visit My Modern Met Media.
Butterfly Drawing – Draw an Easy Monarch Butterfly Today!

In today’s drawing tutorial, we will be teaching you how to draw the beautiful monarch butterfly. These butterflies come in vibrant and striking orange and black colors, and it’s almost impossible to miss them! Despite the monarch butterfly only living for six to eight months, the most amazing fact about them is their migration from Canada to Southern California or Central Mexico, which is nearly a 2,500-mile migration! Luckily, today’s butterfly drawing tutorial will only take you the afternoon to complete. Let’s roll up our sleeves and get drawing!
Table of Contents
- 1 Draw a Monarch Butterfly Step-by-Step
- 1.1 Step 1: Draw the Body of Your Butterfly Sketch
- 1.2 Step 2: Draw the Butterfly Antennas
- 1.3 Step 3: Add in the Construction Lines for the Wings
- 1.4 Step 4: Outline the Wings
- 1.5 Step 5: Outline the Body of Your Butterfly Sketch
- 1.6 Step 6: Add the Layers to the Wings
- 1.7 Step 7: Draw the Inner Patterns Within the Wings
- 1.8 Step 8: Draw the Outer Pattern on the Wings
- 1.9 Step 9: Add the First Coat of Color
- 1.10 Step 10: Add the Second Color Coat
- 1.11 Step 11: Color in the Outer Pattern on Your Butterfly Wings
- 1.12 Step 12: Add Color to the Body
- 1.13 Step 13: Texture the Wings
- 1.14 Step 14: Color Blend the Inner Patterns
- 1.15 Step 15: Color Blend the Outer Patterns
- 1.16 Step 16: Add a Realistic Outline
- 1.17 Step 17: Color the Body of Your Butterfly Sketch
- 1.18 Step 18: Finalize Your Butterfly Drawing
- 2.1 What Color Can a Butterfly Drawing Be?
- 2.2 Is It Easy to Draw a Monarch Butterfly?
Draw a Monarch Butterfly Step-by-Step
Our butterfly drawing tutorial is a full step-by-step guide to teach you how to draw a beautiful butterfly! We have made it easier than ever to learn how to draw a monarch butterfly, as we take you through the basic construction steps, all the way to the shading and contouring process. As an added bonus, our drawing tutorial can be completed on either a graphic tablet or paper, so anyone can enjoy today’s tutorial.
The below collage gives you a more in-depth insight into the steps taken to achieve your final result!
Step 1: Draw the Body of Your Butterfly Sketch
Begin your butterfly drawing by drawing the main body represented by a vertically, stretched-out oval shape.
Step 2: Draw the Butterfly Antennas
Attached to the top of the body, draw two antennas reaching outward. These do not have to look symmetrical.
Step 3: Add in the Construction Lines for the Wings
Begin this step by drawing a large circle on either side of the body of your butterfly drawing. These must be positioned towards the bottom. Continue by drawing a large, diagonal oval on either side of the main body. These must be positioned towards the top.
Note! Both ovals may slightly overlap the circles. These construction lines will now represent the wings of your butterfly sketch.

Step 4: Outline the Wings
Make use of your previously drawn construction lines to aid you in outlining a more realistic set of wings for your butterfly drawing.
Step 5: Outline the Body of Your Butterfly Sketch
Use the oval shape drawn in step one to aid you in outlining a curvier body for the butterfly. Once you are satisfied with the body of your butterfly, you may erase any visible overlapping or construction lines.
Step 6: Add the Layers to the Wings
Within each wing, draw an inner wing outline. This will add a layer to your butterfly wings and create more depth.
Step 7: Draw the Inner Patterns Within the Wings
Within the inner wing outline, draw a symmetrical pattern on each wing. This pattern can be whatever you choose.
Step 8: Draw the Outer Pattern on the Wings
Surrounding the previously drawn patterns, draw smaller ovals along the outer outline of each wing. Complete this step by drawing two eyes in the middle of the head.
Add in the body texture lines and rear horizontal texture lines by drawing four small circles within the body of your butterfly drawing.
Step 9: Add the First Coat of Color
Select a regular paintbrush and dark brown paint, and evenly color the wings of your butterfly sketch.
Step 10: Add the Second Color Coat
Make use of a fine, sharp brush and golden yellow paint, and evenly fill in the inner patterns on the wings.
Step 11: Color in the Outer Pattern on Your Butterfly Wings
Use the same brush as previously and switch to cream paint, and evenly color the outer pattern on your butterfly wings. For each top wing, select two oval shapes and color them in brown paint.
Step 12: Add Color to the Body
Select a fine brush and dark brown paint, and evenly color the body and antennas of your butterfly drawing. Repeat this step using cream paint, and color the body texture lines and rear horizontal texture lines.
Step 13: Texture the Wings
Use a small, soft brush and black paint, and add light shading along the edges of each wing. Follow this with a fine brush and a combination of black and light brown color paint, and add fine hairline brush strokes to the inside of each wing.
With a rough, textured brush and light brown paint, add dotted texture lines along the edges of the wings.
Complete this step with a fine brush and yellow paint, and add subtle dotted texture lines on either side of the body.
Step 14: Color Blend the Inner Patterns
Use a small, soft brush and bright orange paint, and apply soft brush strokes along the edges of the inner wing pattern. Follow this by using white paint to add highlights to your butterfly drawing. Once completed, select a blending brush to smooth out and blend the color coats together.
Step 15: Color Blend the Outer Patterns
Make use of a fine brush and a dark shade of yellow paint, and apply soft brush strokes along the edge of the outer patterns on the butterfly wings. Repeat using white or gray paint, and add subtle highlights to your butterfly wings.
Complete the step using a soft brush and a dark shade of brown paint, and add subtle shading to the brown spots on the wing patterns.
Step 16: Add a Realistic Outline
In this step, make use of a soft brush and black paint, and apply fine hairline brush strokes slightly beyond the outline of your butterfly drawing. This will create a more realistic look for your butterfly drawing. Complete this step with red or dark orange paint, and paint soft brush strokes leading outwards from the main body to the inner patterns.
Step 17: Color the Body of Your Butterfly Sketch
Select a fine brush and golden yellow paint, and apply fine crisscrossed brush strokes across the body. Repeat this process with black paint. Complete the body using cream paint to trace the body texture outlines and facial features.
Step 18: Finalize Your Butterfly Drawing
You have almost completed your beautiful butterfly drawing! To finish, make use of a fine, sharp brush and the corresponding colors, and simply trace the entire outline of your monarch butterfly drawing. This will erase any harsh outlines and create a flawless look!
Congratulations are in order as you have just completed a beautiful butterfly drawing! We have taught you how to draw a monarch butterfly in 18-easy steps that anyone, beginner or advanced, can follow. We hope you will be walking away with new drawing skills that you can pass on to others, or apply these skills to your next drawing!
Frequently Asked Questions
What Color Can a Butterfly Drawing Be?
In our butterfly drawing tutorial, we used a monarch butterfly as our inspiration and their traditional colors are orange with black/brown edges. However, butterflies come in many beautiful and vibrant colors, which opens you up to numerous possibilities and does not limit you to any color. So, let your creative side run wild!
Is It Easy to Draw a Monarch Butterfly?
Our butterfly drawing tutorial will take you step-by-step through the entire process, from creating a basic structure to contouring and shading your butterfly. Our tutorial is easy to follow and understand, and in no time, you would have created a beautiful butterfly sketch!
Matthew Matthysen ( Drawing and Painting Artist )
Matthew Matthysen is a multidisciplinary artist. He completed his fine art degree, majoring in History of Art and Contemporary Drawing Practice at the University of Witwatersrand, South Africa. Before joining acrylgiessen In 2020, Matthew worked part-time as an art teacher at Reddford Blue Hills High school. Matthew creates drawing and painting tutorials for acrylgiessen and captures them not only photographically and in written form. He also records the creation of his works in his own creative studio as in video format, from which later with a voiceover and a video editor also drawing tutorials for the Youtube channel of acrylgiessen are created.


