Draw patterns on the wings. To make our butterfly even prettier, draw circles on each wing. Then these wonderful creatures will take on a charming appearance.
How to Draw a Butterfly for Kids


Hi guys! In this drawing lesson, we will try to teach you how to draw a butterfly for kids and novice artists. Drawing a butterfly is one of the most basic lessons, along with a rose lesson, as it teaches you to draw basic elements and symmetrical shapes first.
As you know, butterflies are such delicate, fragile creatures and cannot be touched. But they are insanely beautiful and come in different types. It is noteworthy that butterflies bring both great benefits and harm to agriculture. In the caterpillar stage, they destroy the leaves on the fruit trees, leading to crop loss. At the same time, adult butterflies help cross-pollinate and self-pollinate plants. Both caterpillars and adults serve as food for many birds. And there is no need to talk about the benefits of the silkworm—it is a producer of natural silk. Adult butterflies have large, often brightly colored wings and a noticeable flapping flight. Butterflies have a life cycle ranging from the larva (pupa) to the beauty in the form of a winged insect.
But, unfortunately, they live very little. Adults can live from several weeks to a year, depending on the species. But we will solve this problem. We will draw a butterfly, or maybe even several. Cut them out of paper and attach them to the wall. Follow our advice step by step, and you will definitely get a beautiful insect.
Time needed: 15 minutes
How to Draw a Butterfly for Kids

-
Draw the head. The first step is to draw the head. In the middle of the sheet, draw the small head in the shape of a circle.

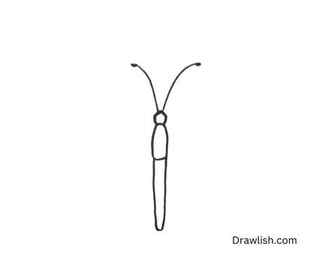
Draw the body. The body has the shape of an elongated oval. In the middle of the body, draw 2 parallel lines for a pattern.
Detail the face. We will draw its eyes and mouth: two points on the top of its head and an arc under them. The ears will look like two antennae with circles at the top.
Draw the upper wings. We will attach wings to it. On the left and right of the body, sketch out the wings of an oval shape.
Draw the lower wings. Draw the same wings, only half the size and with a downward slope. Now our insect can fly.
Draw patterns on the wings. To make our butterfly even prettier, draw circles on each wing. Then these wonderful creatures will take on a charming appearance.
Color the drawing. Since the butterfly is bright and cheerful in nature, we also used bright colors. You can use the same shades, or paint the butterfly in your favorite colors.
Interesting facts about butterflies:
- In the Saturnium butterfly, the caterpillar is so poisonous that the toxins it releases can kill a person.
- The migratory monarch butterfly is able to cover up to 1000 km in one flight, without stopping to rest.
- Butterflies do not sleep at night because they do not need to sleep.
- During a flight over short distances, hawk makers can reach speeds of up to 60 km / h.
- The baby moth is the smallest butterfly, with a wing size of 2 mm.
- Madagascar hawk moths have the longest proboscis, which is 28 cm long.
- The size of the wings of the Tisia agrippina butterfly reaches 31 cm.
- The sense of smell in the peacock-eyed butterfly is very developed: it smells at a distance of 10 km.
Guys, drawing tutorial has come to an end. I am sure you have a beautiful picture. If you liked the lesson, you can share it with your friends on social networks. You can also look at other lessons for kids.
Butterfly Drawing Easy Tutorial
Welcome to our easy Butterfly Drawing Easy Tutorial! We will take you through drawing a butterfly step by step with pictures and a time lapse video at the end.
Butterflies are the ultimate symbol of transformation. From ugly caterpillar to beautiful, colourful winged creature floating gracefully through the air. Although they only live a short time, the life they do lead is delicately graceful and incredible.

Table of Contents
Butterfly Drawing Easy Tutorial – Step 1 – Draw the Head
Butterfly Drawing Easy Tutorial – Step 2 – Draw the Body
Butterfly Drawing Easy Tutorial – Step 3 – Draw in the Top Left Half of the Wing
Butterfly Drawing Easy Tutorial – Step 4 – Draw in the Top Right Half of the Wing
Butterfly Drawing Easy Tutorial – Step 5 – Draw in the Bottom Left Wing
Butterfly Drawing Easy Tutorial – Step 6 – Draw in the Bottom Right Wing
Butterfly Drawing Easy Tutorial – Step 7 – Fill in the Details on the Inside of the Top Wings
Butterfly Drawing Easy Tutorial – Step 8 – Add the Details on the Bottom Two Wings
Butterfly Drawing Easy Tutorial – Step 9 – Add in the Antennae
Butterfly Drawing Easy Tutorial – Step 10 – Colour In Your Butterfly
Butterfly Drawing Step 1 Draw the Head
To make sure your butterfly is symmetrical draw a cross shape with a ruler in the middle of the page. Watch the time lapse video to help with this.
Just above the middle of your page draw a small circle for the butterfly’s head. If you find this difficult freehand then draw round the end of a pen or pencil to get a perfect small circle shape.

Butterfly Drawing Easy Tutorial – Step 1 Image
Butterfly Drawing Step 2 Draw the Body
Just underneath your head draw the body of the butterfly – it will look like a carrot shape or a stretched out oblong. The head and the body will look like a clothes peg.

Butterfly Drawing Easy Tutorial – Step 2 Image
Butterfly Drawing Step 3 Draw in the Top Left Half of the Wing
Now you are going to draw in the top left half of the wing. Make sure it is symmetrical as the picture shows. It will look like a triangle with a rounded edge with a little dip inwards like a bracket. Refer to the picture to help.

Butterfly Drawing Step 3 Image
Butterfly Drawing Step 4 Draw in the Top Right Half of the Wing
At this point you can draw in the top right half of the butterfly’s wing. Make sure that it matches the other top part of the wing as symmetrically as possible. Check out the picture or time lapse video to help.

Butterfly Drawing Step 4 Image
Butterfly Drawing Step 5 Draw in the Bottom Left Wing
Now go back to the left side and draw in the bottom left wing of the butterfly. It will look more rounded than the top part of the wing, almost like the bottom part of a teardrop shape.

Butterfly Drawing Step 5
Butterfly Drawing Step 6 Draw in the Bottom Right Wing
All you need to do for this step is to mirror the bottom left wing on the right hand side, taking special care to make sure it is symmetrical. Have a look at the picture or video to help you.

Butterfly Drawing Step 6
Butterfly Drawing Step 7 Fill in the Details on the Inside of the Top Wings
For this step you can draw in the colourful shapes inside the two top wings themselves. Consult the picture and the video to help. First of all we will add stretched out teardrop shapes as the picture shows, taking care to mirror the same shapes on the other wing. Then you can add the three circles at the tips of both wings as you can see in the picture and video.

Butterfly Drawing Step 7
Butterfly Drawing Step 8 Add the Details on the Bottom Two Wings
Now you just need to draw in a series of teardrop shapes on the bottom left wing and then mirror it on the right side. Check the pictures and time lapse video to help.

Butterfly Drawing Step 8
Butterfly Drawing Step 9 Add in the Antennae
At this point draw in your two antennae at the top of the butterfly’s head. It will look similar to a U shape with two dots on the end.

Butterfly Drawing Step 9
Butterfly Drawing Step 10 Colour In Your Butterfly
This final step involves colouring in your butterfly, especially the wings. The body of the butterfly will be black. We have gone for a Red Admiral approach which involves red, black and white spots on the wings, but it is up to you what colours you would like for your butterfly. Have fun with it!

Butterfly Drawing Step 10
Butterfly Art Supplies
To make this easy art project, you only need a couple of supplies:
- White Cardstock
- Bleeding Tissue Paper (that is an affiliate link to the tissue paper on Amazon) – please be aware that this project WILL NOT work with normal tissue paper, so you must use bleeding tissue paper. One package will give you enough paper to make LOTS of different projects.
- Spray bottle and water
- Scissors
If you’d like to frame the finished project, you’ll also need a second sheet of cardstock, some adhesive, and an 8×10 frame.

