There’s probably no craftier holiday than Halloween. Carving pumpkins, putting together costumes, DIY candy chutes — it’s no wonder the “holiday” often ranks as a favorite among kids. It’s also a very fun one to delve into the finer arts. Who doesn’t love to draw a moonscape, haunted mansion, or a werewolf coming your way. For the kids, though, start with something more manageable, more round, more… pumpkin-y.
How to draw a pumpkin step by step
How to draw a pumpkin we will talk about this step by step in this article!. The tutorial is straightforward. However, at the end of the lesson, you will get a reasonably realistic pumpkin. But in fact, it is not only a massive adornment for Halloween, or weapon of Hobgoblin and Green Goblin, however as well great food.
Let’s get acquainted with this tutorial and study how to draw a pumpkin! Fall is the time of pumpkins! You might object that they are complicated to draw, mainly because of their ribs, however with our lesson you will be drawing pumpkins in no time. We will be showing you a super easy way to make quite a realistic one, and the steps will build a how to draw a pumpkin!
Of course, children think that pumpkins are intended only to be able to climb them. These berries (yes, pumpkin – berry) are useful sources of vitamins.
And now we start to draw a pumpkin!
The content of the article:
Drawing ordinary pumpkin
Drawing halloween pumpkin

YOU WILL NEED:
Front part pumping drawing

First, draw two lines. They connect the top and bottom circles.
Extra lines

Erase the parts of the rings that are inside the lines. A piece of pumpkin should resemble a corn stick.
The second part
We draw the second corn stick to the left of the first one. Part of the wand should be hidden behind the front section.
four

The third part
We add the same detail to the right so that the first part is in the centre. Volume

Now add volume to the pumpkin, adding two more sticks on both sides.
Stem

The last two details of the pumpkin are half hidden behind the previous chopsticks. From above with the help of curved lines draw a stem.
Rear part
Next around the bottom of the stem, draw rounded lines, depicting the back of pumpkin.
eight

Small stem

From the main stem to the right side, draw two more curved lines.
Small stem This stem ends with a pointed tip that curves downward.
Sheet

On a small stem below is attached a leaf that looks like an open palm.
Veins

From the junction of the blade with the stem, draw fine small streaks.

We colour
Paint the pumpkin in any shade of orange, and the leaf and the stems turn green. Collage

Draw a Halloween pumpkin with a pencil
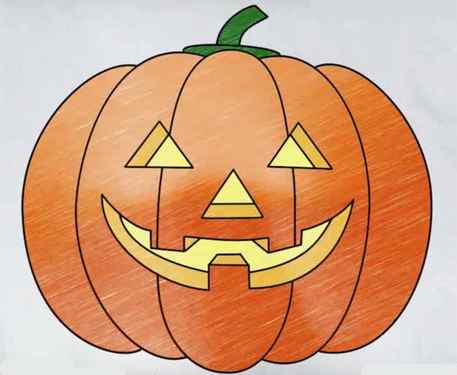

A closer look at how to draw a Halloween pumpkin with a pencil.

Sketch the main contours.
Draw a stalk and draw lines for a symmetrical image of the “face”. Show your eyes and nose in the form of triangles. Draw a smile.

Erase the auxiliary lines with the eraser. Add volume, as is done in the example.

Draw the pumpkin segments. The stem also needs to add volume.

Circle the outlines.
Dim the tail and make shading. First shade the lines of the segments, and then the entire face leave a place of reflection of light.

How to Draw a Realistic Pumpkin Step by Step
Halloween is creeping up on us, which means it’s pumpkin season! Whether you enjoy drinking pumpkin spice lattes (otherwise known as PSLs) or carving them into amazing Halloween creations, we created a fun pumpkin drawing tutorial to help you get into the spirit. After you learn to draw this pumpkin, you can experiment by trying to change its shape or by adding different shapes to its expression. We’ll make this Halloween drawing feel easy by breaking down how we drew this spooky friend into easy steps you can follow.
Expert Colored Pencils
- Sunflower Yellow A016
- Camel Brown A110
- Orange A003
- Raw Umber A132
- Noir A012
How to Draw a Pumpkin Step-by-Step:

Step 1
Draw an oval with a tapered tail on top. This will be the base of the pumpkin and its stem.

Step 2
On the oval shape of the pumpkin, draw three vertical lines dividing the pumpkin into wedges.

Step 3
Sketch a face in the middle of the oval. Draw the eyes in the upper part of the oval with triangles and add the nose between them using a small triangle. Below the nose, draw a wide, crescent-shaped smile.

Step 4
Let’s create the smooth outline of our pumpkin and work on the details in the face and stem. First, create a smooth contour line around the pumpkin. Sketch stripes on the pumpkin to create sections and make them more curved and intermittent in the middle of the pumpkin. Make sure to avoid the face as you’re drawing these lines. We’ll be making the face look more detailed when we start to work with colored pencils.
To give the pumpkin a sly expression, make the eyes slightly curved. Use similar lines to add a curved look to the nose.
Add two teeth to the smile, one at the top and one at the bottom. We also made the stem look more curved. Remove any construction pencil lines with an eraser.

Step 5
In this step, we’ll be finishing the pumpkin’s mischievous expression. Let’s add some realism by adding thickness to the eyes, nose and mouth. Add a semi-circular shadow under the pumpkin and a curl on the top of the stem.

Step 6
Color the base tone for the pumpkin. Use Sunflower Yellow A016 to color the entire pumpkin except for the eyes, nose and mouth. Use Camel brown A110 to color the stem and leave some small areas blank so we can use them later to make the stem look dried.
TIP: Don’t press too hard on the pencil. You’ll want to color with light, even movements. This will make it easier to create soft gradients and perfectly blended transitions in the later steps.

Step 7
Use Raw umber A132 to represent the shadowed areas on the pumpkin stem and add the shadow created by the pumpkin.
Using Orange A003, color over the inner areas of the eye, nose and mouth. Go over the contour and lines of the pumpkin sections with this color. Start coloring from the edge of the sketch and fill in each new section with this color. The middle of the pumpkin, where the face will be, should be the lightest area.
TIP: To make the pumpkin look more voluminous, you need to create smooth transitions from light to dark. This is much easier to do if you don’t press down hard on your pencil as you color. Using the light, even strokes we mentioned before will allow you to create perfect gradients and easily mix colors.

Step 8
Now let’s add the finishing details to our pumpkin and refine his expression. Using Noir A012, color the pumpkin’s eyes, nose, and mouth. Draw in some eyebrows using Raw Umber A132. Use the same color to enhance the shadow under the pumpkin. Loosen the pressure you apply on the pencil as you reach the edges of the shadow. This will make it appear as if the shadow is diffusing around the edges. You can add a touch of this color to the thickness of the eye sockets, nose and mouth to tone down the orange color at the edges and add realism to the pumpkin.
Step 1: Draw a freehand wavy circle.
Pumpkins are not round, so don’t try to make this perfect. The more imperfect your circle is, the better. Extra points if you start by drawing two brackets, connected at the bottom by a semi circle.
Draw a curved line on the outer left of your imperfect circle to form a crescent. Then, on the inside draw two curved lines like brackets. Remember, no two pumpkins are the same, so if you want more definition, add more curved lines.
Step 3: Draw the stem of the pumpkin
The stem of the pumpkin looks a lot like an open triangle with a curved top, closed out on the bottom by a 7 edged star. There’s definitely room for extra creativity here.
A leaf looks very much like a tear drop with ragged edges. Start out with an oval, then attach to the pumpkin stem with a short curved line.
Step 5: Use short curved lines to accentuate the markings on the leaf
That’s it! You’re done drawing a pumpkin! In the spirit of halloween, you can easily convert this pumpkin into a jack ‘o’ lantern that is spooky and fun. Encourage your kids to really make this their own by adding in unique faces for some fun flare.
More Step-By-Steps
Nice pumpkin! Now, how about drawing a haunting moon, drawing some bats, a cat in a hat, and you’ll soon have a complete Halloween picture good enough to display on your fridge.


