1. Draw the deck or bridge surface. The deck can be any shape you like, but it’s typically a simple rectangle.
How To Draw A Bridge Step By Step
A bridge is a structure that spans a physical obstacle, such as a body of water or a valley, and is typically used to provide passage over the obstacle. The design of bridges involves many considerations, including the strength and rigidity of the bridge’s construction, the materials used in its construction, the height of the bridge, and the traffic that the bridge must accommodate.
In this article, we will show you how to draw a bridge step by step.
To draw a bridge, you will need:
– A pencil
– A piece of paper
1. Begin by drawing two parallel lines in the middle of your paper, with about a half-inch of space in between them.
2. Next, draw a third line perpendicular to the first two, so that it forms an “X” shape.
3. Now, draw a fourth line that extends from the end of the first line and crosses the middle of the “X” shape.
4. Finally, draw two more lines parallel to the first two, extending from the end of the fourth line.
5. You should now have a basic outline of a bridge. To make it look more realistic, start adding details.
6. First, add a curve to the top of the bridge.
7. Next, add a curve to the bottom of the bridge.
8. Finally, add diagonal lines to the top and bottom of the bridge to give it a more textured look.
9. Your bridge should now be complete!
Planning the Bridge Composition
A bridge is an essential part of many landscapes, providing a way to connect different parts of a scene and create a more interesting composition. When drawing a bridge, it’s important to plan the composition carefully to make the most of this important feature.
The first step is to decide where the bridge will go in the scene. It’s usually best to place it somewhere that will create a strong visual impact, such as in the center of the picture or at the edge of the frame. If there’s a river or other body of water in the scene, the bridge can be placed to span it, creating a sense of drama and scale.
Once the placement is decided, the next step is to draw the basic outline of the bridge. This can be done freehand or with the help of a few simple reference points. For a simple bridge, it’s best to use a few basic shapes like rectangles and triangles.
After the outline is drawn, the details can be added. This includes things like the railing, the supports, and the texture of the bridge. Again, these details can be drawn freehand or with the help of reference photos.
When the bridge is finished, it’s important to add some context to the scene. This can be done with trees, buildings, or any other features that will help to set the bridge in context.
With a little planning and some careful drawing, it’s easy to create an impressive and eye-catching bridge composition.
Sketching the Basic Structure and Perspective of the Bridge
When it comes to bridges, there’s definitely more than one way to skin a cat – or in this case, to draw one. In this tutorial, we’re going to take a look at how to draw a bridge step by step, including the basic structure and perspective of the bridge.
The first step is to sketch out the basic structure of the bridge. This includes the outline of the bridge, as well as the location of the pillars and arches. Be sure to keep the perspective in mind as you sketch, angling the bridge and pillars to match the perspective of your scene.
Once the basic structure is sketched in, begin adding details to the bridge. This includes the arches, the railing, and the roadway. Don’t forget to add shadows and highlights to give the bridge a realistic look.
The final step is to add the background scenery. This can be anything from mountains and trees to a cityscape. Be sure to keep the perspective in mind as you add the background, and make sure it matches the perspective of the bridge.
That’s it! You now know how to draw a bridge step by step. With a little practice, you’ll be able to create bridges that look realistic and fit perfectly into your scenes.
How to Draw Suspension Bridges
wikiHow is a “wiki,” similar to Wikipedia, which means that many of our articles are co-written by multiple authors. To create this article, 19 people, some anonymous, worked to edit and improve it over time.
This article has been viewed 85,893 times.
Suspension bridges are said to be more durable than the usual bridges during earthquakes. They are supported by cables and towers in order to carry vehicles and people as well.
Constructing bridges take months or even years to create but drawing one will only take you a few minutes.
Steps
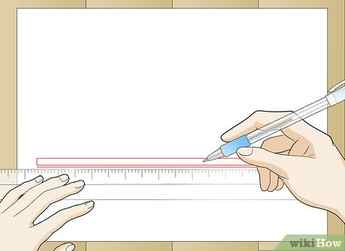
Draw a rectangle and a line below it.
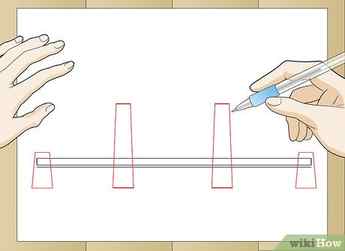
Draw four towers. The second and third tower should be twice the size of the first and last towers. Position them as shown in the drawing.
Erase overlapping lines.
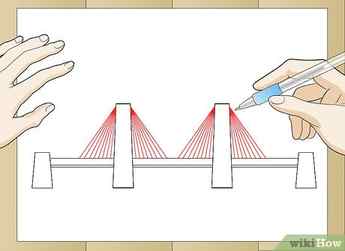
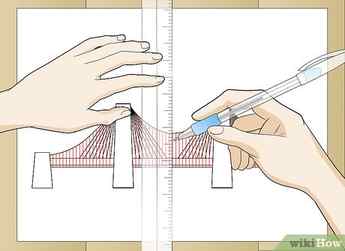
Draw the suspension cables. From each sides of the second and third tower, draw eight lines connecting the bridge.

Draw curves from tower to tower.
Draw evenly spaced vertical lines throughout the bridge.
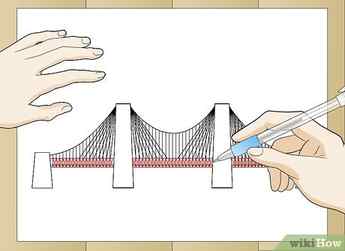
Draw a small x between each of the spaces to create the railings.
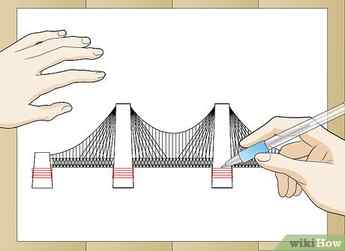
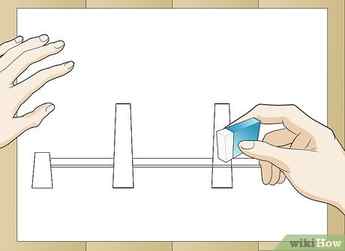
Add more detail to the towers by tweaking its design.

Erase overlapping lines.
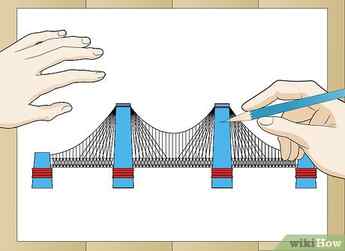
Color the towers any color you want!.
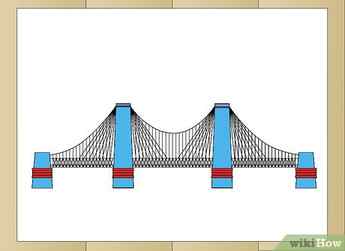
Finished.
Advertisement
Community Q&A
Search
Question
How do I draw fish under the water?
Community Answer
Draw a fish, then add in water lines and bubbles. Then, if you want to, add in details for underwater such as shells or coral, etc.
Thanks! We’re glad this was helpful.
Thank you for your feedback.
As a small thank you, we’d like to offer you a $30 gift card (valid at GoNift.com). Use it to try out great new products and services nationwide without paying full price—wine, food delivery, clothing and more. Enjoy! Claim Your Gift If wikiHow has helped you, please consider a small contribution to support us in helping more readers like you. We’re committed to providing the world with free how-to resources, and even $1 helps us in our mission. Support wikiHow
Question
How do I draw water under the bridge?
Community Answer
You can draw squiggles and color them blue. Then maybe use a white-colored pencil for details.
Thanks! We’re glad this was helpful.
Thank you for your feedback.
As a small thank you, we’d like to offer you a $30 gift card (valid at GoNift.com). Use it to try out great new products and services nationwide without paying full price—wine, food delivery, clothing and more. Enjoy! Claim Your Gift If wikiHow has helped you, please consider a small contribution to support us in helping more readers like you. We’re committed to providing the world with free how-to resources, and even $1 helps us in our mission. Support wikiHow
Question
What are cable stayed requirements?
Community Answer
A cable-stayed bridge has one or more towers, from which cables support the bridge deck.
Thanks! We’re glad this was helpful.
Thank you for your feedback.
As a small thank you, we’d like to offer you a $30 gift card (valid at GoNift.com). Use it to try out great new products and services nationwide without paying full price—wine, food delivery, clothing and more. Enjoy! Claim Your Gift If wikiHow has helped you, please consider a small contribution to support us in helping more readers like you. We’re committed to providing the world with free how-to resources, and even $1 helps us in our mission. Support wikiHow


