Erase the excess. Compare your drawing with the drawing shown in these six steps. Erase all unnecessary left over from the drawing process.
How to Draw a Bunny


Hello friends! In this guide you will learn how to draw a bunny with detailed instructions.
Bunnies are a mammal that belongs to the hare family. Bunnies have long ears, eyes on top of their heads, and a massive body that allows them to run and jump quickly.
Hares are common animals in different parts of the world and live in a variety of environments, from northern tundra to subtropical forests. They are also well adapted to life in the countryside.
Hares are known for their cute and funny traits, making them very popular characters in literature, film, and other art forms. Drawing a cute bunny is not only a fun and creative project, but also an opportunity to immerse yourself in the world of beautiful and amazing nature.
On our site, you will find useful instructions for drawing a bunny and other animals, as well as many tips and instructions that will help you create beautiful and unique art projects.
Time needed: 20 minutes
How to Draw a Bunny
-
Draw the oval of the head. The first and important step. Begin by drawing the basic outline of your cute bunny’s head.
Draw the bunny ears. In the second step, you need to depict large and long bunny ears. To do this, you need to extend out the lines from the head and shape the ears.
Outlining the body. To the right of the head, draw the outline of your bunny’s body. In addition to the shape of the body, you need to depict the bunny’s tail.
Depict the legs. In front of the torso, draw small cute bunny legs.
Hind legs. Using curved lines, depict the big hind leg of the bunny.
Erase the excess. Compare your drawing with the drawing shown in these six steps. Erase all unnecessary left over from the drawing process.
Detail the face. Draw the almond eye as shown in the illustration for this step. After that, draw a detail of the bunny’s ear, which will visually make the ear more voluminous. We finish this step by drawing the nose of the bunny and its mouth.
Details of the paws. This step is extremely simple, you just need to draw lines that will separate the fingers on the bunny’s paws.
Trace your sketch. Trace the sketch of the bunny using stroke tools such as a fountain pen or marker.
Color your bunny drawing. Let’s move on to coloring the bunny. You can use any tool you like to color your drawing. For example, crayons, pencils, or paints. You can also choose a different color for the picture, and not the one we showed in our instruction.
Cool! Your bunny is ready, and now you can share this art with your friends. Try to draw other animals that are on our site.
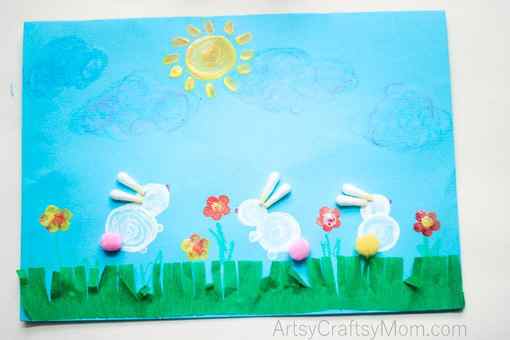
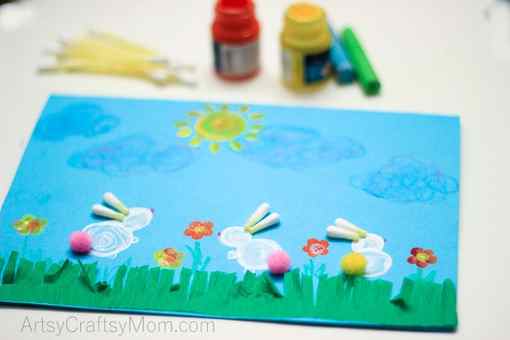
Easter Bunny Rabbit Art for kids using Q-Tips
Every month this year, we have a challenge between us bloggers to incorporate a different craft medium or theme into a simple tutorial. This month’s challenge is Q-TIPS and with Easter / Spring just around the corner, we decided to make a stylish Easter Bunny Rabbit Art for kids using Q-Tips
Not only is it super fun to create, but it will also become an Easter Keepsake. Turn it into a card or hang it on the wall, it will look super cute both ways.
Contents hide
Easter Bunny Rabbit Art for kids using Q-Tips
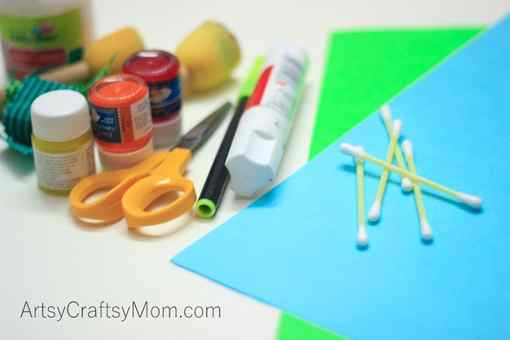
- Q – Tips or cotton swabs
- Small pink pom poms
- Scissors
- Cardstock – Blue
- Green Crepe Paper
- Glue stick & Glue gun
- Acrylic colors – White, Red, Yellow, Orange, Green
- Oil pastels – Blues ( optional)
To make the Easter Bunny Rabbit Art for kids using Q-Tips
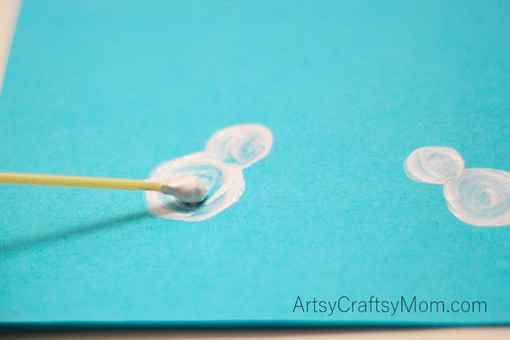
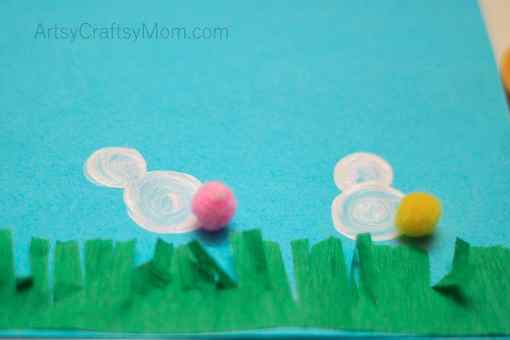
Line up all your supplies. Using a Q-tip dipped in white acrylic paint, paint 2 circles on the blue card stock – one small for the rabbit’s head & another slightly bigger for its body. Let dry.
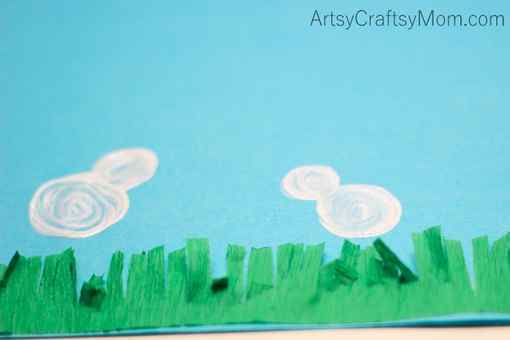
Using scissors, make vertical cuts along the long edge of the green crepe ribbon to form the grass. Make sure you cut only 3/4 of the way.

Using a glue stick, line the green crepe paper grass at the bottom of your blue card stock.
Using a glue stick or a glue gun, stick on tiny pink pom-pom tails for the rabbits. We used pink & yellow, but you could very well use white too.
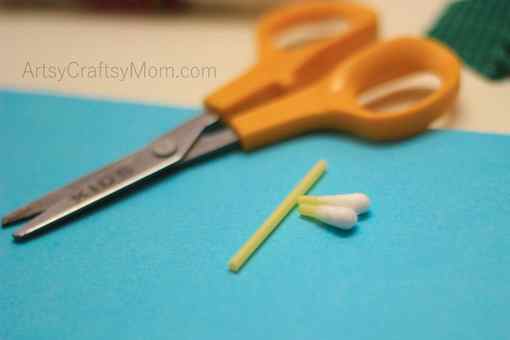
Cut off the cotton heads of the Q tips carefully. One Q-tip will make a pair of ears for each rabbit. So we cut 3 cotton swabs.
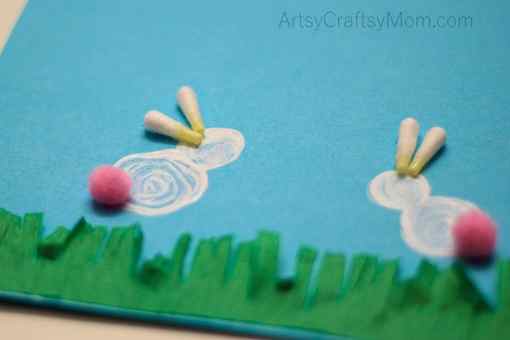
Using glue, place the cut pieces of cotton swabs on the top of the rabbit’s head. Make sure the ears are close to each other & are placed with the cottony part facing outwards as shown.
Using q tips again, paint flowers by placing Yellow Orange or red dots in a circle.
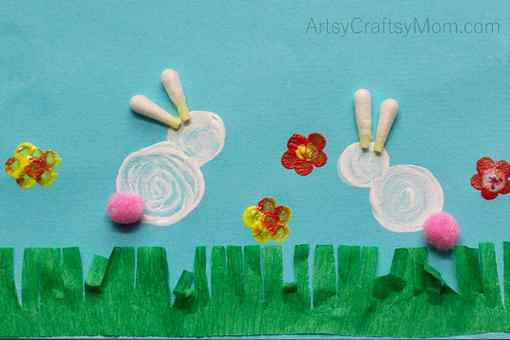
Finally, draw the stems, leaves, clouds etc using oil or chalk pastels to complete your artwork. We painted a sun at the top using a q tip again.
This Easter project was originally designed as a greeting card, however, it can also be used as an Easter decoration as well. It can be framed or you can just put a string through and hang it somewhere on display making it part of your Easter decorations.

Be sure to check out the fun blog posts below, to see what the other bloggers in the challenge came up with for our paper Q-Tip Challenge! You can also follow us on Instagram with the #KidsCraftStars hashtag and see what we are crafting daily!


