However you choose to celebrate 31 October, there is one tradition that will generally precede all festivities. Jack-o’-lanterns are a staple of Halloween, but how will you make yours stand out? Our simple four-step guide will get you started, and we have our list of easy pumpkin carving ideas but here are our top tips for giving your pumpkin a touch of magic.
Kid-Friendly Pumpkin Carving: Tips, Tools, and Advice
SafeWise experts have years of firsthand experience testing the products we recommend. Learn how we test and review. We may earn money when you buy through our links.
Nothing can get your family in the Halloween spirit like carving a pumpkin together. To help ensure everyone enjoys a fun and safe pumpkin-carving experience, we’ve put together this list of pumpkin carving tips for kids.
Keep your little owlets safe with our weekly newsletter
Sign up to get the latest family safety tips and reviews on products like kids smartwatches and car seats.
By signing up, you agree to our Terms and Conditions and Privacy Policy.
Pick a pumpkin that’s good for carving
A safe pumpkin-carving experience starts with choosing the perfect pumpkin. Here’s how to land the right one:
- Look for a pumpkin with smooth, less bumpy skin. A smooth pumpkin is easier for kids to draw on and safer for you to carve.
- Avoid pumpkins that feel heavy for their size. This can indicate thick walls that could be difficult to carve through.
- Skip any pumpkins with soft spots, which can indicate rotting.
- Inspect the pumpkinfor any nicks or cuts that may make it vulnerable to infection.
- Pick a pumpkin with a flat, front surface for carving—that will yield the best results.

Take precautions when carving pumpkins
Best pumpkin carving kit
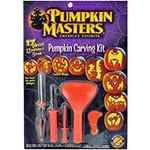
Pumpkin Masters Carving Kit
*Amazon.com price as of post date. Read full disclaimer.
According to the American Society for Surgery of the Hand, Halloween often results in serious hand injuries—requiring three to four months for rehabilitation. To help avoid a trip to the ER, take these precautions when carving pumpkins.
- Don’t rush.
- Use small, controlled motions.
- Choose a location that is well lit and a work surface that’s sturdy.
- Keep your hands and carving tools dry.
- For added safety, leave the pumpkin top on so you don’t put your hand inside the pumpkin and risk cutting it.
Never let a young child carve a pumpkin. If you allow your older child to create a jack-o’-lantern, supply them with an age-appropriate pumpkin carving tool kit and supervise them closely.
Wipe Down Pumpkins to Keep Them from Rotting
Before carving, wipe down the outside with a diluted bleach solution. This will remove microbes that cause decay. When cleaning out the pumpkin be sure to remove every bit of pulp so it won’t attract any bugs. After carving wipe down all the surfaces, inside and out. Keep your carved pumpkin out of direct sunlight and refrigerate it for up to ten days when not on display, especially if you live in a warmer climate.
This maintains the pretty pumpkin shape and stem. Also, a lot of the gunk inside the pumpkin settles at the bottom overtime, so when you remove the opening much of the pulp and seeds will come out with it, making cleaning easier. Lastly, this also makes placing and lighting the candle easier. Set the candle on the base–you can use long t-pins stuck through the candle into the pumpkin to help hold it in place–and then lower the pumpkin over it.
Separate the Seeds and Goop
As you clean out the pumpkin, put the seeds and goop (aka the pulp) in a large bowl of cold water. Give it a few good stirs and a lot of the gunk will fall to the bottom of the bowl while the seeds float to the top. Once they are separated skim the seeds off the top. Pat the seeds dry and toss them with a little oil, and salt and pepper or give them a sweet and spicy treatment. Roast at 350ºF until until browned, 15 to 20 minutes.
Now that the pumpkin is cleaned out, you will want to thin the walls. Pumpkins tend to have very thick walls, and for the light to shine through, especially if you are etching a design, you will want to thin it to about 1/2 to 1-inch thick. The best and quickest tool for this job is potters’ loop tool. The sharp edges make quick work of biting through the soft pumpkin flesh.
Plan and Draw Your Design Before You Start Carving
When designing anything, it’s always a good idea to plan out your design before jumping in, especially when you are working with something (like a pumpkin) where there is no going back once you have made a cut! Use a pencil, ball point pen, or tracing paper to draw the design on the pumpkin and then get carving.
The small saw-type knives in kids pumpkin carving sets are the best for digging into your design. They are small and easy to handle, and the blades are flexible so you can easily turn corners and make round shapes.
Make your pumpkin shine from the inside out

Use multicoloured Christmas lights to add a new dimension to simple styles, or try using a red bicycle light, set to flash, for a really sinister touch.
Funny faces and ghoulish grins not your thing?
Try making simple shapes like stars or spooky creatures with cookie cutters, or use an apple corer or drill bits to add polka dots for a more grown-up pumpkin.
Wondering what to do with the leftovers of your creation? Put them to good use in our perfect pumpkin recipes.
Also check out our Halloween hub page for more spooky suggestions.
Get more pumpkin carving and cooking ideas.
What are your top pumpkin carving tips? Leave a comment below.
Advertisement
Always take care when using sharp objects and open flames and always use electrical appliances in line with the manufacturer’s instructions.


