Once you have completed this drawing, you could also challenge yourself to draw the lady bug with its wings open. That will be even more fun!
How To Draw A Lady Bug (Easy Step By Step Tutorial)

If you would like to learn how to draw a lady bug with full step by step instructions and a guide on how to go about coloring your drawing, I’ve created an awesome tutorial that will show you how.
Lady bugs are one of the most cutest creatures that just seem so innocent and they make adorable drawings. As tiny as they might be, their vivid colors are what makes them stand out and easy to spot.
Despite having the name ‘bug’, they aren’t actually bugs but beetles and they are quite strong too in which they can defend themselves from other creatures by producing toxins.
Pretty mighty for such a small creature, right?
I’m sure you must be even more impressed with lady bugs after finding out this information but let’s get back to what you came for and that’s learning how to draw a cute lady bug.
Grab a piece of paper, a pencil, and let’s begin.
Reference Image
Our very first step before we even pick up a pencil, it’s to take a second and analyse our lady bug reference.

As you can see, this lady bug has a small round body with black spots on them, a line in the middle of the body, as well as an oval-shaped making up the head with another smaller shape for the eyes.
For this drawing, we won’t be following this reference exactly but instead basing our drawing off it.
However, it’s always helpful to know what the structure of a lady bug is like before trying to draw it from imagination.
Steps For Drawing A Lady Bug
Step 1: Draw A Circle

Begin by drawing a circle like I have done over here. This will make up the body of the lady bug.
You can sketch it a few times before you get the shape that you want.
Of course, if you want to give your lady bug more character, you can try to make your shape curvier towards the bottom rather than having it as a this shape.
Step 2: Draw A Half Circle For The Head
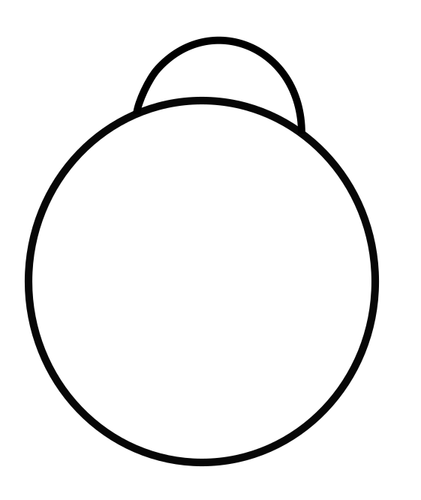
At the very top of the circle (not exactly in the middle but leaning more towards the right of this drawing, draw a dome shape (half circle).
Step 3: Draw A Smaller Half Circle
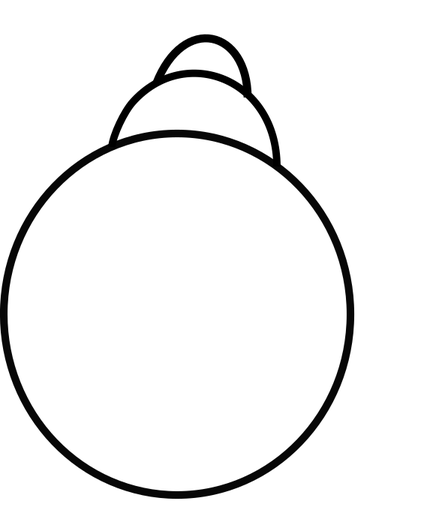
You’ll then want to draw another smaller dome shape for where the eyes and antenna will sit. This will make up the front head portion of the lady bug drawing.
Step 4: Add The Eyes And Antenna
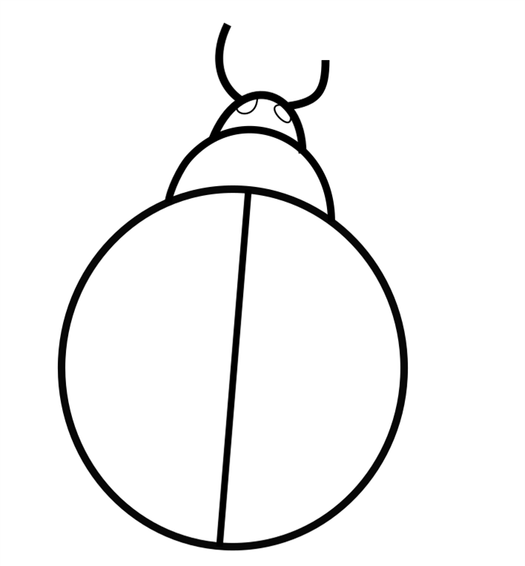
Lastly, you’ll want to draw a line down the circle of the body of the lady bug and give your drawing eyes at the very first dome shape you had drawn in the last step.
Don’t forget to draw two curved lines, making one longer than the other for the antennas.
Once you have completed this, you can move onto coloring your lady bug drawing.
Benefits of this activity
- Through this activity, children will be able to explore various art materials.
- They will also be curious to try different colors and textures. Encourage them to experiment by using various toys and materials. Step by Step Drawing Guide for Kids
- These activities can be performed with various tools and equipment.
- They can be used to create new shapes, paint and cut paper products, and assemble objects.
- Art helps children develop fine motor skills such as hand-eye coordination and the ability to create scribbles and marks.
- It also helps develop gross motor skills such as drawing and painting.
- By using markers, a child can develop eye tracking by following the movements of his/her eyes as they create color.
- This will help them learn how to read and form letters.
Let’s draw a Ladybug
What is a Ladybug?
Ladybug/Ladybird beetle is a name given to the family Coccinellidae, which includes about 5,000 species of beetles. These little birds are usually hemispheric in shape and have short legs. The wing covers and spots of ladybird beetles vary depending on the species. The nine-spotted ladybug beetle, for instance, has four spots on its orange wing cover.
- Entomologists refer to bugs as the true insects, which are known as Hemiptera.
- These dome-backed beetles have been called ladybugs for 500 years in Europe.
- They usually refer to themselves as ladybugs’ beetles.
- During the middle ages, European crops were plagued by pests. Farmers started praying to the Virgin Mary to ward off the invaders. And ladybugs came to ward off these pests.
- The farmers started calling them red and black lady beetles. They were named after the Virgin Mary.
- A ladybug’s Hemolymph will stain the surface of its joints after being startled.
- The smell of Hemolymph can also be unpleasant for humans.
- Like many insects, ladybugs have Aposematic coloration. This allows them to tell predators about their toxicity.
- Almost all ladybugs feed on insects. They are good predators of plant pests.
- These little creatures have long, pointed, and legless bodies. They’re usually found in the middle of the night and feed on aphids.
Materials needed to draw the Ladybug
White drawing paper – To draw and color.
Pencil – Drawing with a pencil helps, making corrections by erasing and re-drawing.
Eraser – To erase any mistakes if any.
Black Marker – After the drawing is done, black markers can be used to make the outline.
Ruler – to draw the guidelines.
Crayons – To add color to the drawing.
- Drawing guidelines are very helpful for students who may not have the time to make their own lines.
- The oval shape of the body should also be positioned near the top of the paper.
- It should also be high enough to allow for the legs and head to be underneath.
- Getting started is very important, as it can help children feel more confident and productive while they’re working.
- Having a visual reference point will also help others learn how to be more accurate.


