Luckily, drawing is fun, so practicing is easy! To get better at drawing and to help you find your signature style, it’s a good idea to doodle whenever you can. Doodling helps you practice different styles, shapes, and figures without needing to commit to a big project or something that ends up looking “finished”. Who knows, you might just find your favorite subject to draw after practicing some of these doodling tutorials!
Snowman Art Lesson – Ice Cream Cone Drawing – Winter Season Project
This resource can be used by students on Google Drive or Google Classroom. To access this resource, you’ll need to allow TPT to add it to your Google Drive. See our FAQ and Privacy Policy for more information.
Also included in

This bundle has 9 different art projects that are perfect for the cold months of winter. no mater where you live! These Google Slides have all the steps you need to start creating! This lesson teaches about:LineShapePattern ValueColorDrawing with basic shapesThis lesson is great for:Elementary art
Products
$22.00 Price $22.00 $26.00 Original Price $26.00 Save $4.00
View Bundle
Description
This is a cute winter time snowman lesson about shadows and chalk techniques. This Google Slide presentation has all the steps you need to start creating.
This lesson teaches about:
- Line
- Shape
- Color
- Chalk pastel techniques
- Drawing with basic shapes
This lesson is great for:
- Elementary art teachers
- Square 1 Art or other school art fundraiser
- General education teachers looking to add more art to their curriculum
- Homeschooling families
This lesson includes:
- Google Slide Presentation
- 2 read aloud books (video)
- Materials needed
- Step-by-step process photos
- Teacher example
Here are a few more winter/snowman lessons!
Doodling Supplies

To get started you’ll need some paper, a pencil, some drawing pens in multiple point sizes for drawing lines in different thicknesses (we love Le Pen Drawing for this), and if you want to add some color you’ll need some markers like Le Plume Permanent, which are great for drawing comics and anime, or Le Plume II, which are perfect for coloring!
Ready? Let’s get started!
How to Draw a Carnation
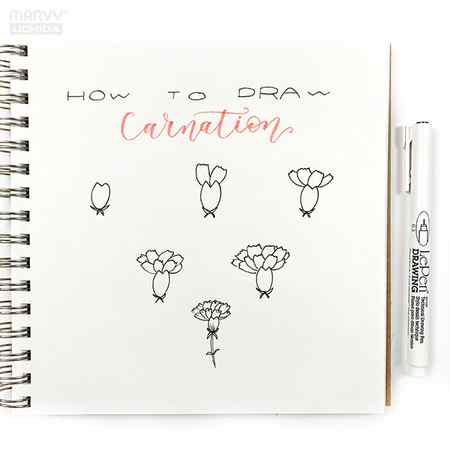
- Carnation – Sketch with a pencil then a fineliner to ink.
- Take your LePen Drawing and sketching the body of the carnation (calyx), draw an elongated U shape then connect the shape with a V.
- Add leaves under the body, 2 hugging the body and 2 downwards.
- For the flower petals, start from the center of the body and draw a rectangular shape upwards with a top of the petal having jagged edges then draw the line back down to the body.
- For the next petals, draw the next 3 petals behind the first petal with the same step as before.
- For the final row of petals, draw the petals stacked behind the first row of petals. There should be an odd number of petals to give it a full umbrella look.
- After the flower is done, draw a stem down from the body and add more leaves.
- After the sketch is done, ink with a fine liner and color in the carnation
How to Draw a Tulip
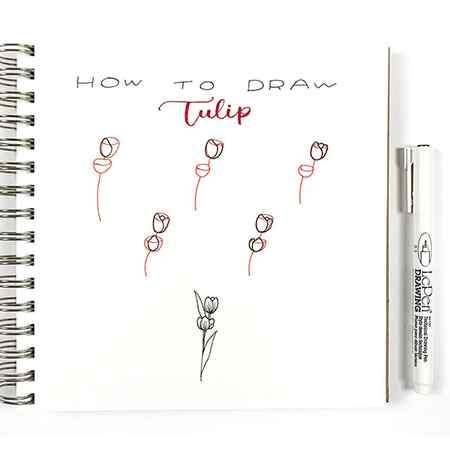
- Tulip – Sketch with a pencil, the red is the guide
- For the guide: Start by drawing the letter U, connect the opening of the U with an oval then draw a line down and draw another U with an oval off to the left of the first shape.
- Inside the guide draw a petal with your LePen Drawing: using an oblong shape draw the petal with a tapered edge on the right.
- To the right of the petal, at the tapered edge, draw up towards the guide and connect the petal to the bottom of the first petal.
- Draw the last petal with an arch, keep the arch lower than the tip of the other 2 petals.
- On the bottom guide, draw another tulip, this time start the petal in the center with 2 tapered edges.
- Draw 2 ovals on both sides of the first petal to finish the tulip.
- Draw a few lines from the bottom of the center petal to create veins.
- Finish the tulip by adding in the stem and a long leaf.


