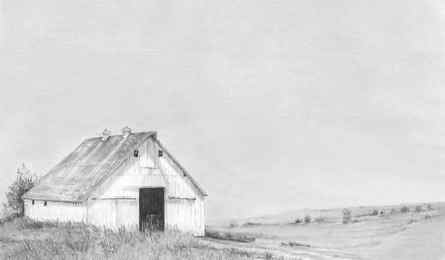
The second image is much improved by adding a toned sky. The white barn is now the focal point, as the toned sky accentuates and brings the entire scene together much better.
Drawing Skies and Clouds
Ever since a fellow artist challenged me to include a sky in one of my drawings, I have been keeping my mind in the clouds. I am continually amazed at the beauty of just looking up in the sky! Over the past couple of years, I have been learning the importance of toning the sky and adding clouds as part of overall compositional improvement in my landscapes. I think I could spend hours and hours fiddling with each puff of white!
Start looking up to the sky and observe cloud formations. Take photos of clouds and you will be amazed at what you will start to “see”!
What’s the purpose of a sky?
- Broadens the range of tones available in your drawing. The white of the paper can now represent the highlights only.
- Creates uniformity to your drawing composition.
- Adds an additional sense of reality to your landscape.
- Adds atmosphere and sets the “mood” of the scene.
In the following series of drawings, which illustrate the importance of a toned sky and why the sky and clouds should be considered in the overall compositional study of any landscape, I’ve chosen a very simple scene with a white barn – my only variable is the inclusion of a sky and clouds.
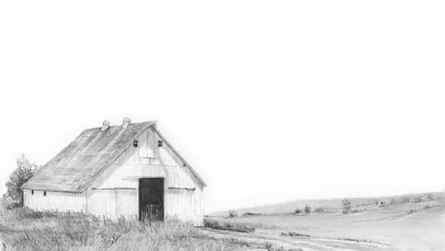
This first image is the drawing without a sky. It is very stark and the sky (the white of the paper) is competing with the white of the barn.
The second image is much improved by adding a toned sky. The white barn is now the focal point, as the toned sky accentuates and brings the entire scene together much better.
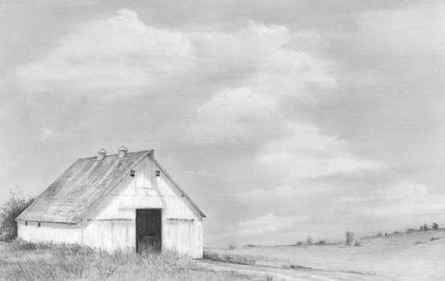
The third image incorporates a toned sky as well as including clouds. The clouds add depth to the scene as they recede into the distance. They also create a visual directional flow for the viewer. The clouds lead the eye through the drawing and add interest as well.
Cloud Formations and Cloud Types
- Stratus – Wispy light clouds
- Cumulus – white puffy…cottony
- Dramatic – rain clouds – thunderheads
- Back lit clouds – sunsets
- Skies are lighter at the horizon and go darker as you go up the sky.
- Clouds use perspective – smaller and tighter the farther in the distance they are.
- Unless the sky is the central part of the drawing, light wispy or under-stated clouds work well.
- Use clouds to lead the viewer through your landscape.
- Clouds have form and are three-dimensional – they don’t have any lines or hard edges.
- The more dramatic clouds – the darker the base tone should be (this allows more range of tones).
Watercolor pigments for sky
Some watercolor pigments seem to be made for sky colors, and it’s worth taking a close look at your blues and making some swatches to see which one matches your local sky best. The color of the sky differs a bit in different parts of the world, and also depends on your standpoint, the time and place, and while I love Cerulean Blue (PB36) and Cobalt Blue (PB28) for „my“ sky here in Germany, other painters might prefer Ultramarine (PB29), Cobalt Azure (PB35), mixes with Phthalo Blue (PB15) or Indanthrone Blue (PB60) for dramatic dark mixes. Some of these pigments have a beautiful granulation, which makes for a very natural looking sky.
In the mornings and evenings, the sky can take all kinds of intensely red, pink, yellow and orange colors, especially in the evenings you will see gradients between the intense sunset colors and the blue layers of the sky, darkening bit by bit. With watercolor, there’s always the problem of not mixing these too much with the blue you might still see – otherwise the sky will turn green, a color you will never observe for the sky (except when you happen to watch the aurora borealis).
Painting Clouds
Clouds seem difficult to paint at first, because they are white, and usually so is the paper, so you’ll have to paint around them to make them visible. If you take a closer look you will notice that clouds do have darker parts too, even the fluffy white cumulus clouds – the flat bottom these clouds have is where you can locate the dew point, meaning the spot where water vapor condenses into liquid water.
Clouds can also have different colors, although these are usually more muted. Light greys, yellows, blues, or pinks, or in the case of intense sunset you might see intensely orange and pink clouds. It all depends on the light. Clouds also come in different shapes and names, and these can be painted with different watercolor techniques. Observing and learning these shapes will not only make you a big cloud nerd, but you will gain a better understanding of the natural world around you – you might even be able to tell the next rainstorm arriving, or that the weather will decline the next day. Of course you don’t need to know any scientific terms to paint a beautiful sky with clouds, but it’s a helpful tool and can make nature journaling more interesting: it’s another way to get closer to nature.
If you want to explore painting clouds more deeply, I explain the most common techniques for sketching and painting clouds in detail in my online course on painting clouds. I demonstrate how to paint different types of clouds and skies (sunny weather, thunderstorm, sunset, and more), and I also explain basic cloud anatomy so you can learn the names of what you paint.
The Shape Of Clouds
Clouds can have a multitude of shapes, but there are also a few rules. Clouds actually follow perspective and foreshortening rules, so everything that’s close to you will be more round, detailed and irregular, while clouds closer to the horizon seem flatter and compressed. You actually see these clouds from the side. Also note that clouds very rarely have cartoon-like shapes. The key to draw convincing clouds is to make the edges irregular – like everything in nature, you will make a better sketch of you really look at a shape and don’t give in to the schematic approach you have in your head.
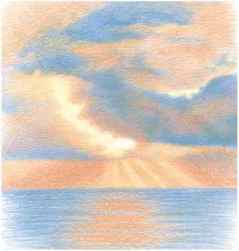
Sunsets are great to watch and a wonderful end to the day. Particularly in the colder months you can watch spectacular sunsets. To keep a sunset sketch luminous and colorful, there are a few tricks. The first thing you need to embrace is to exaggerate the contrasts – you will need to make the dark areas a lot darker than what you can still see with your eye to make the color of the sunset pop. Remember that your paper can never shine as brightly as the sun, so you can only suggest the light and the glow in the sky. Squint your eyes to get a better idea of the values (and don’t look directly into the sun).
Another technique is not to put blues and reds on top of each other – since watercolor is transparent and the paint layers will mix, you will get a muddy brown layer or cloud. Yet often we can observe a sky that’s blue on the top, and bright orange where the sun just disappeared behind a mountain. How do you paint this? The trick is to make two graded washes, so that the colors will gradually fade out, and barely mix in the middle where they will meet.
To add luminous orange or pink clouds on top of your blue sky, you have to be a bit more resourceful. You either have to leave a white space and paint around your cloud shapes, or you will have to do an underpainting – gouache is the most helpful medium for this, as it’s fully compatible with watercolor. You can either use white gouache and then add the color of the cloud with a light watercolor wash once it’s dry, or directly work in the gouache color you see.
I hope you’re looking forward to gaze at the sky now from time to time, or maybe this has activated your cloud nerd genes. In any case, I hope you’ve gotten a few practical tips on how to tackle painting the sky and clouds. If you still want more, check out my cloud painting class. Have I forgotton anything you’d like to know? Let me know in the comments!

Thank you for reading this blog! It’ll always stay free. To keep it going, you can support my work directly through Patreon or through my nature sketching classes.

Join my free newsletter and never miss a blog post! You’ll get new blog post notifications directly to your inbox. Receive 5 great sketching resources as a welcome gift for joining my newsletter! Here’s what’s inside:
- How to draw anything (PDF guide)
- Getting started with watercolor (free ebook)
- My favorite tips for creating great sketchbook pages
- My 5-step guide for drawing birds (PDF guide)
- My current watercolor palette layout (PDF guide)
By subscribing, you agree that I may process your information in accordance with my privacy policy
Clouds Add Depth to Any Drawing
Clouds are like snowflakes—no two are alike. Burnishing is what makes clouds look fluffy and dimensional. The subtle tonal changes give them depth. I love the colors and shapes they create. This little drawing has a lot of depth because of the colors and the layers of the clouds. Although it is all in blue tones, it is very rich in hue. You can create the same drawing and turn it into an entirely different look by simply adding or changing colors. You could also take this and use it as a background, adding some trees in the foreground. Or you could add a horizon line and create a lake or ocean below it.
Sky Blue Light, True Blue, Cloud Blue, Imperial Violet, Ultramarine Blue, White
Clouds and atmosphere always move side to side, not up and down. All pencil lines associated with a sky should be placed horizontally. Always study your subject or reference photo and note the direction of the sunlight. In the example at right, the sunshine is centrally located and peeks through the clouds a little off center and to the right. It streaks through the sky in a horizontal fashion.
Create a Subtle Sunset With Complementary Colors
This example shows what can be done with very few colors and the layering approach. Layering gives the drawing a gentle appearance, while the use of opposite colors adds punch. Study your reference photos carefully before you begin to draw, so you know which technique is required to obtain the look you want.

Use the White of the Paper to Create Rays of Light
This sky is a beautiful example of how intense the sky can be when drawn in colored pencil. Use the white of the paper to create contrast with bright, sunlit areas. See how the rays of light overlap the dark clouds below? Burnish the colors surrounding the white paper to create this intense separation.
This drawing is dedicated to my dear friend, Kelly McBride.
Stonehenge paper 8″ x 10″ (20cm x 25cm)
Was this article helpful?
Recommended Books
- The Art of Drawing
- Drawing for Beginners
- Drawing for Kids
- Drawing Animals
- Drawing Landscapes
- Drawing People
- Drawing Nature
- Drawing with Color
- Drawing with Pencils
- Drawing with Watercolors
- Drawing with Charcoal

Pencil Drawing Made Easy

Realistic Portrait Drawing Course
Related Posts
- Build The Water And Begin Drawing The Duck
- Barns Grass Rocks and Water
- Things To Remember – Drawing In Colored Pencil
- The Clenched Fist – Drawing Hands
- The Downward Gaze Vs The Closing Eye
- Head And Hands – Drawing the Head and Hands
juana
How to draw a sunset with colored pencils easy?
3 months ago
Drawing a sunset with colored pencils can be a fun and creative process. Here are some steps to help you achieve a beautiful and easy sunset drawing: Supplies you will need: – Colored pencils (colors like red, orange, yellow, purple, and blue) – A piece of drawing paper – A pencil for sketching – An eraser Step 1: Sketch the outline Start by lightly sketching the basic outline of your sunset using a pencil. Draw a horizontal line near the middle of your paper to represent the horizon. Then, sketch the main elements like mountains, trees, or any objects you want in your scene. Keep the lines simple and light, as you will erase them later. Step 2: Create the sky Begin coloring the sky using your colored pencils. Start from the top of the paper and gradually transition to the horizon line. Use a light blue color and gradually blend it with darker shades of blue or purple as you approach the bottom. Make sure to leave some space near the horizon line for the sun and any clouds you want to add. Step 3: Work on the sun Color the area where the sun will be using a bright yellow color. Add a small dot of orange or red in the center to make it appear more vibrant. Blend the colors gently to create a smooth transition. Step 4: Add clouds and details If you want to include clouds in your sunset, lightly sketch their shapes using your pencil. Then, use a white colored pencil or an eraser to create the cloud shapes. Add soft strokes using light blue, pink, or purple to give them a realistic look. Step 5: Add the landscape If you want to incorporate a landscape in your sunset, use different shades of green or brown colored pencils to draw mountains, trees, or any other elements. Blend the colors using soft strokes to create a natural texture. Step 6: Final touches Once you are satisfied with your drawing, go over the details and make any necessary adjustments. You can add additional layers of color to enhance the vibrancy of the sunset. Use a white colored pencil to add highlights or small dots to make your drawing more dynamic. Remember, practice makes perfect, so don’t worry if it doesn’t turn out exactly as you imagined. Enjoy the process and have fun experimenting with different color combinations to create a stunning sunset with colored pencils!
sandra johnson
How to draw glowing effect with pencil on white paper?
4 months ago
- Start by sketching out your drawing with a pencil.
- Once you have the shape and outline you’re looking for, begin shading in certain areas to create a base for the glowing effect.
- Use a sharpened pencil to draw fine lines around the areas you’ve shaded to give the impression of glowing.
- Use a white colored pencil or a white gel pen to highlight areas of the drawing that you would like to look as if they are glowing.
- Erase any pencil lines that you don’t want by using an eraser.
- Take a white or light-colored crayon and color in the areas you want to be glowing with a heavy hand. Use circular motions to create a bright glowing effect.
- Once you are happy with your glowing effect, take a blending stump or a tortillion and blend the glowing areas together to create a smoother look.
Betty
How to color night sky with colored pencils?
4 months ago
- Choose the right colors: For a night sky, you’ll need shades of blue, black, and possibly a touch of purple. Select pencils that match the desired hues.
- Prepare the canvas: Start by lightly sketching the outline of your night sky scene with a pencil. It could be a skyline, trees, mountains, or any other elements you want to include.
- Layer the colors: Begin by applying a light layer of the brightest shade of blue. Use light pressure and make long, smooth strokes. Cover the entire sky area.
- Build up the darkness: Now, use a darker shade of blue or a touch of purple to begin adding depth and darkness. Apply this color in gentle layers, focusing on the areas where you want to create shadows or intensity.
- Add black: After adding some depth with the darker blue or purple, gradually introduce black into your sky. Use light pressure and layer the black in small sections. Blend it with the blue shades to create a smooth transition.
- Create variation: To make the night sky more interesting, you can add other shades of blue to create highlights or simulate starry effects. You can also experiment with blending techniques to achieve different textures or moods.
- Add stars or other details: To create stars, gently press your pencil tip or the end of a white colored pencil onto the paper at various points in the sky. Alternatively, you can use a white gel pen or white paint to add larger stars or even a moon.
- Refine and blend: Once you have all the colors and details in place, take a moment to refine and blend the colors together. Use a blending stump, soft cloth, or your fingertips to smooth out any visible pencil strokes or harsh edges. Remember, practice and experimentation are important in mastering any technique, so don’t be afraid to try different approaches and discover your own unique style.
Ermias
How to draw a night sky with colored pencils easy?
4 months ago
Drawing a night sky with colored pencils can be a fun and easy process. Here’s a step-by-step guide to help you: Materials you’ll need: – Colored pencils (black, dark blue, light blue, purple, and white) – A piece of drawing paper – A pencil for sketching Step 1: Sketch the outline Start by lightly sketching the basic outline of your night sky using a pencil. You can draw hills or mountains at the bottom of the page to give some depth to the scene. Keep the outline simple as it will be covered by the colored pencils later. Step 2: Background colors Using your dark blue colored pencil, start coloring the background of the sky. Begin from the top of the paper and gradually press harder as you move downwards to create a gradient effect — darker at the top, getting lighter towards the horizon. Step 3: Adding stars Take a white colored pencil and randomly dot the sky with various-sized stars. Start with larger stars and gradually add smaller ones as you move down the page. Vary the density and placement to create a more natural effect. Step 4: Moon or planet If you’d like to include a moon or planet in your night sky, lightly sketch its outline in pencil. Then, use your white colored pencil to fill it in. Add a little shading with your black colored pencil on one side to give it dimension. Step 5: Nebulas and clouds To add some depth and interest to your night sky, lightly sketch some cloud or nebula-like shapes on the paper. Use different shades of blue, purple, and black colored pencils to fill in and blend these areas. Start with the darkest shade, then blend in lighter shades towards the surrounding sky. Step 6: Final details Using your lighter blue and purple colored pencils, add additional details such as smaller clouds, gentle curves, or swirling shapes. Gradually blend them into the sky to provide a sense of movement and atmosphere. Step 7: Finishing touches Take your white colored pencil again and add some additional highlights. Blend them lightly into the sky to create a subtle glow around the stars or moon, adding to the overall luminosity of the night sky. Remember, there is no right or wrong way to draw a night sky with colored pencils. Allow yourself to be creative and experiment with different techniques. Don’t be afraid to make mistakes — that’s how you learn and develop your own unique style. Enjoy the process and have fun creating your own serene night sky scene!
jessica
When to start bunishing in colored pencil drawing?
7 months ago
Colored pencils can be used in the very beginning stages of a colored pencil drawing. Starting with a light layer of color will give you a base for the drawing, and it’s easier to build up layers of color than it is to erase existing color. Additionally, depending on the paper you’re using, you may be able to use the colored pencils to layer color, creating the depth and value needed for realistic drawing.
tobias
How to color a moon with colored pencils?
9 months ago
- Begin by lightly sketching out the shape of the moon using a pencil.
- Shade in a light layer of color all over the moon with a yellow or peach colored pencil.
- Create the look of texture on the moon’s surface by lightly shading with a darker yellow or peach colored pencil.
- To add shadows, use a dark brown colored pencil and create small curved lines that follow the shape of the moon and the shadows created by the light.
- To create more contrast, use a dark blue colored pencil and lightly shade around the bottom and sides of the moon.
- To create the look of stars, use a white colored pencil and make small circles of varying sizes all over the moon.
- Finally, to really make the stars pop, lightly shade with a soft gray pencil to create a sense of depth.
SEMERE
How to draw a cloudy sky?
10 months ago
- Begin by drawing a large, curved horizontal line across the top of your paper. This will form the top of the clouds.
- Draw a few smaller curved lines below the first line. These can be slightly curved or steeply curved lines to create a range of heights and depths in your clouds.
- Connect each of the curved lines to one another with small, jagged lines. This forms the shape of the clouds.
- Create texture and depth in the clouds by adding more jagged lines in between the curves.
- Color the sky a light blue or grey to indicate clouds.
Carlos
How to draw clouds with pencil easy?
11 months ago
- Start by sketching an outline of the cloud with a pencil. Make sure to leave some empty space in between the edges of the cloud to give it a fluffy look.
- Begin shading the outside of the cloud with a light pencil stroke. Move the pencil in a circular motion to create extra texture.
- Create a more pronounced texture by pressing down harder on the pencil and creating more circular motion in your shading.
- Add more depth to the cloud by creating shadows with darker pencil strokes. Place shadows within the lighter parts of the cloud, and make sure to add more pressure when shading with darker strokes.
- Soften the entire image by gently smudging the pencil lines. This will blend the lines and create a more realistic cloud.
- Lastly, use an eraser to add highlights to the cloud. Erase small areas to add contrast and make the cloud look more realistic.
Martin
How to draw sun rays pencil?
11 months ago
- Start by sketching a basic circle to form the sun.
- Draw several curved lines radiating from the center of the circle. Make sure that the lines taper off as they go away from the center, like rays of light.
- Add more curved lines to fill the gaps between the rays.
- Go over all of the lines with a darker pencil, to create contrast and make the rays more visible.
- Shade the sun to give it more of a realistic look.
- Complete your drawing by adding details such as stars, clouds, or any other elements you want to include.
Eden
How to draw a night sky with pencil?
11 months ago
- Begin by lightly sketching a horizon line with your pencil.
- Draw in some tree branches or other objects toward the bottom of the horizon line.
- Next, draw a series of short, light pencil strokes in the upper half of the horizon line to create stars.
- Shade around each of the stars you drew to make them stand out more.
- Use a slightly darker pencil to layer in wispy clouds across the sky.
- Use a paper blending stump to smudge and blend the clouds together.
- Using the same pencil, draw a moon along the horizon line. Make it as big or small as you’d like.
- Shade the moon and add in craters using a very light pencil.
- Add in some stars along the bottom of the moon as well.
- Use a blending stump to smudge and blend any bits of the sky together. And you’re done!
chantelle
How to draw wispy clouds?
11 months ago
- Start by using a light gray colored pencil or marker to draw a linear, curved line that gradually grows in size. This will serve as the base of the cloud.
- Use the same pencil or marker to draw several more curved lines that are slightly larger than the first line. They should connect with the initial line and overlap each other.
- Add some depth to the cloud by using thicker lines. You can also make it more wispy by using thinner, more jagged lines.
- Finally, use a lighter shade of gray to add some highlights to the cloud. This will make it look more realistic and add a sense of light and airiness to the composition. And there you have it – a wispy cloud!
laura
How to make a sunset with colored pencils?
11 months ago
- Start by sketching out the basic outline of the horizon, a few clouds, and the sun.
- Use a yellow colored pencil to fill in the sun.
- Begin to layer on the sky, starting from the horizon up. Use burnt sienna, yellow ochre, and red-orange colored pencils to create a warm sky. Make sure to make the sky darker toward the horizon and lighter as it goes up.
- Add a few clouds using light blue and white colored pencils.
- Add extra details to the sun and sky with pink, orange, and yellow colored pencils.
- Using a blending stump, lightly blend some of the colors together.
- Add some shadows and highlights to the sun and clouds with dark and light blue colored pencils.
- Finally, use a white colored pencil to add some stars in the sky.
costanzo
How to color a sunset with colored pencils easy?
11 months ago
- Start by sketching the sunset, including the horizon line and any other details you want to include. Make sure to leave enough blank space to color the sunset.
- Begin coloring the sky. Start by lightly layering the sky with yellow and orange colored pencils.
- Then, add some red and pink accents to the sky. Make sure to blend the colors together and to keep the lines soft.
- Lightly layer some white pencil over the sky to make it look more realistic.
- Darken the bottom of the sky and the horizon line with some darker shades of orange, red and pink.
- Add depth to the sky by adding some dark blue and purple colored pencils near the horizon line.
- Finally, create reflections on the surface of the water with some blues and purples. Finish the picture by blending the colors together.
enrica siciliano
How to draw a night sky with colored pencils?
11 months ago
- Start by sketching out a simple horizon line with a light pencil.
- Add various sizes of swirls, circles and curves to the night sky with a variety of colors. You can use colors like blues, purples, blacks, and grays to add depth and interest.
- Shade in the dark areas of the sky with a darker color.
- Use a white pencil to add stars to the night sky.
- Use colors like yellow, orange and white to add a few clouds to the sky.
- Add some texture to the clouds with a white pencil.
- Finally, use a white pencil to add a few stars to the sky and a few moonbeams.
Franco Lucchesi
How to use pencil colour as natural drawing?
1 year ago
Pencil colours can be used to create natural drawings in a variety of ways. Start by sketching out a basic outline of the object, such as a landscape, portrait, or still life. Once the outline is established, use pencils of varying softness to create shadows, lines and textures. Experiment with light and dark tones to create depth and realism within the drawing. You can also use blending tools such as tortillons or blending stumps to further blend and shade the colour. Finally, you can use erasers to erase small details and create highlights.


