The key to impasto painting with a bristle brush (or any brush for that matter) is to mix plenty of paint and load the brush up with a generous amount. When loading the brush, rather than dragging the bristles over the paint, try reversing the direction of movement and push the bristles into the pile of paint as if you were shoveling the paint with the brush and the bristles where the scoop of the shovel. This will load up your brush with more paint than the standard drag-method of picking up paint.
What to Use for Textured Canvas Art?
Textured canvas art refers to any type of artwork that features a textured surface. This can be achieved through the use of various techniques and materials, such as layering paint, applying mediums, or using tools to create texture.
Using the right materials is essential for creating high-quality textured canvas art. Different materials and techniques will produce different results, so it’s important to choose the ones that will help you achieve the look and feel you want.
For example, certain paints may be better suited to creating certain textures, or certain tools may be better at creating certain effects.
By understanding the properties of different materials and how they can be used, you can ensure that your textured canvas art is as successful as possible.

Canvas
There are several types of canvases that can be used for textured art, including:
Stretched canvas
This is the most common type of canvas used for textured art. It is made of a tightly stretched piece of fabric (usually cotton or linen) that is mounted onto a wooden frame. Stretched canvas is available in a variety of sizes and can be purchased new or reused from an old painting.
Canvas Board
This is a stiff, lightweight board with a canvas surface that is primed and ready for painting. It is a good option for textured art because it is easy to work with and relatively inexpensive.
Canvas paper
This is a lightweight paper with a canvas-like texture that is ideal for practicing textured techniques or creating small works of art.
Before you begin creating textured art on your canvas, it’s important to prepare it properly. This includes priming the canvas with gesso, which helps the paint adhere to the surface and prevents the canvas from showing through the paint. You should also make sure the canvas is properly stretched and secured to the frame, as this will help it stay stable while you work.
To prepare the canvas for textured techniques, you may also want to apply a base coat of paint. This will help to create a more even surface for the texture to be applied on top of and will also help to create a cohesive look for your finished piece.
Paint
Acrylic paint is the most commonly used type of paint for textured art because it is water-based, dries quickly, and is easy to manipulate. It can be thinned down with water to create a watercolor effect or thickened with a medium to create a more textured look.
Acrylic paint is also very versatile and can be used to create a wide variety of textures, from the look of water to grass, skin, glass, and more.
Oil paint is another option for textured art, although it is slower drying and requires a longer drying time between layers.
It is also more difficult to manipulate than acrylic paint and is generally not as suitable for creating a wide range of textures. However, oil paint has a softer, buttery consistency that some artists may prefer for certain textured techniques.
Layering
Building up layers of paint on top of each other can create a textured effect. You can do this by applying thin layers of paint, allowing each layer to dry before adding the next one, or by applying thicker layers of paint and blending them together.
Scraping
You can use a palette knife, putty knife, or another flat tool to scrape or remove paint from the canvas to create texture. This can be done while the paint is still wet or after it has dried.
Impasto
This technique involves applying thick, textured layers of paint to the canvas using a palette knife or other tool. The paint is applied in a thick, uneven manner, creating a raised, three-dimensional effect.
Sponging
Using a sponge to apply paint to the canvas can create a textured, spongy effect. You can also cut the sponge into different shapes or use it to create a pattern on the canvas.
By experimenting with different techniques and using a combination of thin and thick layers of paint, you can create a wide range of textured effects on your canvas.
Use Oil Paint with Tube-Grade Viscosity

Let’s look a little more at achieving texture with paint viscosity. If you are using a good, quality artist-grade paint, you can usually achieve impasto textures by using the paint as it comes straight from the tube, without the use of mediums.

But this also depends on which colors you are using. Certain colors are naturally more oily and have a lower viscosity than other colors. For example, it will be easier to create thick layers of paint with a Yellow Ochre than with Ivory Black since Ivory Black has a higher oil content and not as much body.
So if you want to create thick texture, start by using the paint straight from the tube without any thinning or adding impasto mediums. This will achieve impasto textures and effects without the hassle of adding mediums.
Keep in mind this doesn’t mean you cannot thin the paint at all to achieve impasto texture. Thinning the paint with just the right amount of mineral spirits can give the paint some flow, which still maintaining its body and thick nature. Just don’t add so much medium or spirits that the paint becomes soupy and runny.

You also want to make sure you have a generous amount of paint to apply to the canvas. Impasto applications require a lot more paint than thin layers do. With thin layers, you spread the paint around, but with impasto applications you lay the paint on the canvas with minimal if any spreading. This approach requires a lot more paint.
Remove Oil from Pigments Before Painting
As described above, the more oil a pigment contains, the more difficult it is to create impasto texture with it. One trick to thicken up your paint is to squeeze some out onto an absorbent surface such as thick paper or cardboard before you start painting. This will draw out some of the oil from the pigment and make it more tacky allowing for easier applications of thick paint.

Some websites recommend placing your oil paint on cardboard a day before you start painting. I’ve found that the paint can start to get pretty tacky after just an hour. The time needed will depend on the brand of paint, it’s oil content, and how tacky you desire your paint to be.
Use Impasto Oil Painting Mediums
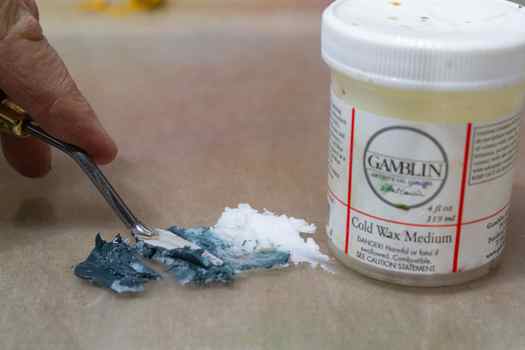
Certain colors of oil paint can be very expensive. While you may not think twice about applying thick layers of Burnt Sienna, applying thick layers of Cadmium Red can hit your wallet pretty hard. In steps impasto mediums. These are mediums that you add to your oil paint to thicken them up which allows you to create thick, impasto texture.

There are a number of brands on the market. One of the most popular is Lukas Painting Butter Impasto Medium. It’s a gel-like substance that is alkyd-based so it dries fast. It claims there is no shrinking or cracking once it dries.

There is a great company out there called Natural Pigments which carries four different types of impasto mediums for the serious artist made by Rublev. Their Velazquez Medium makes colors slightly transparent. They also have Impasto Medium and Impasto Putty and they also have Oleoresgel and Underpainting Transparent Base which doesn’t contain any dryers.

I’ve used Rublev Impasto Medium and it works great! It gives the paint plenty of body yet the paint retains a buttery feel that is very easy to manipulate. One thing about Impasto mediums is that they can have a tendency to change the value of the pigment. In the photo above I used pure Alizarin on the left and the same pigment mixed with Rublev Impasto Medium on the right. You can see the paint on the right is slightly lighter in value.


