Thanks! We’re glad this was helpful.
Thank you for your feedback.
As a small thank you, we’d like to offer you a $30 gift card (valid at GoNift.com). Use it to try out great new products and services nationwide without paying full price—wine, food delivery, clothing and more. Enjoy! Claim Your Gift If wikiHow has helped you, please consider a small contribution to support us in helping more readers like you. We’re committed to providing the world with free how-to resources, and even $1 helps us in our mission. Support wikiHow
How to Paint a Pumpkin
wikiHow is a “wiki,” similar to Wikipedia, which means that many of our articles are co-written by multiple authors. To create this article, 41 people, some anonymous, worked to edit and improve it over time.
The wikiHow Video Team also followed the article’s instructions and verified that they work.
This article has been viewed 687,909 times.
When Halloween or the fall season comes knocking, painting a pumpkin is a creative and fun craft that the whole family can enjoy — without the mess of making a jack-o’-lantern. To do it right, you just need a pumpkin, some paint, and a little vision. Here’s how to paint a pumpkin.
Steps
Part 1
Part 1 of 2:
Prepare to Paint Your Pumpkin
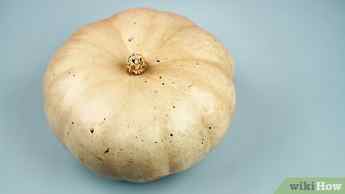
- Watch out for any soft spots in the pumpkin because that may be a sign of rot. You want your pumpkin to be fresh and to last as long as possible.
- Almost any variety of pumpkin can be painted, but the following are especially good: Baby Pam, Sugar Pie, Neon, Lumina, or Cotton Candy.
- Take care not to get the stem area (top) or the blossom end (bottom) of the pumpkin wet. This can cause the pumpkin to rot.
Advertisement

- Let the shape of your pumpkin inspire your design. For example, a squarish pumpkin could become Frankenstein’s head.
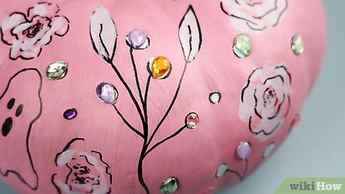
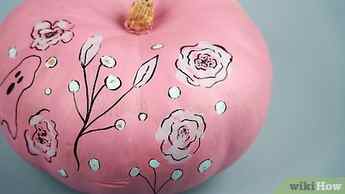
- Who says painting pumpkins is just for Halloween? You can paint your pumpkin to echo a fall theme, such as painting leaves or scarecrows, or just paint something completely random on your pumpkin.
- Have fun with painting your pumpkin and paint a self-portrait or a portrait of a member of your family.
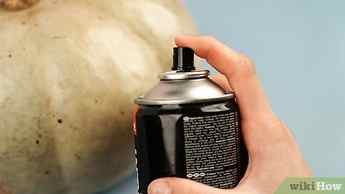
- Use a brush to apply a liberal coat of sealer evenly to the entire surface of the pumpkin, and allow to dry thoroughly. Clean this brush thoroughly if you plan on using it for painting.
- Give the sealer time to dry before you move on to paint the pumpkin.
Advertisement
Part 2
Part 2 of 2:
Paint Your Pumpkin
- Pick a color that complements your design. If you’re drawing a goblin, pick an eerie green color for your background.
- Paint your pumpkin in sections, allowing each to dry before moving on to the next. This way, you won’t be stuck holding a pumpkin dripping with wet paint.
- Watch out for the wet paint on the bottom. Make sure you don’t set the pumpkin down on its bottom when the bottom is wet, or it will stick.
- To keep the pattern or stencil steady, it might help to tape it in place.
- To create straight lines, stripes, or shapes, tape pieces of masking tape to your pumpkin in the desired pattern.
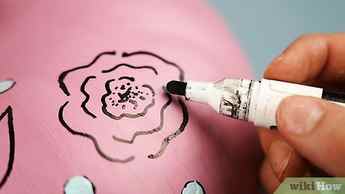
- Optional: Use transfer paper (graphite paper) to trace your design. Transfer paper is a popular craft product used to transfer a design or pattern onto any surface. Here’s how to use the transfer paper:
- Print out or draw your design on a piece of paper.
- Tape a piece of transfer paper to the pumpkin.
- Tape the paper with your design on top of the transfer paper.
- Use a pencil to trace the outlines of the design.
- When you’re finished, remove the two layers of paper, and you’ll find the outline of your design traced onto the pumpkin.
- If you are using light colored paints, you may need to add additional coats.
- Make sure your paint is thoroughly dry before adding layers on top.
- Make sure that the design covers all of the visible parts of the pumpkin so you’re not just tracing it onto the front. Step back to admire your pumpkin to see how much of it is actually visible.
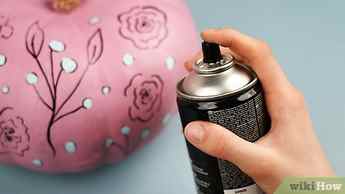
Use a sealant to set your design. When your paint is completely dry, spray a light layer of craft sealant all over the painted areas of your pumpkin.
- Glue yarn or raffia around the stem of the pumpkin for hair.
- Sprinkle glitter on wet paint to add sparkle.
- Using glue dots, a glue gun or craft glue, add googly eyes, sequins, rhinestones, pom poms, beads, or craft foam shapes.
- Top your pumpkin with a hat for a final touch.
- If you’re placing it outside, try to keep it out of direct sunlight or heat to make it last longer.
Advertisement
Paint Orange Pumpkins in Acrylics
Fall is the time to paint orange pumpkins in acrylics on just about anything in decor. Really you can do this any time of year but Autumn seems to be the time that pumpkins take center stage.
No time to view this now? PIN for later.

When I shared my Fall Scrabble Tile art I had a two-sided tile in place of the A. One side had a Fall Leaf painting and the other an Orange Pumpkin.
If you need help with certain terms or techniques you will find this helpful Basic Strokes for Beginners
Full list of supplies I use every time I paint Basic supplies you will find useful
Supplies to paint orange pumpkins
First choose your surface of choice, on this one I used a 1×6 pine board cut into a square, you can also use stretched canvas
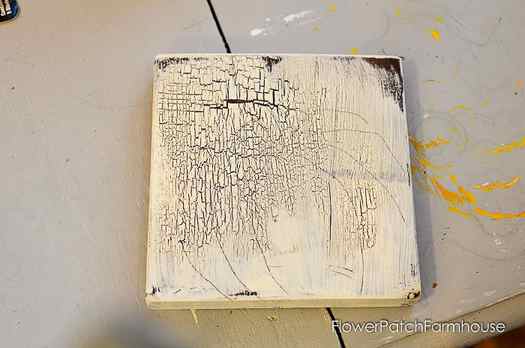
For a tutorial on getting the crackle effect visit this post :How to Use Crackle Medium
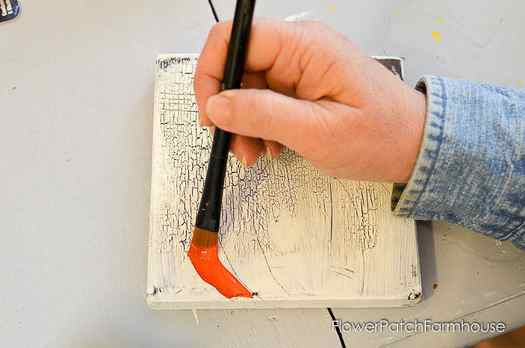
1. Paint background color
2. Add crackle coat
3. Paint on top coat
4. Let crackle background dry thoroughly
Instructions for how to paint pumpkins
5. Sketch or trace on pattern of pumpkin
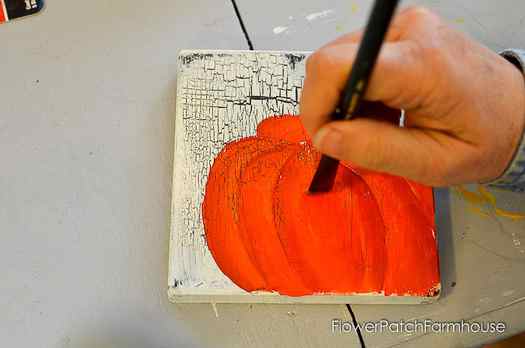
6. Double load the #12 Flat brush with the Tangelo Orange and Georgia Clay. (see this post if you don’t know what double load means)
Stroke the Georgia Clay side along the outside edges of the pumpkin ridges and the Tangelo Orange toward the center.
7. In the center paint both sides of it as you did the other pumpkin ridges then just fill in the very center with the Tangelo Orange. (if that seems confusing just view the video)
8. While the paint is still wet load some Banana Cream into the brush (do not clean the brush first), touch in and blend to create some highlighting.
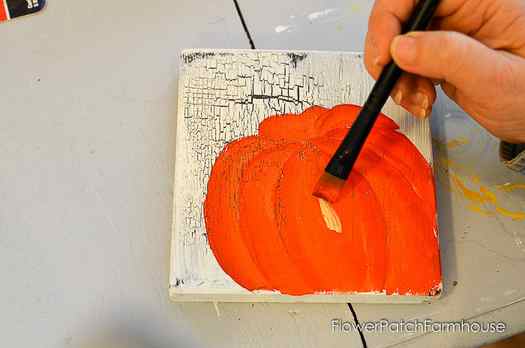
This will draw it forward creating dimension.
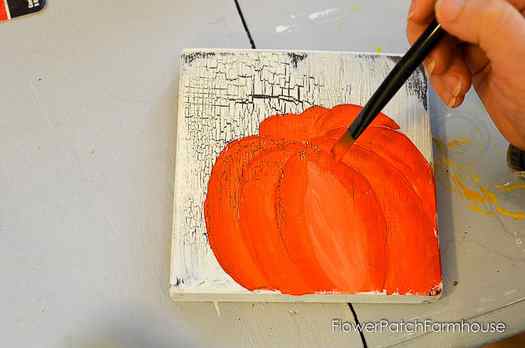
9. Clean the brush and squeeze dry with a soft cloth or paper towel.
10. Double load the brush with Banana Cream (Sunflower) and Burnt Umber. Stroke upwards to create the stem.
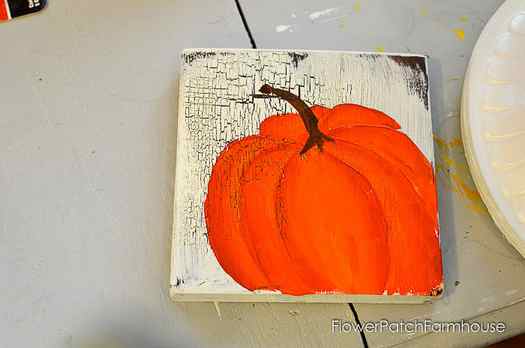
11. Finish with a matte or satin Varathane finish or you can also use a wax. I really like DecoArts Creme Wax finish. It glides on like butter and buffs out to a wonderful heirloom finish. And it has no harsh odor.
In the video I show how to shadow around the outside edges and added a bit of white highlights but those are totally optional. As well as after taking a second look at this pumpkin I thought the stem too narrow. So in the video I show how I widen it and fix the base of it.
Now you have a gorgeous orange pumpkin!
I just finished a complete Pumpkin Leaf tutorial, go Here to see it! I used real pumpkin leaves to create the pattern.


