Make sure all grass blades are not touching.
How to Paint Grass: Painting Tips and Techniques
Painting grass is always a fun and challenging project. There are many different ways to paint this subject, but the best way is through experimentation. How do you want your painting of grass to look?

Choose what colors you want, how much detail you need, and which mediums work best for the finished product. This tutorial will show some tips on how to paint grass on canvas so that it looks realistic!

Before You Start a Project
The grass is one of the most common subjects in landscape paintings along with trees and clouds, so it’s no wonder that many artists are looking for advice on how to paint grass oil, watercolors, or acrylics. There really isn’t any magical trick or technique you can use to make this subject easy; it takes time and practice like everything else. However, if you follow these simple tips below, they will help smooth out your learning curve quite a bit (and save some paper!).
The Art of Watercolor Painting: Tec.
Please enable JavaScript
Grass has two very distinctive features: its round shape (like blades overlapping each other) and soft color gradation from dark green at the base to light green towards the top.
If you want to paint a meadow, landscape with grasses, or vegetation in the ground plane, painting grass can help sell that idea. Not only does it add detail and color variation but also depth to the scene.
The grass is a great texture for paintings because of how easily it blends into surrounding colors while laying on top of other layers at the same time. This helps blend together all objects in your picture.

Paint grass if you are looking for something fun yet simple enough to complete quickly! When finished properly, this type of project will give an elegant touch to any art piece!

Color Scheme for Painting Grass
There are several different ways that you could go about choosing your colors when painting grass: full-color or just green; detailed with every blade drawn out or flat shapes with no details; dark greens for shadows, mid-tones in the center, light greens on top; etc.

There is no right or wrong way to choose colors for your picture. However, depending on what you’d like the mood of your painting to be and what mediums you’ve chosen will determine which colors work best.
Some people like dark greens for shadows, others prefer bright lime-yellows – do whatever works best for your project or personal style!
Color Schemes For Painting Grass
- Natural green

- Browns and tans
- Cool colors (blues)
- Bright/light brown or tan with dark greens mixed throughout

- Shades of yellow and light green with pops of blue here and there depending on your reference photo
- Blues and browns mixed together
- Shades of green, yellow, and red for a fall feel

- Vibrant oranges with little pops of blue in between
How to Mix Green Color for Grass
Mixing green is simple! There are generally three shades of green that you’ll want to use when painting grass.
- Dark Green. Use this color for the majority of your areas where grass will be seen in large patches or as a ground cover throughout your picture. This shade should really pop out and give great contrast against other colors within your work.
- Light Green. The second shade which can be mixed from either dark green or yellow paint, use this color sparingly on top of darker greens only if necessary because it’s pretty bright by itself depending on how much you mix with it. If so desired, try using light green over some parts of the darkest shade instead to create more variation in your painting!
- Yellow. This is the third and final shade which should be mixed from either dark green or light green. Only mix a little bit of this color into your mixture because it can become very bright over time depending on how much you use. If necessary, experiment with different shades until you find a perfect one that will suit your needs for creating realistic grass in your paintings!

Read more about blending acrylic paint in our Detailed Beginner’s Guide.
Composition
As with all paintings, it’s important to know how the elements in your piece will interact and where they’ll be placed.
The grass is flat by nature so make sure that when you’re placing a patch of grass or blades within a certain area that there isn’t too much going on around them which would distract from their appearance.
You can utilize your painting’s composition in order to convey a story or mood.
For instance, if you want the grass to seem as though it is blowing in the wind then try having some parts of it curl upward! This will give off the illusion that your vegetation is being blown by gusts of air coming from one specific direction which ties into what you may have wanted your picture to be about.

Things You’ll Need
Be sure to have all of your supplies ready! Painting is a fun and fast process so it’s important not to miss any part because you’ll want to know how to paint grass in watercolor or acrylics without interruption if possible!
Paper or Canvas
Choose canvas or paper if you’d like to paint grass in acrylic or watercolors. Oils can be painted onto most surfaces including wood!
Reference Photos
Having a reference photo will help produce your painting. Take as many reference photos as you’d like. These can be used to paint grass in realistic or abstract ways.
However, don’t let the image restrict how you approach this subject matter! Instead, use it as a guide and create something uniquely yours by adding in personal touches you feel improve the overall picture!
Paints
There are a few different mediums that can help achieve the look of realistic grass: oil, watercolor, or acrylic.

Acrylics
This is a great medium for beginners or those who want to paint grass quickly since it dries so fast! There are many colors available as well which makes these an appealing choice if you’re looking for bright hues in your painting.
Acrylic paint’s formula has been improved over time making brighter hues ideal for grass especially if using acrylic paints! This can produce very vibrant pieces due to their fast drying times so make sure each section dries before adding to your painting!
Watercolors
These tend to be very vibrant yet transparent due to their water-based formula. They also dry much faster than oil paintings, but they don’t offer as much depth as oils do as acrylics do.
Watercolors offer no smell which makes them ideal for younger artists who may not like painting with smelly paints such as oils and acrylics!
Oil Paints
The slow drying time of this type of paint will help create more layers and color intensity with each stroke! Oils work best on canvas or wood surfaces.
Oil paintings will give a smooth finish and great color depth, but they take longer than other media because of the drying time between layers.
These paints are very complex due to the mixing involved in creating shades and hues, but this is a great medium for those who want to take their time.
Don’t know what to choose: oil or acrylics? We compared both mediums in this article.
Brushes
Brush type can vary based on your goals for the painting.

If you’re going for a smooth finish then use oil brushes or just regular watercolor brushes that have been cleaned thoroughly after each session of painting.
For acrylics, choose synthetic bristles if possible because they hold more color than natural hairs which will cause streaking throughout the finished product.
Watercolor brushes are also good choices due to their softness which makes them easy to blend with colors together smoothly without harsh lines appearing in the final piece! However, keep in mind these types of brushes may be harder to clean than oil brushes.
Be sure to choose a brush that won’t damage your painting when you’re applying paint! This is why it’s advisable for beginners to use softer types of bristles that are able to bend and move with the surface without damaging or marking up the paper.
If you have hard and sturdy bristles, they can cause unwanted creasing in your work if pressed too firmly into a certain area.
Other Tools
There are many tools that can be used to create grass texture! Check out these suggestions below which will help you approach this subject matter in many different ways while achieving your goals!
- Palette Knives. If you’re looking for realism when it comes to how foliage such as leaves appears on trees then palette knives can be used as an alternative way of applying paint onto paper instead of using traditional, round brushes as most artists do! For instance, try using different shapes such as triangles and rectangles which mimic the look of real leaves.
- Toothbrushes. Artists use toothbrush bristles for painting fine lines and details on their paintings – you’ll want some with soft bristles if possible.
- Sponges. These can be attached directly onto the end of brushes for interesting effects like spattering or blurring colors together!
Painting Grass and Foliage: Techniques for Capturing Foreground Detail in Your Paintings
There are several ways to approach grass and foliage in your paintings depending on the outcome you desire. In this post I’m sharing one of the more simple ways one could approach grass and foreground details that produces impressive results.
At first glance, painting something like this may seem like a lot of tedious work and careful planning. However I must say that achieving this type of detail in my foregrounds is one of the more relaxing parts of the process. In fact I don’t plan any of the specifics out before I begin and tend to go with the flow. The beauty of painting grasses and ground litter like this is as long as you capture the general lighting/color as a whole, you don’t need to worry about the tiny specifics. Grass can grow any way it pleases and the ground can change from as little as the wind. So keep that in mind and keep your thoughts loose along with your brushwork.
The first thing to do is to cover the entire area you’re working using a wider brush. I block in the area with a few of the more common colors.
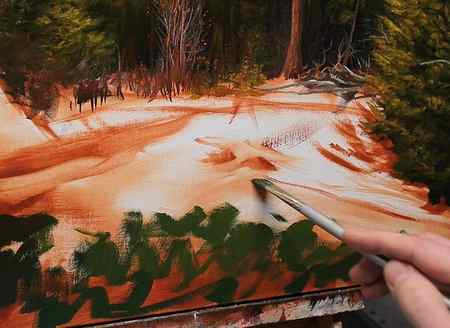
I like to add a little bit of rough detail but I keep it to a minimum. At this stage I typically stick with the angled flat brush and focus on nothing more than covering the canvas.
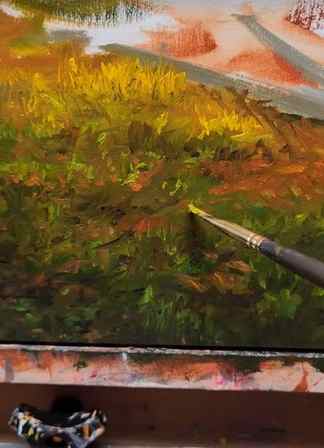
Once covered in general shapes and colors, I then switch to a detail brush like this dagger and I load it heavier with a nice roll of paint.
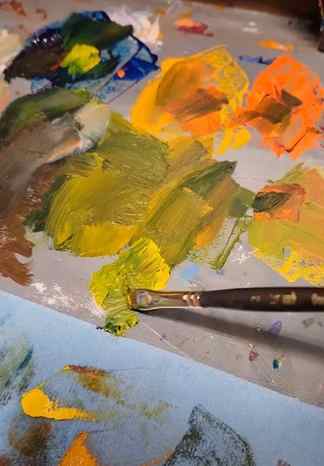
I dance and twirl the brush around letting the paint melt off the brush onto the canvas. I want many small natural patterns and to achieve that I delicately flutter the brush in all sorts of different ways with different brush strokes.
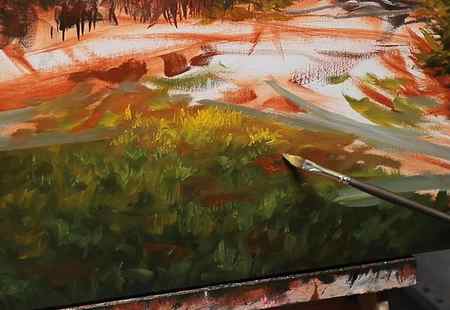
Depending on the angle, the pressure, the paint load, and the part of the brush that contacts the canvas surface, it produces different patterns or textures. This is typically a small trial and error type of process where I’m not shy to add lots of paint and I’m willing to change directions and try different colors. Eventually I’ll hit my stride and develop a procedure that produces the results I’m looking for. Patience is important here with all the small brushstrokes.

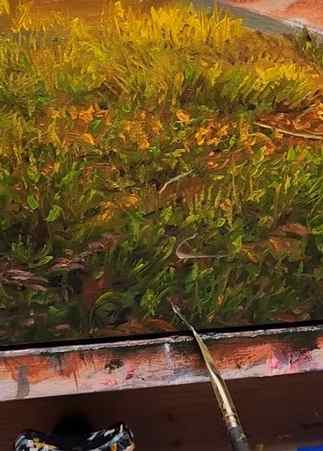
I switch colors often until it starts to exhibit this complex pattern of ground litter and foliage. I prefer using a brush like this over say a fan brush because I feel like with patience it produces a more natural organic feel. I like to use oils with liquin impasto medium as the medium helps me layer colors on top of each other without blending together and becoming mud.
I remain focused on where the light is and where the shadows fall as that becomes most important to the painting overall. The small details are just there to please the viewer upon closer inspection. So I cannot stress the need to step back often and assess the area as a whole. Getting caught up in pointless details can steer you in the wrong direction, away from the goal. I prefer to bounce around, adding little by little, at this point so that I get enough important details without overdoing it and becoming bogged down in a single area.
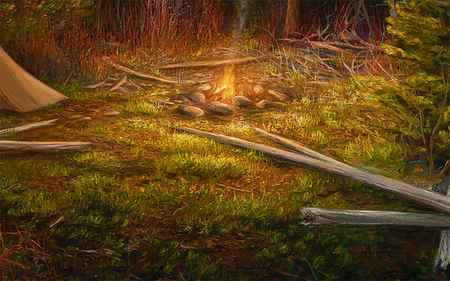
At the very end when I feel there is enough texture, I’ll roll on some blades of grass that are larger with thicker paint, add a few sticks and twigs where I see fit. This gives the viewer a few distractions to keep their eyes moving.
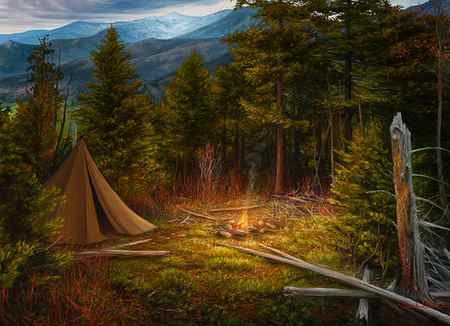
The foreground is looking lively and realistic and now I’m ready for the tent and campfire which came next. I cover how I painted the fire in this blog post.
I spent some time poking at this whole area of the painting to crisp up some edges and add the finer details of the blades of grass where I saw fit. I used a lot of the tip of the brush to delicately add these details and clean up certain areas. Remember that most of what is done beyond this point should be done with caution so that it doesn’t become overworked.
I made a short instructional video that you can watch on my YouTube channel of this entire process:
I hope that you find this bit of information helpful in your art and that it makes things like grass a little less intimidating. Thanks for reading and happy painting.
My complete list of art and studio supplies I use
Grow Your Painting Skills and Resources
Instant access to 1000s of royalty-free reference photos of landscapes and wildlife as well as step by step oil painting videos. Checkout My Memberships for more info.
I’m Chuck Black, landscape and wildlife artist based in Southwest Montana.
Explore More

A Deep Dive into Realism in Landscape Painting: What It Is and How to Master It

The History of Oil Paint: From Crushed Berries to Modern Paint Tubes

The Language of Birds: How Understanding Bird Calls Enhances Your Outdoor Experience
Back to The Painter’s Block
Note: By purchasing through these links, you’re supporting our site at no extra cost to you.
© 2023 Wildlife and Art LLC,
Chuck Black
Subscribe to my newsletter for a chance to win a print each month


