Chien Chung-Wei: Spontaneous Watercolor
One Stroke Flowers: How to Create Beautiful Nail Art Flower Decorations With One Stroke Painting Technique? : [Step-By-Step Nail Art Guide With Pictures]
Would you like to create one stroke flower nail art decorations?
In this nail art book, I am going to show you how to execute the One Stroke painting technique and create stunning flower decorations. For the sake of this tutorial, we work on natural nails, not on gel nails. But you can use the One Stroke technique in gel nails. However, in this book I’ll show you what you have to do differently in order to successfully create One Stroke flowers on gel nails and what you have to do in order to create One Stroke flowers on natural nails.
Moreover, you’ll learn the complexity of the technique and no matter what colors you choose, you can ultimately create beautiful, detailed, and in depth flower nail art decorations.
Filled with step-by-step colorful pictures, I’ll guide you through the process until you get it done properly.
One Stroke painting technique originates from Donna Dewberry, developed during the 1980s. She was very passionate artist and wanted to remove any intimidations when it comes to enabling anyone with a desire to paint to succeed. However, when Donna was developing this technique, she mostly used One Stroke to create lush flowers and landscapes on canvas. Doing One Stroke on nails in a bit more difficult due to the little space you have to work and the smaller scale of executing the technique and actually designing the flowers. So it takes a bit of practice.
If you follow my instructions closely, you can create amazing One Stroke flower decorations fast, like the one you see on the cover of this book.
Grab your copy now!
Избранные страницы
Tanya Angelova has been featured on NAILS Magazine in both 2012 and 2016. She has been working in the nail art industry since 2007. Tanya is dedicated to help others succeed in the industry and why not this to be you. In fact, she has started working and educating 1:1 motivated candidates to become professionals in the area of nail art. Most of her graduates became professionals and opened their own nail salons.
True success comes with a lot of determination, hard work, dedication and cultivating good relationships.
Success leaves clues,
Tanya Angelova
Founder of ImproveNailDesign.com
Jean Pederson: Acrylic Painting – Mixed Media Flowers

$41.97
Video Length: 1 Hour 25 Minutes
Category: Acrylic, Art, Flowers, Mixed Media
- Demonstrations of acrylic paint, gels, pastel, pencil and more
- Step-by-step instructions for creating flower compositions
- Outline of creation process to create the most developed piece of work
Customer Reviews
Based on 1 review Write a review

John MacDonald: Creating Dynamic Landscapes
John MacDonald: Creating Dynamic Landscapes
from $151.97
John Pototschnik: Unlimited Color with a Limited Palette – DVD/Book Combo
John Pototschnik: Unlimited Color with a Limited Palette – DVD/Book Combo
from $223.97

Chien Chung-Wei: Spontaneous Watercolor
Chien Chung-Wei: Spontaneous Watercolor
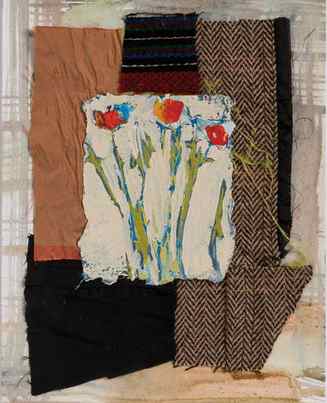
Skin Deep: Creating Abstract Paint-Skin Flowers, by Staci Swider
One of the highlights of my studio workday is when my son, Declan Konesky, also an artist, comes to visit, and we bounce ideas around. It was during one of these visits that these paint-skin flowers were born.
I had cleaned a palette of some dried acrylic paint, and the dried paint pieces were lying on a table. Declan decided they looked like flowers. After laying the irregular shapes onto another painting I had in process, it was clear that the flowers needed stems. But not just any stems; the stems needed to be as irregular and organic as the flowers. That’s when we tried painting with some pine needles (pine straw) from the garden. The pine needles created just the right line thickness and the perfect amount of quirkiness. I added a textile scrap to the painting for texture and to anchor the composition, and boom! I never tire of lifting dried paint from my palette and seeing the interesting color combinations that will become flowers.

Materials
- Freezer paper, or non-stick craft mat (I used Reynolds ® Freezer Paper.)
- Masking tape
- Golden ® Artist Colors Fluid Acrylic paint, assorted colors, including dark and light green
- Palette knife or cardboard scrap
- Flexible glue, such as Aleene’s ® Tacky Glue ®
- Watercolor paper or other heavy paper with surface texture
- Plastic or paper plate to use as a palette
- Pine needles or a small twig approximately ¼” x 5″
- Scraps of textured colored fabrics, such as jacquard, corduroy, tapestry, etc.
- Paintbrushes
- Plaster gauze, 1 roll 4″ wide (I used CraftWrap™.)
- Scissors or craft knife
- Empty cardboard box, sized to accommodate the artwork (I used a 4¾” x 6¾” macaroni box, but the top or bottom of a gift box would also work.)
- Water
- Foam core or corrugated cardboard scraps, slightly smaller than your artwork
- Optional:
- Heat gun
Make the flowers
Whenever possible, I like to use the paint that’s dried on my palette, but sometimes you just don’t have enough, or the colors aren’t quite right. Here’s how to make paint skins from scratch.
1. Place a piece of freezer paper, shiny-side up, on your work surface, and tape it in place.
2. Squeeze several colors of acrylic paint onto the freezer paper, and smear them around with a palette knife or cardboard scrap. Place the colors next to each other on the freezer paper, allowing the paints to mix and combine, and leaving some small areas without paint. Don’t be afraid to use unusual colors; the crazier the better. Let set for approximately 30 minutes.
3. After the paint has had a chance to dry a little (it doesn’t have to be completely dry), add another layer of paint over the top of the first layer, making sure to cover the entire surface—no un-painted areas this time. Allow to dry overnight.
TIP: If you’re in a hurry, use a heat gun to speed up the drying time. Just be careful using the heat gun near paper, as the paper can be scorched.
4. Carefully peel the paint off the freezer paper. Turn the paint chips over to reveal the shiny underside. This will become the blossom. Tear the peeled paint into shapes to form flower heads. (FIGURE 1) Experiment with layering the skins, one piece over another, to add further dimension and interest to the flowers. If layering, use glue to attach the layers. Set the flowers aside.

Create the painting
1. Tear a small piece of paper to size for the painting. Tearing creates a nice deckled edge. I used a 4″ x 6″ piece of watercolor paper.
TIP: If the paper you’ve chosen is lightweight, glue a couple of pieces together. You don’t want the paper to sag under its own weight.
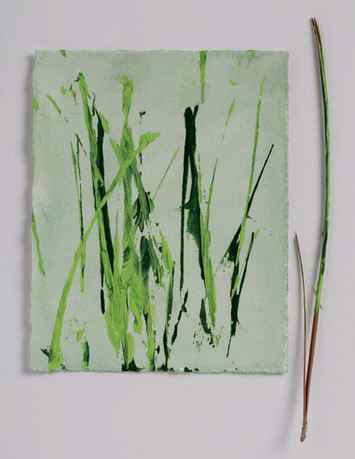
2. Pour some dark green paint onto a plastic plate. Holding the pine needles at the joint where the needles come together, dip them into the paint, making sure to cover most of the length of the needles. Lay the needles onto the paper to create a few random stem lines. Repeat this process two or more times across the paper. Alternatively, dip the side of a small, thin twig into green paint, and use it as a stamp to create the lines.
3. Repeat step 2 with a lighter green paint, allowing the 2 shades of green to mix during the printing process. (FIGURE 2) Some of the lines will read as stems and some will read as leaves.
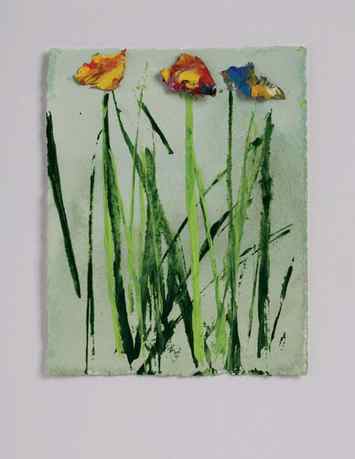
4. Attach the flower heads at the top of the green stems with glue. (FIGURE 3)
5. Glue a small strip, or layer several strips, of fabric at the bottom of the painting. (FIGURE 4) Alternatively, lay a few fabric pieces on a painted background, and then lay the flower painting on top. (FIGURE 5) Heavy tapestries in rich dark colors are great for this, as are tweeds and old suiting fabrics.
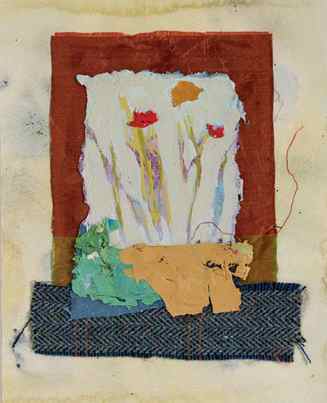
6. Optional: Paint a color between and around the flowers and stems to fill in the spaces. (FIGURES 4 AND 5) Adding paint after printing gives the painting depth and interest. Some of the background will peek out around the flowers and stems. If you wish to have a cleaner image, paint the background before printing the stems. For the paintings in figures 2 and 3, I painted the background a very light neutral color for maximum contrast to the stems and flowers.
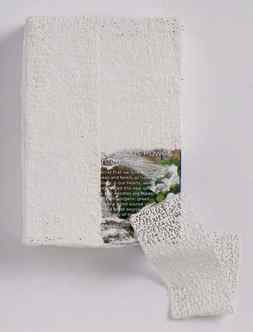
Build the shadow box
1. Cut several pieces of plaster gauze into 6″ lengths (approximately) and set them aside. Make sure to keep the strips dry until you are ready to use them. Water activates the plaster in the gauze.
2. If necessary, remove one side of the cardboard box, using a craft knife or scissors. I removed the front of a macaroni-and-cheese box. Place the box bottom-side up on your work surface.
3. Dip a gauze strip into the water, and allow the excess water to drip off. Starting on the bottom of the box, carefully place a strip of wet gauze across the box and smooth it out with your fingers. The gauze is very limp when wet; keep it as flat as possible when handling it. Using your fingers, rub the plaster into the open areas of the gauze. This not only creates a smoother surface, it also makes the gauze stronger. Continue laying wet gauze onto the box (FIGURE 6) until the back and all of the sides are covered.
4. Turn the box over and add gauze strips to the inside, continuing until the entire box is covered. Smooth all of the lumps and bumps from the strips with your fingers. Allow the plaster to dry overnight.
5. Using colors that complement the flowers, paint the box, inside and out, with acrylic paint. Build up thin layers of color, creating beautiful depth and texture. Try using a darker shade on the outside of the box and a lighter color on the inside, or vice versa, for added interest. (SEE OPENING IMAGE.) Set the box aside to dry.
Finishing
1. Cut a piece of foam core or corrugated cardboard (or a few pieces if desired) slightly smaller than the painting.
2. Glue the foam core piece(s) to the center back of the painting, allowing the ragged edges of the painting to extend beyond the backing piece.
3. Add glue to the back of the backing piece, and glue the floral artwork centered on the back of the shadow box. (SEE OPENING IMAGE.)
Staci Swider’s work reinterprets the patterns and textures found in function-driven objects, such as quilts and baskets, as dreamscape imagery that straddles the line between figurative and abstract. Her work has been exhibited at the Morris Museum of Art as well as many galleries across the Southeast. Staci’s book, Acrylic Expressions, and her four instructional painting videos are available at interweave.com. Visit her online at staciswider.com.
For more from Staci Swider, don’t miss her tips for escaping a creative rut or her great products featured below:


