Did you make this project? Share it with us!
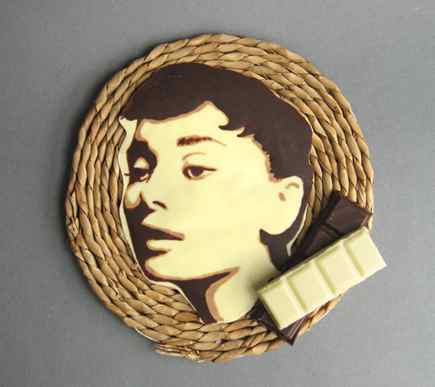
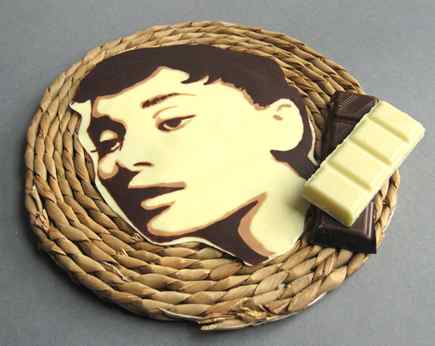
Painting With Chocolate.


Painting with chocolate is pretty much like painting on a canvas, is easer because you dont need much more talent than tracing and i little bit of patience.
Unlike painting on a canvas painting with chocolate allows you to trace your drawing and is like painting with numbers.
You can do this with anything and you can use it as cake toppers or just as is, they are so beautiful that everyone is going to be amazed
Add Tip Ask Question Comment Download
Step 1: Materials and Tools
Materials:
Chocolate on bars or melts
Ziploc bags
Wax paper
Small painting brush
Toothpick
A photo or a drawing
Tools:
A container to hold hot water.
Add Tip Ask Question Comment Download
Step 2: Get You Art Ready
Get a piece of wax paper that covers you entire picture.
tape down the picture and the wax paper to you working area to make sure it does not move once you star tracing.
Add Tip Ask Question Comment Download
Approaches to painting on chocolate
Today’s post will introduce you to a simple chocolate painting technique that yields amazing results. Don’t worry, it doesn’t require special equipment or outstanding drawing skills. You can choose any motif you want, be it pictures of friends and family, handwriting, your kid’s favourite cartoon character, an elegant pattern, a company logo or the movie star you have a crush on – almost anything can be turned into an accurate chocolate picture with this easy method. You can use it as a neat cake decoration, or serve it on a plate together with dessert.
I was thrilled when I discovered this technique on Yurin’s Obentou Blog (*3兄妹ママのお弁当ブログ*). It’s a Japanese blog that centers around kyaraben. Go have a look at it! It doesn’t matter if you can’t understand Japanese, because looking at the pictures is satisfying enough.
Basically, I will be explaining Yurin’s method here, but since I’m not using the the same material and I’ve chosen a different kind of motif I adjusted the method plus I added some personal tips.
How to make a Chocolate Painting
- a picture subject.
- dark and white chocolate. I used regular block chocolate, the dark one had 72% cocoa content. Note that Yurin is using so called sign choco. Apparently, that’s chocolate sold in Japan for decoration purposes. It has quick drying properties, comes in a pen-shaped tube and there are different colours available. But really, regular chocolate works fine too.
- optional: food colouring. I tried regular liquid food colouring once and it resulted in a rather bad chocolate texture. I guess it’s better if you work with liposoluble food colouring or powder alternatives. I mixed white chocolate with matcha green tea powder once and it turned out well. Please tell me if you know of any other methods to colour white chocolate naturally.
- a piece or cardboard or a tray
- parchment paper
- small plastic bags
- a bamboo skewer or a toothpick

Original Picture

Altered Picture
A few last words: The chocolate has a rather soft texture when at room temperature and melts as soon as you touch it. That can be a desirable state if you’re using the chocolate picture as a cake frosting for example. If you’re aiming for a chocolate picture with a very shiny surface that snaps, you have to put in some extra effort when heating the chocolate. Research chocolate tempering if you’re interested.
Have fun with this cool technique! And please let me know if you have additional tips! 😀

Posted in Black & White, Decoration, Dessert, Gift Ideas | Tags: chocolate
Finally color! I love color! With all of the products and techniques available to color cake related items, I wanted to run through the gamut and see which ones work best with modeling chocolate (MC) and its unique set of properties. Certain methods work well for a specific type of decorating and not for others; some colorants confer altered textures or consistencies. Here I will share with you my insights for picking the right coloring method for your project.

I wanted to try a wide variety of products for coloring to get a feel for many of the possibilities available so I used everything from grocery store liquid food color to petal and luster dust. Some of the options may seem redundant but I wanted to try some of the colorants in a variety of ways to see if there was an advantage or disadvantage to doing it a certain way. I am going to list them all so that you have a complete picture and understanding of the choices.
For all of the examples I started with white modeling chocolate to have a true sense of each colorants ability to color but starting with a MC made from a basic colored coating or candy melt can be a great option as well.
I divided the coloring into three categories.
- Pre-coloring: mixing before the modeling chocolate is made by adding color to either the melted chocolate or the corn syrup.
- Mid-coloring: mixing color throughout the made modeling chocolate.
- Post-coloring: Applying color to the surface of the modeling chocolate.
Let’s start with Pre-coloring techniques!

Pre-coloring is probably the easiest way to color modeling chocolate. The color easily swirls into your liquid of choice and then all you have to do is mix up your modeling chocolate as usual. The downside is that you end up with one full batch of a certain color and sometimes it is difficult to determine what color your final product will be until it is made in full. For this reason, I recommend pre-coloring when you are going to use a large quantitiy of one color of modeling chocolate and if you have an idea of the intensity your food color will impart. The following is a list of ways to pre-color MC.


1. Liquid or gel into corn syrup. In this first method gel or even inexpensive liquid food coloring is added to your measurement of corn syrup or liquid glucose, mixed up and the stirred into melted chocolate or candy melts. Here I added 2 drops of liquid food coloring (which spread across the surface of the corn syrup). I did not notice any change in the texture of the modeling chocolate.


2. Candy coloring into candy melts or chocolate. Oil based candy food coloring is stirred into the melted chocolate or candy melts and then blended with the corn syrup. This created a lovely silky final product but since I added so much coloring (oops, slip of the hand!) it was a little softer than that made with other colorings. I recommend making a firmer than usual MC if you plan to use candy coloring.


3.Gel coloring into candy melts or chocolate. Gel coloring is dropped into melted candy melts or chocolate and stirred before corn syrup is blended in. I don’t recommend this method. The melts seize before the corn syrup is stirred in. You can still make a modeling chocolate via this method but the MC is disjointed, losing all of its stretch (you can see the crackles in the MC if you look closely). It also cools very firm and is crumbly when returned to. If for some reason you feel the need to do this, add extra corn syrup to keep in smooth and together.


4. Powdered food coloring into melted candy melts. A small scoop of powdered food coloring was added to melted melts and stirred in before mixing with the corn syrup. Using this method the powder did not dissolve completely leaving speckles in the final product even after it was kneaded. Perhaps if you are making robin’s eggs this would be desirable but for uniform color another method is advisable. If you choose to use powdered colors I suggest dissolving it in vodka or lemon extract and then adding it to the corn syrup if you wish to color in the pre-mixed phase.

Next we will move on to the Mid-coloring methods. These methods are the most practical and applicable for every day needs. They allow you to color from a small amount to a large amount of modeling chocolate and enable you to adjust the colors easily as you go. They also provide uniform coloring for nice solid color applications.


5. Candy color into MC. Candy food coloring is blended into the mixed modeling chocolate. The candy colors give nice smooth saturated colors but they do soften the modeling chocolate a bit so it is best to start with a firm MC recipe if using the candy colors.


6. Gel color into MC. Gel color blends into the MC nicely and in moderate amounts does not affect the texture of the modeling chocolate greatly. This is probably the best general method for coloring modeling chocolate.


7. Gel color plus cornstarch into MC. If you need to achieve a very saturated color that requires the addition of quite a lot of gel color, the addition of cornstarch can help maintain the texture of the modeling chocolate by absorbing some of the moisture from the food color. The addition of cornstarch does dry the MC some and it may require an extra bit of working or a touch of shortening after storage.


8. Liquid color into MC. Basic grocery store liquid food coloring is kneaded into modeling chocolate. This is probably the method that surprised me the most. I expected the liquid to cause the MC to break, but it didn’t. It actually worked very well and generated a nice bold color. This is a great option if this is the type of food coloring you have on hand or need to buy some in the wee hours of the morning at your local market. If you are going to add large amounts you may need to add some cornstarch to counter act the softening effects of the liquid.


9. Petal dust into MC. For this I scooped a small amount of petal dust onto the MC and kneaded it in. It didn’t work as well as some of the other methods as far as blending and saturation is concerned but I feel like this is a good option if you are coloring a base that is later going to be dusted with the same color petal dust. Such as for flower petals or other items to be shaded in gradient.


10. Coloring with colored MC. Use already made solid colors of modeling chocolate to blend or tint your base color. This is a nice option because you will not affect texture at all and you will have a fairly good idea of the direction you are going with the colors you are trying to achieve. I like to have brown or chocolate MC on hand to mute and soften my modeling chocolate colors as well. If you have a basic rainbow of modeling chocolate colors on hand you can blend at whim to achieve any color.


11. Coloring with colored fondant. A small amount of commercial colored fondant is used to color the MC. If you are working with a colored fondant sometimes it is advantageous to color your modeling chocolate with the fondant to reach a complimentary shade. This works well if you keep your fondant to around 25%. Much more than that and you will lose some of the lovely characteristics of MC and it will start to act more like fondant.


12. Coloring fondant with gels and adding to MC. Gel color is added to a small amount of fondant which is then added to the modeling chocolate. Adding gel to fondant first serves two purposes. First, it offsets some of the effects of the adding excess liquid to modeling chocolate. Be sure your fondant is firm or add extra cornstarch before you start. Second, it enables you to create a hypersaturated target color that you can then blend with the MC. This reduces the risk of color overshooting by directly adding color to your final product. Once again, it is advisable to add only 25% fondant to your modeling chocolate.


13. Coloring fondant with candy color and adding to MC. Candy color is added to fondant and then added to the MC. The reasoning is the same as above with a similar result. Once again the candy color has a slight softening effect so start with firm modeling chocolate or add a touch of cornstarch.

Here are the Post-coloring effects. These methods are best used for artistic touches such as dusting petals, painting details or accentuating texture.

14. Dusting with petal dust. Dust on a layer of petal dust over a rolled out, cut or shaped decoration. This method works well for solid color effects as well as gradients and soft shading. The oils in MC adhere well to the petal dust for both dramatic and subtle coloring. For strong color effects use freshly shaped MC which has oils on the surface.

15. Dusting with luster dust. Luster dust works similarly well with MC as petal dust but the color saturation is not as strong due to the translucence of the shimmer particles. For solid color shimmer pieces, color the modeling chocolate first and then dust with a complimentary shade of luster dust.

16. Painting with petal dust and lemon extract. Mix a small amount of petal dust with lemon extract and paint onto a cut or shaped piece of modeling chocolate. I feel that dusting gives a smoother effect. I had some slight clumping when painting, but this is also an option and gives very solid saturation.

17. Painting with gel color. Apply gel color directly to the modeling chocolate with a paint brush. It beads up initially but as you stroke across the surface repeatedly it starts to set. This might be advantageous for accentuating texture such as wood grain. You could paint the color on and wipe off the beaded gel from the raised points before it is absorbed into the MC.

18. Painting with candy color. Brush candy color across the surface of the MC with a paint brush. Candy color smoothly coats the surface of the modeling chocolate. Some brush strokes are slightly noticeable but this might be desirable if you are going for an artistic painted look.

19. Sponging with gel color. Using a cosmetic sponge and a binder clip, dip into a small amount of gel and tamp to absorb (see Coloring Wafer Paper). Then sponge onto the MC for solid color or shading effects. This technique avoids the beading up associated with painting the gel on. The gel color seems to soften the modeling chocolate slightly.

20. Sponging with candy color. As above, load a cosmetic sponge with a small amount of candy color and sponge onto modeling chocolate. This gives a lovely solid finish, or you can sponge a blend of colors or achieve a gradient of color. This technique would work well on petals. The surface dries well after a few hours and does not soften the MC pieces.

21. Coloring with food safe markers. Color on a set piece of modeling chocolate with food safe markers. Allow your modeling chocolate to dry for a few hours before using this coloring method. You will not achieve solid coloring but it can be used to add small details or achieve a coloring book look. This may also work for adding wood grain texture or grass effects.

22. Spraying with food color spray. Can spray coloring can be used to lightly mist modeling chocolate that has been set to dry for a few hours (left). If you mist too heavily it will bead up (see right). This technique could be useful to accent texture or shade organic looking pieces. A similar effect could possibly be achieved using an airbrush but I did not explore this technique.
Phew! There they all are! I apologize for the longest post ever, but I wanted to provide as much information as possible. This is also the end of my current series on modeling chocolate. I hope this helps you on your way to many modeling chocolate adventures!


