So the “gist” of this is, more layers means more dimension. You can stop if you’d like!
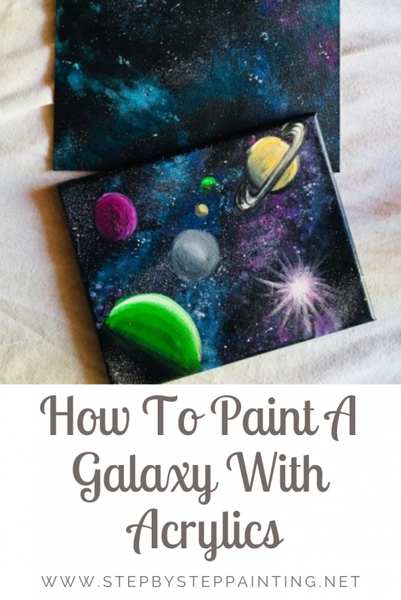
How To Paint A Galaxy With Acrylics

Learn how to create your very own galaxy painting with acrylics!
This step by step painting tutorial will guide you through the process and techniques of rendering the entire galaxy on any size canvas or surface!
There are two parts to this tutorial. Part one is how to paint the galaxy background.
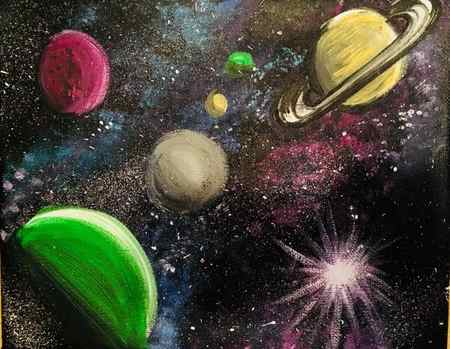
Part two is how to paint the planets after you have done the galaxy painting.

I used a sponge for 80% of this galaxy painting. The sponge helps to create the blurred effect you see with the colored paint.

I also did this on an 11 x 14 canvas and an 8 x 10 canvas. As stated above, you can do this on any size.
Enjoy this tutorial! Happy painting artists!
My Other Galaxy Painting Tutorials:


Yield: Any Size Canvas
How To Paint Galaxy Space With Acrylics

This tutorial will show you how to do the sponge painting technique to render an acrylic galaxy painting.
Active Time 1 hour
Total Time 1 hour
Difficulty Easy, Medium
What Colors Make a Galaxy?
One of the first question you might have is what colors should you use in a galaxy?
Black is the first color that comes to mind when you think of galaxies or space. But galaxies also contain some vibrant clouds of dust and gas which are known as nebulas. The colors in nebulas range between red, magenta, blue, teal, green and white.
Galaxy Painting Colors
- Black/Dark Blue
- White
- Magenta
- Red
- Blue
- Green
- White
Need Galaxy Night Sky Inspo?
One of the best ways to get galaxy ideas is to look at high quality pictures from professional photographers.
Using a picture as inspiration can help you add some interesting features to your own painting. This can also help you with the shapes/proportions and even colors of your painting!
The picture I chose for inspiration is this picture of the Milky Way taken by Denis Degioanni . You can use the website Unsplash to search for more pictures.

Tips on How to Paint a Galaxy Night Sky With a Sponge
Remember I was mentioning using a simple tool to help blend your galaxy?
In this section I will go in depth on how to use your sponge to blend. For the full step-by step tutorial check out the guide at the end of this post.
Using a sponge is surprisingly easy and a great tool for beginners. Sponges will help you create foolproof and AMAZING blends without much effort. They are especially useful for beginners who might find it challenging to blend paint with a normal brush. I find using a sponge to blend paint is way easier and requires less skill than using a brush.
And it’s fun to use.
Types of Sponges For Blending
What kind of sponge works best?
You can use this type of artist sponge , which is what I used in this tutorial. But if you don’t want to spend extra $ then you can use a simple kitchen sponge (a clean one of course). They will both yield the same effect, but the artist sponge will just be more of a smoother looking blend.

Before using the sponge, you’ll use a 1 inch flat brush to put your paint down.
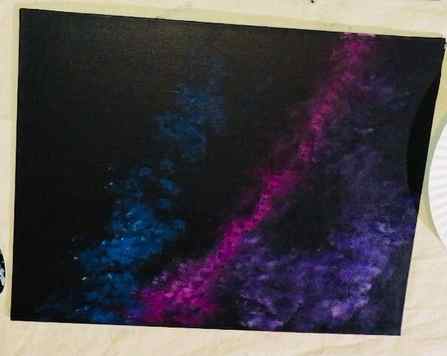
You don’t have to be perfect here (nor do you have to blend), since we will be blending with a sponge in the next step. Just have fun and get your paint on the canvas as messy as you’d like! The order of the colors are (from outside edges, inward): black, blue, purple, pink and light pink at the bottom


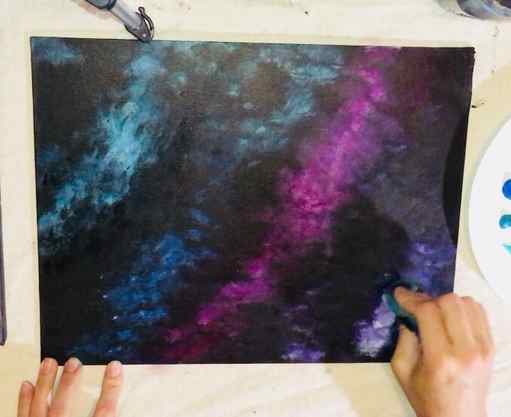
How To Blend with a Sponge
Now for some fun sponge blending work!
Using your sponge of choice, blend the borders between each color. Start with the lightest and work your way to the darkest (order below). To blend with a sponge use a light up and down dabbing motion like you’re stamping. Don’t press too hard or you’ll remove paint from the canvas.
Here is the blending order (to keep dark colors from muddying the light colors).
- Light pink with pink
- Pink with purple
- Purple with blue
- Blue with black
Try to use a clean part on your sponge for each color blend. Once the sponge no longer has clean areas, rinse it off with water.
If you don’t have a sponge, you can blend with your brush using the same order above. You can clean off your brush with each blend.

This first layer gives you the shape and color of your milky way galaxy sky. For the rest of the painting steps check out the full tutorial below.
Tips of blending with a sponge
- Work with lightest colors to darkest so you don’t darken the lightest colors.
- Use clean parts of sponge with each color blend
- Rinse sponge when all areas are covered with paint
- Blend by lightly dabbing your sponge (up and down) along border of colors
How to: Create a galaxy watercolour painting
STEP 1 – Secure your paper to your work surface with masking tape and trace your round object to draw a circle, applying minimal pressure with your pencil.

STEP 2 – Prepare your watercolour paint: blue (ultramarine blue), pink (Alizarin Crimson), light blue (cerulean blue) and purple, which you can achieve by mixing alizarin crimson and ultramarine blue in your palette.

STEP 3 – Wash the drawn circle with water, using a big brush. Then, add a few drops of Cerulean Blue to the centre of your circle.

STEP 4 – Repeat this step with your Alizarin Crimson and Ultramarine Blue, adding paint in the central area of your circle. Apply these colours away from the Cerulean Blue, allowing the paint to blend naturally on the saturated paper.

STEP 5 – Continue this process on the external area of the circle. You can add more details to your galaxy by adding a few drops of pink in this phase (we recommend Rose Madder Lake).
STEP 6 – While your paper is still wet, add white gouache to the mix, focusing on the central area where your Cerulean Blue is. After this step, let your painting dry completely.

STEP 7 – Using a small brush, splash some white gouache on your now-dry painting. Try flicking your brush with your finger! Use a paper towel to remove the splashes of gouache that landed outside the circle.
STEP 8 -Once the splashes are dry, you can draw a variety of stars on your little galaxy using white gouache or a white gel pen.

STEP 9 – On the darkest part of your artwork, paint a ¾ of a circle in white gouache. Then use a wet brush to bring the paint in, moving from the outside to the inside. Then smooth It will look like the outline of a planet!

STEP 10 – Let dry, then take off the masking tape and admire your stellar painting!

Thank you Anna for your amazing tutorial!
Did you follow this guide to make your own galaxy painting? Show us your result on Facebook, Twitter and Instagram using the hashtag #CASSART!
FEELING INSPIRED?
- See more of Anna’s watercolour illustrations on her website, or follow her on Instagram to see her latest artworks.
- Email

- Print


