Home Decor DIY Project: Fall Acrylic Painted Wood Slices
I have some holiday projects in the works but, today thought I’d share a fall craft project I hadn’t shared yet. A while ago when I was creating a few posts for Deco Art I created two fall craft paintings. I picked the one I thought would make the better tutorial for the site. I have not been painting daily until I wet my brushes the other day. It’s almost like I need two of me I’ve been so busy. Here’s the fall craft project along with how it was created and a supply list.
I’ve been meaning to share this diy fall pumpkin project but, hadn’t had time to edit the photos until now. I’m not sure when or if my other painting is up on their Deco Art site yet but, I am doing projects for them. YA! I’m part of their blogger/artist network. Honestly I have loved the last two projects (Chalk Paint & the one at the end of the post)

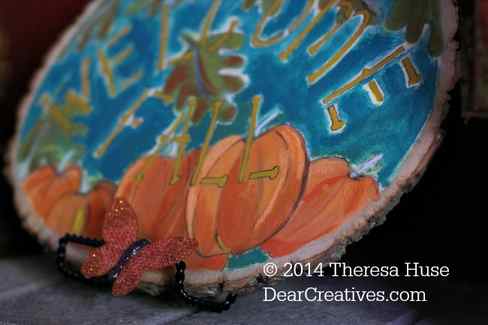
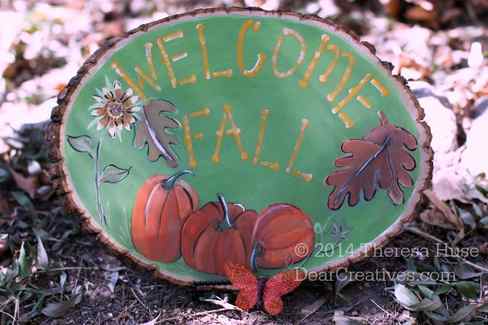
This is the one that didn’t make the cut! You know when you don’t exactly love something you’ve painted? It’s juxtaposition, balance, busyness. To me this was slightly skewed as I set out for one thing and made changes along the way.
The creative process for painting needs experimentation. At least that’s the way I create, learn and grow. Taking risks, sometimes letting things happen.
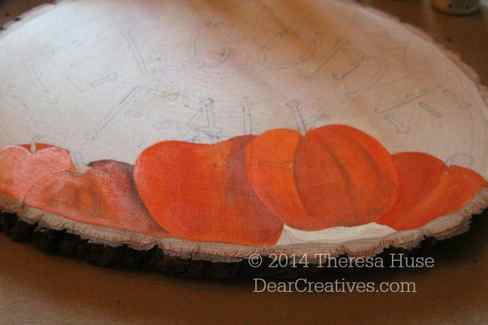
Even when you start out with a drafted plan you can get caught up in the paint, let the colors and moment carry you along. I had a feeling my sketch had too much going on but, I wanted to give it a try. You never know sometimes things workout or you work over them. In this case I just left it.
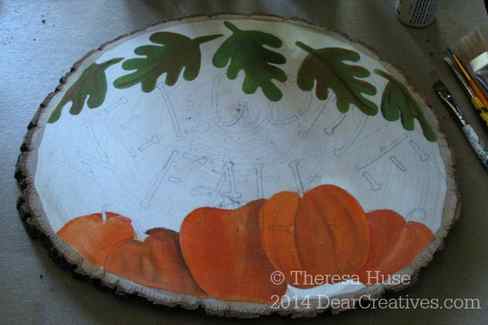
I wanted it to feel like the leaves were falling from the sky. I was planning on just giving a light wash to the background and ended up painting it. I struggled with the color being a bit too muted before (no image) with the lettering. That’s when I went for it. All or nothing with putting on the teal blue background. I left bits of the white peeking through. Added black detailing around the letters.
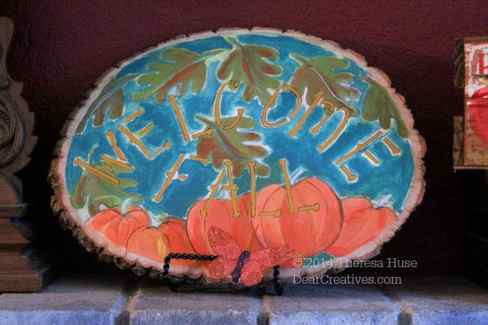
I think the main thing is there is a lot going on in the tiny area. The thing is if you aren’t close up it doesn’t feel so busy. You see lots of color, shapes and then the welcome fall. On my mantle it sits until I change things up for the holidays. I’m ok with it. It’s not my favorite piece but, there are things I like about it.
Here’s the one I made for Deco Art . When I see the tutorial over there I’ll let you know and link to it. The process for this one is different in the steps and the way it was painted and shared in that tutorial. To me they also look better in person it’s hard to have the camera pick up all the details along with true colors.
Here’s a supply list if you want to try making a holiday decor painting;
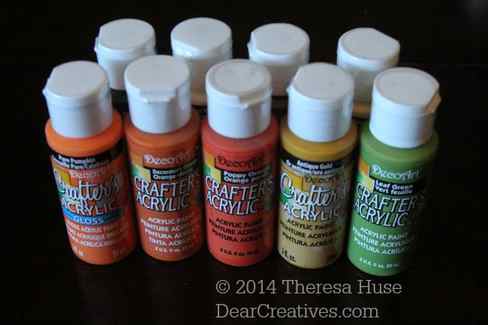
- I am totally in love with the wood rounds that I’ve been using for projects I use Walnut Hallow Basswood
- I always prime my wood crafts and many of my canvas projects with Liquitex Professional Clear Gesso Surface Prep Medium, 32-oz
it helps seal the wood so it’s not porous and which means you don’t need to use as many layers of paint. It seals the wood so it doesn’t soak in. - Paint brushes a basic set is fine such as this one that comes with a lifetime guarantee!
- 15 Piece Art Paint Brush Set & FREE Organizer – Perfect Collection of Shapes and Sizes – Acrylic, Watercolor, Oil – Even Facepainting! – The Best Set for Kids, Art Students, Amateur and Professional Artists – Lifetime Replacement Guarantee – By Montebello
- A basic lettering stencil set alphabet stencils
- I drew my own pumpkins but, you can always pick up a holiday stencil set
You can make your own by sketching first with stencils or by using a pattern of stripes or dots. I can’t wait to share what projects I have coming up next. You can always follow my autumn crafts & diy board, artsy craftsy boards or all the other Pinterest boards for more inspiration!
Do you like one over the other? Which one? Have you ever painted your own home decor signs or artwork?
Related post Woodland Animals post!
Sharing is caring!
111 shares
About Theresa Huse
Artist and Crafter, Photographer. Mom to 5 who loves to share creativity, recipes and, great finds.
#simplycreate Creative Wood Slice Art Set

The little mini paintings are completely doable, you’re just following step by step. I’m breaking down the process of the painting showing lots of techniques. it’s really easy!
There’s an incredible selection of acrylic colours, really good quality paints, acrylic pens which are lovely to use, & your brushes.
This is a really enjoyable painting; I think people will be really proud of the results.” – Jenny Muncaster
How to paint blossom on wood

Base Colours
Using the flat wash brush begin by painting approximately ¾ of the wood slice with magenta paint in an arc leaving the top free. Fill the uppermost section in with light blue and blend this into the magenta while the paint is still wet to create the sky.
TIP: First give your wood slice a thin coat of white paint before starting your picture. This acts as a primer and helps to keep your colours bright. When this is dry squeeze a little of each of the paint colours out onto your plate; magenta, light blue, ultramarine, scarlet, white and black. Have some water handy for cleaning your brush in between painting and a separate cup of water for blending the white paint from the acrylic paint marker.
Next step
Base Colours
Using the flat wash brush begin by painting approximately ¾ of the wood slice with magenta paint in an arc leaving the top free. Fill the uppermost section in with light blue and blend this into the magenta while the paint is still wet to create the sky. TIP: First give your wood slice a thin coat of white paint before starting your picture. This acts as a primer and helps to keep your colours bright. When this is dry squeeze a little of each of the paint colours out onto your plate; magenta, light blue, ultramarine, scarlet, white and black. Have some water handy for cleaning your brush in between painting and a separate cup of water for blending the white paint from the acrylic paint marker.

Painting the Mountains
Block in the mountains with the flat wash brush using light blue and ultramarine. Create about 5 or 6 mountain shapes. Use a little black to darken the tops of the nearest mountains to suggest distance.
Next step
Painting the Mountains
Block in the mountains with the flat wash brush using light blue and ultramarine. Create about 5 or 6 mountain shapes. Use a little black to darken the tops of the nearest mountains to suggest distance.

Adding The Early Morning Light
When dry use the white acrylic paint marker to outline the tops of the mountains where they meet the sky. Use the round brush dipped in a little clean water to blend the white paint from the marker pen up into the sky. This will soften it and give the effect of early morning light. Repeat this technique at the base of the mountains for clouds and mist. Add some thin washes of colour over the top for extra depth.
Next step
Adding The Early Morning Light
When dry use the white acrylic paint marker to outline the tops of the mountains where they meet the sky. Use the round brush dipped in a little clean water to blend the white paint from the marker pen up into the sky. This will soften it and give the effect of early morning light. Repeat this technique at the base of the mountains for clouds and mist. Add some thin washes of colour over the top for extra depth.

Starting The Blossom
Mix some water with the black paint enough to create a fluid consistency for painting some finer detail. Using the round brush paint a tree with branches bending across the landscape. Mix up a few separate variations of pink for the blossom, experimenting with mixing different shades of magenta with white, scarlet and a little ultramarine. Paint the blossom on the tree using the tip of the round brush to create tiny petals in various colours.
Next step
Starting The Blossom
Mix some water with the black paint enough to create a fluid consistency for painting some finer detail. Using the round brush paint a tree with branches bending across the landscape. Mix up a few separate variations of pink for the blossom, experimenting with mixing different shades of magenta with white, scarlet and a little ultramarine. Paint the blossom on the tree using the tip of the round brush to create tiny petals in various colours.

Adding Highlights
Finish the effect of the blossom by adding a few tiny dots for highlights using the white acrylic paint marker.
Next step
Adding Highlights
Finish the effect of the blossom by adding a few tiny dots for highlights using the white acrylic paint marker.
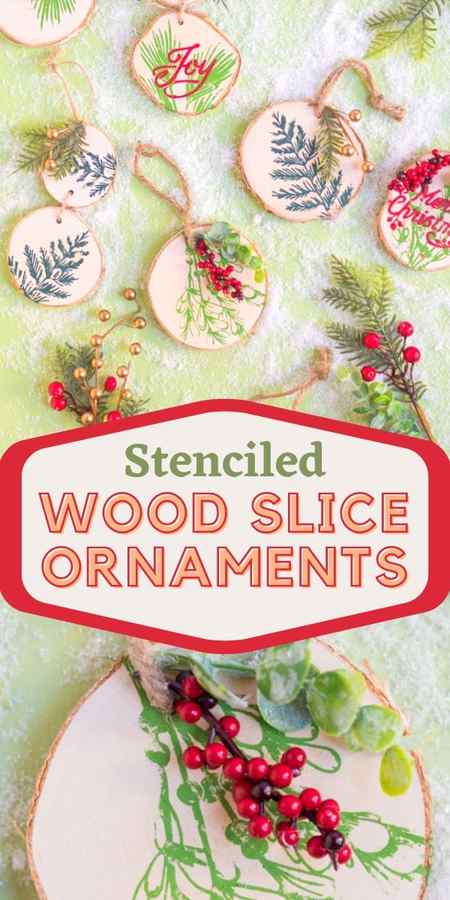
DIY Stencil Painted Wood Slice Christmas Ornaments
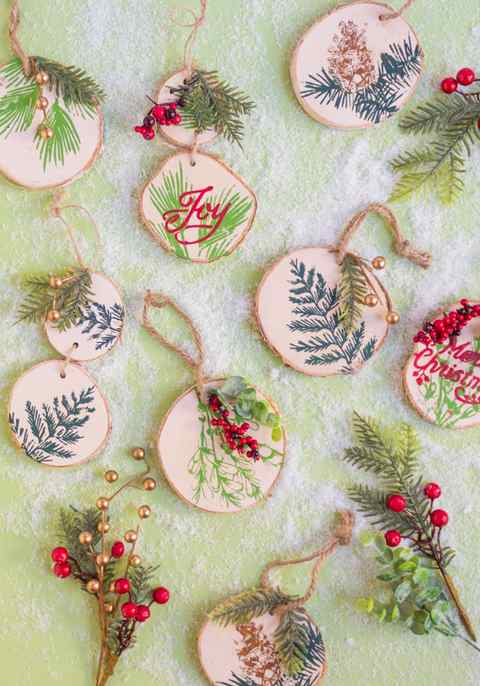
I have always wanted to do something with these birch ornaments I’ve seen at the craft store, and I am so excited how these painted wood slice ornaments turned out! I’m partnering with Martha Stewart Crafts® to show how their beautiful stencils and craft paints create amazing results for even the beginning crafter. No painting experience required! All the Martha Stewart products featured in this post are available exclusively at Michaels.
This post contains affiliate links. See our full disclosure.
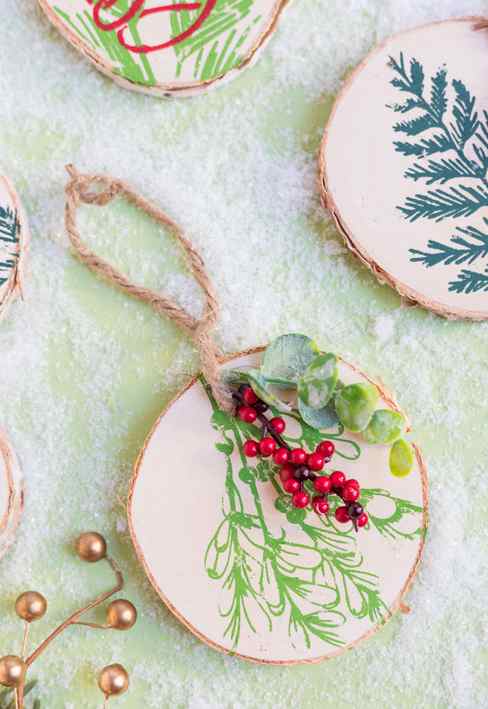
I accented the Martha Stewart Winter Green stencils with some faux winter greenery. I love the added texture and natural element it brings to the birch ornaments. Wouldn’t these make the prettiest Christmas gifts? I was able to whip up a bunch of these in an hour because the stencils make it so easy.
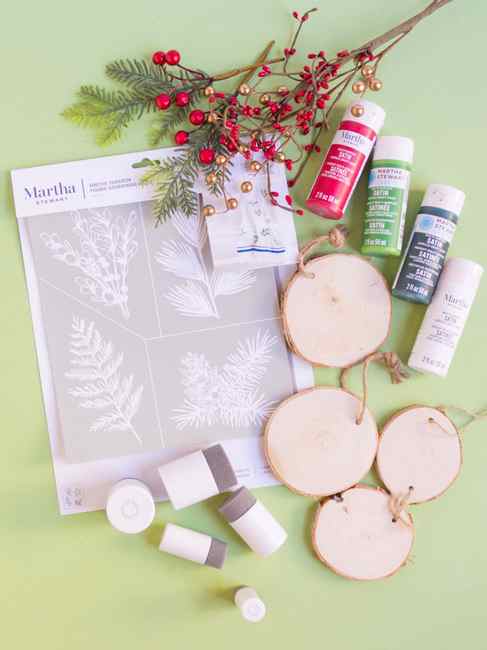
Supplies for Painted Wood Slice Ornaments
- Martha Stewart Winter Greens Silkscreen Stencil (find this Winter Greens stencil at a local Michael’s near you)
- Martha Stewart Holiday Christmas Stencil
- 4″ wood slice ornaments (find at Michael’s)
- Double wood slice ornaments (find at Michael’s)
- Martha Stewart Multi-Surface Satin Acrylic Paint
- Foam pouncers
- Faux greenery such as these red berries
- Wire cutters
- Hot glue
How to Paint Wood Slice Ornaments
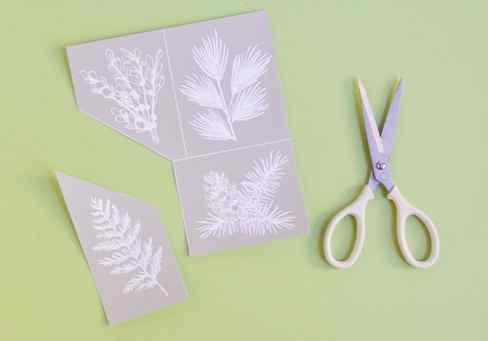
Step 1: Cut out stencils
Cut out the Winter Green silkscreen stencils with scissors.
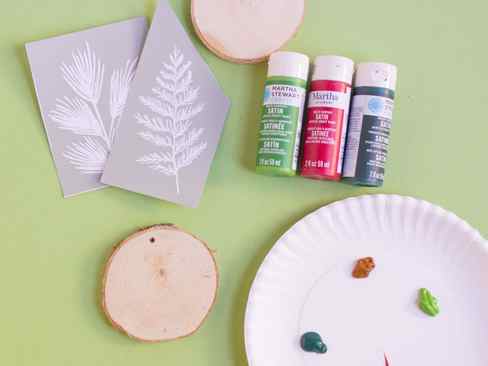
Step 2: Choose paint colors
Squeeze a small amount of each of your paint colors onto a paper plate. Remove the twine hanger from the wood slice ornament to allow a flatter surface for stenciling.
Step 3: Apply paint to stencil
Peel the backing off of the silkscreen stencil and place on top of the wood slice. The entire stencil may not fit on the slice, but position it at an angle so the main design is captured on the wood. Use a foam pouncer to apply a small amount of paint to the stencil with an up and down dabbing motion.

Step 4: Carefully remove stencil
Peel off the stencil to reveal your beautiful design! Rinse off the stencil while the paint is still wet to keep it working great.

Step 5: Add Christmas sayings
You can also layer on Christmas sayings above the greenery designs. I added a “Joy” and “Merry Christmas” stencil from this Martha Stewart Holiday Christmas Stencil pack once the greenery was dry.

Step 6: Decorate with faux greenery
Finish by adding small sprigs of faux greenery. I used wire cutters to trim them berries and greenery from the stems and added them to the top of the wood slice with a dab of hot glue.

Didn’t these turn out so pretty? I would love a tree full of these with other natural elements like pine cones. What about an old school popcorn and cranberry garland? I might just have to try that!

Like this stenciled Christmas craft idea? Then don’t miss my snowflake ornaments and stenciled gift boxes, also using Martha Stewart stencils!

This post is sponsored by Martha Stewart Crafts®. All expressed opinions and experiences are my own.


