The above information is based on research and testing done by Golden Artist Colors, Inc., and is provided as a basis for understanding the potential uses of the products mentioned. Due to the numerous variables in methods, materials and conditions of producing art, Golden Artist Colors, Inc. cannot be sure the product will be right for you. Therefore, we urge product users to test each application to ensure all individual project requirements are met. While we believe the above information is accurate, WE MAKE NO EXPRESS OR IMPLIED WARRANTIES OF MERCHANTABILITY OR FITNESS FOR A PARTICULAR PURPOSE, and we shall in no event be liable for any damages (indirect, consequential, or otherwise) that may occur as a result of a product application.
Clear Tar Gel
GOLDEN Clear Tar Gel is a 100% acrylic polymer dispersion colorless gel with an extremely resinous, syrupy, stringy, and tar-like consistency. It is a unique product with a long rheology; conceivably it could be poured from a three-story building as one long strand!
Clear Tar Gel can be used to generate fine detailed lines by “dripping” it over painting surfaces. It can be blended with all GOLDEN Acrylic paints, offering a full range of colors with which to work.
PRODUCT APPLICATION
Creating a Tar-like Consistency
The specific “feel” and consistency of Clear Tar Gel is created by the type of thickener used during the manufacturing process. This thickener gives the gel a long rheology, similar to the consistency of honey, which allows for better leveling and less brush-strokes.
Blending with GOLDEN Fluid Acrylics (10% Fluid additions or less) works well to create colors that maintain the gel’s tar-like consistency.
Use as a Medium
Mix any quantity of Gel with GOLDEN Heavy Body, Matte, Fluid, Matte Fluids or High Load Acrylic colors. Clear Tar Gel also blends easily with other GOLDEN Gels or Mediums. To thin, add water or GOLDEN Mediums. Note: Larger additions of acrylic paints and mediums will increasingly lower the stringy nature of Clear Tar Gel.
Fine lines can be laid onto a surface by simply dipping a palette knife or other tool into the Tar Gel/Paint mixture, then moving it quickly over the working surface. The line thickness can be controlled by the size of the tool and the speed with which it is moved.
Use as a Leveling Promoter:
GOLDEN Clear Tar Gel is also useful to increase an acrylic paint, gel or medium”s leveling ability. Start with additions of 5% to another acrylic product and increase as needed to achieve the desired consistency. Adding water to the Clear Tar Gel may be necessary in order to allow some mixtures to level before drying.
In thicker layers and pours, crazes can develop in the surface during drying. If wanting to minimize this risk, keep fluid applications under 1/8in thickness and completely level throughout the drying process. Refrain from using damming devices with pours, as this can encourage crazing.
Allow Mixtures to Release Foam
It is nearly impossible to avoid creating foam bubbles when mixing paints. Blends should be allowed to sit long enough for foam to rise to the surface. The length of time necessary for this process depends upon the thickness of a mixture. Generally, mixtures with Clear Tar Gel should sit for at least 24 hours to become bubble-free.
General Mixing Information
Do not mix with oils. Paint on any non-oily surface. Abrade non-absorbent surfaces for increased adhesion. GOLDEN Acrylics dry quickly and may be painted over immediately, yet complete drying will take longer. Avoid freezing. The minimum film formation temperature is 48°F/9°C. Clean tools with soap and water.
SURFACE CUSTOMIZATION
One of the best things about acrylic is how easily you can customize your work. If you can think of it, acrylic will most likely stick to it. Wood, board, masonry, metal, paper, glass, plastic – you can customize all sorts of surfaces to create a range of results. So, what are the best ways to create a bespoke surface for acrylic paint? The Liquitex range gives all sorts of options. Here’s an overview.
Some materials naturally offer more ‘grip’ for the paint to hold onto. Others – super smooth, non-porous surfaces like metal – offer less. Prepping a surface with a gesso or medium helps the color adhere and stay in place for the long term. Prepping also seals it, to keep color pure. Without sealing, some impurities (water/color) can leach through into your work causing discoloration over time.
What is a ground?
Your ground is the first base layer you paint onto the virgin surface. It’s also the term for the material used. Artists traditionally use a gesso, but you can use a range of different mediums as a ground – from fluid mediums to modeling pastes and texture mediums. We talk about a good ground adding ‘teeth’/’tooth.’
When looking at customizing your surfaces, first decide what you want to create. Then make sure your support and ground are appropriate for it. Your choice has a large effect on how the paint handles, how it dries and its long-term stability. For example, paint dries fastest on textured, absorbent surfaces. If you’re planning to do something heavy or 3D, you’ll need to lock the acrylic in with a super strong ground. Laying down a base can also shift the values of the paint you apply on top. This gives you the chance to customize, adding texture or color. A smooth white base under an opaque color will add brightness, while a deep textured black base will give dimension.
How can I prepare my surfaces using Liquitex products?
For custom grounds, the most obvious route is to use color. The color and tone of your base can affect the chromatic and tonal appearance of your paint, so choose strategically. Our professional Gesso range has a range of popular colors: titanium white, black or gray. These contain a blend of pigments to give a neutral opaque base which instantly eliminates your surface color and allows you to build. Deeper colors will give depth and white is the classic backdrop for colors to express their natural character. If you want a bespoke color, simply make your own. Select your acrylic color and mix with acrylic gesso or medium to create the effect you want. Professional Soft Body and Heavy Body Acrylics and Basics color are the optimum consistencies. Our Clear Gesso is also great for when you’d like your surface to show through, but it needs additional tooth.
Texture is another way of customizing your surface. Peaks, swirls and knife marks. Liquitex Professional Super Heavy Gesso adds instant 3D texture and is an ideal way of creating sculptural shape. It also acts as the perfect ground if you want to support weight: once dry it will hold modeling pastes and heavy mixed media onto your surface. You can paint on top, tint it with color or mix with Liquitex gesso to get a more fluid consistency. Alternatively, mix one of our texture mediums/pastes into gesso to create different textural effects. Liquitex Modeling Paste makes a great, absorbent ground for pastel, charcoal and graphite drawings – try 3 parts gesso to 1 part Modeling Paste. You can get a less absorbent surface with less tooth by diluting Liquitex gesso with Liquitex Matte Medium.
Liquitex Professional Natural Sand is also an ideal way to customize your surface. Natural sand particles add structure and texture, drying to a matte, ‘beach sand’ finish with an opaque/semi-opaque appearance. Use on its own, mixed with color or overpainted once dry. It’s the perfect base for acrylics, pastels and graphite. Professional Ceramic Stucco contains tiny hollow ceramic spheres to add a structured, undulating texture to your support. Completely buildable, it dries to a light gray matte stucco finish and is a useful base for staining, color washes and glazes. Or try Professional Glass Beads. Glass microspheres add a reflective, undulating finish for a bubble-like effect.
Lustre, sparkle and metallic highlights are another way to customize surfaces. Add a dash of Professional Iridescent Medium to your gesso, then overpaint with a transparent color and see the result. Try Professional Gold or Silver Medium in the same way. All Liquitex products are 100% compatible and will work together so get experimenting. The possibilities are infinite. Find our full surface prep guide here.
Which materials are you working with ? Share with us on Facebook and Instagram for a chance to be featured.
Explorations – Bubble painting II

Some time ago I did a series of experiments with paint and bubble bath. They proved quite popular and I had several expressions of interest in a tutorial, so I wrote up my first fully documented Exploration. Since then I have received a request to do a video of the technique. It has taken me a while to get there as I didn’t have the equipment to actually put a video together, but a few days ago I finally managed to wrangle one out of my iPad. It is nothing snazzy, but it does demonstrate a part of the procedure I had difficulty explaining in the tutorial.
So here we are – Bubble Painting Basics.
For more detailed information and my notes, please check out the original Exploration. Here are a few more notes on the medium:
- Make sure you don’t add too much detergent. I tried working with bubble mixture (for blowing bubbles) but the concentration required was too high vs water and paint. The mixture will not dry. The detergent will corrupt the paint structure.
- I did some experimenting with acrylic media. The acrylic media doesn’t bubble like water, so what bubbles there are aren’t strong enough to create a high enough stack of bubbles to scoop up a print from.
- The water, paint and bubblebath ratio is very important. Having not done the experiment for quite some time, I had to re-experiment to find the best mixture. Fortunately I had kept my mixes from last time and after failing to get a good mix with a new batch, I was able to grab the old batch out of the cupboard and re-aquaint myself with what makes a good mix.
- Stick with the cheap paints. I tried using some of my Golden Liquid Acrylics with no success. I will experiment further as I was using some acrylic media at the time which likely contributed to my failure, but it appears my children’s paints are more successful. Not to mention that the amount of paint needed is considerable and my bank account was groaning each time I squirted some more of my expensive acrylic paint into the mix.
- Sealing a board with gloss acrylic media resists the bubble print and you end up with little blobby prints rather than bubble prints.
- Canvas has the wrong texture to fully work this medium. I tried printing on canvas board, but the dry board wouldn’t take the print and when I used some acrylic media, I encountered other problems. I have had some success with gesso, so I might go back and thoroughly coat some canvas board with that and see what I can come up with.
Here are a couple of the prints I came up with this week. I’m not sure what I’m going to do with them at this point, but I do find the colours exciting.
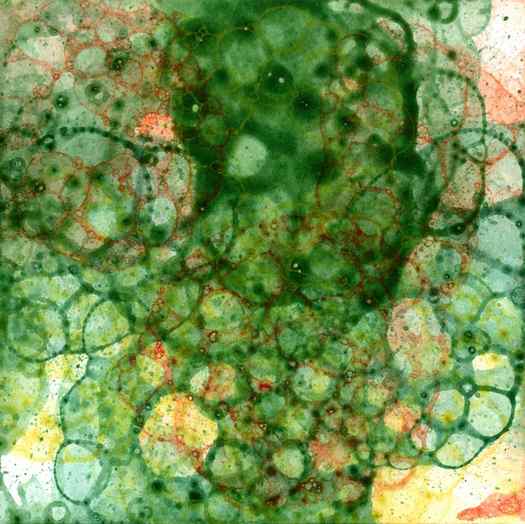
I used a muddy green, a bright orange/vermillion and a yellow, colours deliberately chosen because of their ability to make mud. Fortunately no mud was created.
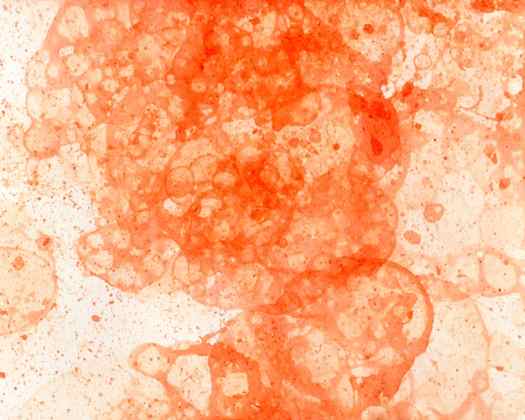
And for this I stuck with just the orange/vermillion, but actually managed to print it into an art journal. Art journalling is something I’ve never done before, but I’m interested in exploring as a technique to free up my art. To tell you the truth, I’m finding it a little scary. The whole concept of not preplanning a work, having the previous week’s work and mistakes sitting right next to whatever I’m working on now…it is a very strange concept for me. But I’ve bought the $5 bound journal and am attempting to follow a challenge over at Art Journalling to get me into the act.
Anyways, this is my submission to Paint Party Friday this week. I hope you enjoyed my first ever You Tube video, basic though it was. You never know, I might actually do some more.
Don’t forget to check out the other great artists at Paint Party Friday, there is some fantastic talent over there.


