The Frugal Crafter Blog
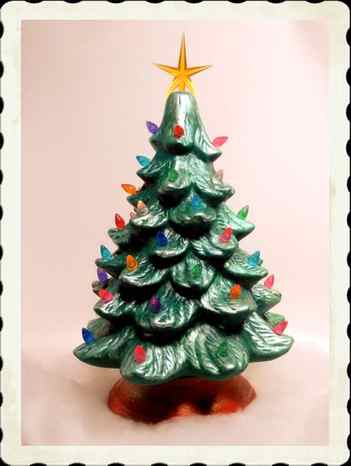
Hi friends! Today I have a fun DIY and exclusive giveaway for my blog readers! My grandmother had a ceramic tree that she would put out every year and I just loved it so I was so excited to find a seller on ETSY who makes the blank ceramic trees to decorate!
Creativity happens is also offering 20% off to all of my viewers with the coupon code thefrugalcrafter and just so you know the DIY Tree ships free! While you are at it check out the other fabulous gift ideas they have, from coffee mugs, ornaments, pet dishes and bakeware to beautiful glazed yarn bowls they will have the perfect gift for many on your holiday shopping list!

Let’s Paint a Ceramic Tree!
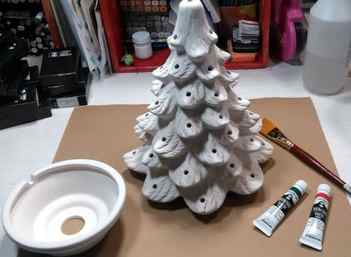
My DIY Ceramic Christmas Tree came smooth and ready to paint. Carefully unpack the tree and set aside the lamp part and the plastic bulbs. Protect your work surface with newspaper or a drop cloth. Gather your supplies. You will need:
- DIY Christmas Tree
- Acrylic paint (I used Turner Acryl Gouache in Red, Green, Gold, Pearl Green, Pearl White and Green Lame’)
- Paint brushes: 1″ flats for base coating, 2″ hog fans for dry brushing & 1/2″ hog for accenting with the glittery lame’ paint.
- Bucket of water for cleaning brushes and a rag for wiping them dry.
- Glue: Beacon 3-in-1
Step 1. Paint the base of the tree bright red and the tree dark green.
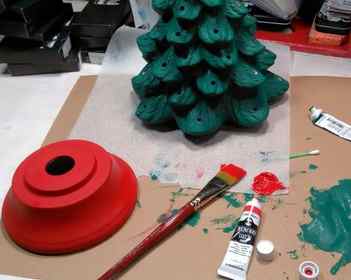
I recommend setting the painted ceramics on a piece of waxed paper to dry so they don’t stick.
Step 2. Use a clean fan brush to swipe gold paint on the red base, it will give it a festive, yet rustic look. Use a clean dry fan brush to dry-brush the pearl green paint on the tree branches. Don’t cover it completely, you want some of the darker green to show in the creases and shadows.
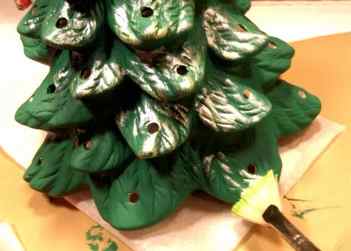
Step 3. Repeat the dry-brushing on the tree branches with pearl white paint but do not cover all of the pearl green, you are applying less paint. Think of adding a bit of frost or snow to the tips of the evergreen boughs.
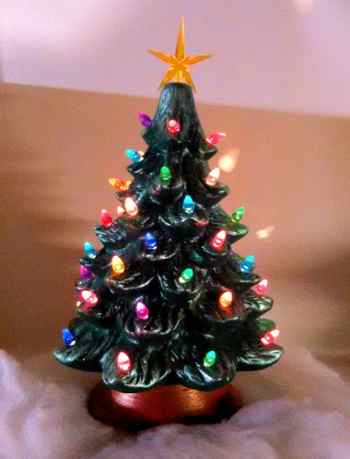
Step 4. Once the tree and base are dry insert the bulb into the tree base using the attached clip and place the green tree on top. I decided to glue the lightbulbs in on mine because I was afraid of them getting lost but you could also leave them loose and decorate it every year! For the above photo I turned on the tree and turned off the overhead lights, the photo does not do it justice, it is so pretty lit up!
Would you like to win one of these DIY Christmas Trees? Simply visit Creativity Happens ETSY store and let me know what item she sells that you think would make the most amazing holiday gift and let me know in the comments below. I will pick a winner on November 9th, Good luck! Oh! and if you want to take care of some of your Christmas shopping while you are there be sure to use the coupon code: thefrugalcrafter to save 20% on your order at Creativity Happens. It is so nice to check off a few people on the gift list! Hmmm, my sister would love one of those yarn bowls…
Thanks for stopping by and til next time happy crafting!
customizing a vintage ceramic christmas tree
You know when you’ve owned something for so long that you’re just sort of seeing past it? You no longer see the potential in it, but just what it is and what it’s always been. Such was the case with this vintage ceramic Christmas tree. We’ve had one in our house for as long as I can remember and it’s always looked the same. My mom made one at a make-your-own ceramics place in the early 1980s and my uncle’s wife at the time made one as well. When I was snooping around in my Opa’s attic over 20 years ago, I found the tree my uncle’s wife made nestled in a box of paper. It’s exactly like my mom’s tree that I grew up with, so I asked if I could have it. For many years, this ceramic Christmas tree was just a nostalgic decoration, one that didn’t particularly feel like my style. Some years, I set it up in one of the boys’ rooms, and other times it just stayed in the box.

Recently, I saw Natalie from My Vintage Porch collecting similar vintage ceramic trees, painting them white, and changing out all of the colored bulbs to clear. It had a total “duh” moment. I can change out the lights?! Of course, I can! Why did I not even think of that? It’s because I was seeing right through it. I had lost my eye for seeing its potential. Seeing a vintage ceramic Christmas tree through Natalie’s fresh perspective gave me a fresh perspective on mine. I liked the green glaze and snowy caps on the branches, so I decided to order some clear replacement bulbs and just replaced the colored bulbs.

The Marshall referred to in the inscription was my uncle Marshall. My son, Marshall, was named after my Opa. There are a lot of Marshalls to keep straight in our family. And Marians. Holly, on the other hand, is one of those family members who just sort of disappeared. She divorced my uncle when I was very young and I don’t ever remember hearing about her again. I have no idea what even happened to her! She might want her tree back…
(So, apparently, I got the story wrong. Holly made both trees and gave one to my mom and one to my Oma. My mom did make a nativity set, which I have. So, Holly might be wanting both of her trees back…)
Anyway, the bulbs I ordered were just slightly smaller than the original bulbs, so I use some hot glue to hold them in place securely.

And what a difference! Now this vintage ceramic Christmas tree is a favorite!

I put it on the pine chest in the foyer to act as a nightlight and so the lights are visible through the sidelights of the front door.
Ceramic Christmas tree painting tips and tricks

We have some of the most gorgeous vintage style christmas trees in stock!
You can choose to paint yours with acrylic paints and you can add glitter gloss and take home the same day or paint with ceramic glaze and have it fired in the kiln for a glass-like finish.

Don’t have time to paint yours in the studio?
Or maybe you know someone that would love to paint one as a gift.
Grab one of our TO GO Tree Painting Kits!
Starting Saturday, December 8th, we will have TO-GO Christmas Tree Paint at Home kits available! Packaged in a pretty holiday gift bag and ready for gift giving! Available with acrylic paints so you don’t have to bring them back for firing or with ceramic glaze.
Our To Go Kit Includes our 11″ Tree* with Attached Base includes light kit, glaze kit or acrylic kit (your choice), brush, plastic pegs, gift bag and instructions!
$49.99 + Sales Tax (while supplies last)
*All tree sizes include base height

Look at these beautiful Ceramic Trees with Glass Green Glaze!

All light up trees include the cord, bulb, plastic pegs and star if applicable.*
*some styles don’t include top stars because they don’t have a top hole.
HOURS
We’re OPEN! Come visit!
Monday: Closed (unless school is out)
Wednesday: 11:00am – 6:00pm
Thursday: 11:00am – 6:00pm
Friday: 11:00am – 6:00pm
Saturday: 11:00am – 6:00pm
Sunday: 12:00pm – 5:00pm
Last seating is always 90 minutes before we close.
Please arrive before last seating time
so you have your item picked out and are already seated and ready to paint. If we have no painters by last seating time, we will close early.
Can’t stay to paint? We can also make you a TO GO KIT so you can paint at home or you can order one online! All pottery items include glaze pots, a brush and firing when you’re done with your masterpiece! All acrylic painted items include an 8 color paint pot strip, a brush, glitter glaze, gloss glaze and a disposable apron
424 Main St, Chatham, NJ 07928, USA


