Now we can move on to coloring the flower with beautiful acrylic paints.
6 Best Flower Painting Tutorials
You all know I love creating and teaching flower painting tutorials! I find them so relaxing to paint and who doesn’t like to look at beautiful blooms?! One of the reasons why I will continue to paint florals is because of the endless possibilities. Really, that is the beauty of creating art and painting!
Flowers come in all colors, shapes, sizes, and textures! There are just so many ways to arrange them on a painting surface, you truly can not go wrong.
* This post may contain affiliate links. If you purchase, I could make a small commission at no charge to you. Please read my Disclaimer and Privacy Policy HERE.

Today I am sharing my favorite flower painting tutorials. It doesn’t matter if you are a beginner or you’ve been painting for years, these simple methods will help you create any type of floral paintings.
My favorite way to paint flowers is very loose and relaxing. All of the tutorials listed will give you some key painting tips & techniques you can use in any composition you bring together.
Flower Painting Tutorials
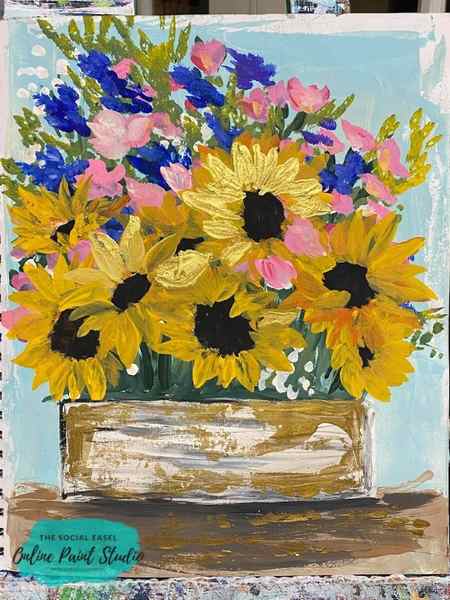
The bright and sunny bloom of golden sunflowers is one of my favorites. In this particular painting tutorial, the sunflower is the main event, but I also walk you through my quick and easy ways to paint common filler flowers like carnations and baby’s breath.
Painting a Tulip from a Photograph
This is another flower painting tutorial I did LIVE on my FREE Facebook page. I love being able to paint along with everyone watching so I can answer any questions along the way. This lesson was all about painting from a photograph. You know that my chosen inspiration photo was going to be a flower! A tulip from my garden in full open bloom.

Techniques for Painting Flowers With Acrylics for Beginners
Stippling
The stippling technique includes creating a collection of tiny dots with acrylic colors. You need to use a sharp, pointed brush for it. You softly put small dots on the painting surface and fill the elements. You can use it to highlight elements of your painting as it creates a higher vibrancy of color in the observer’s eye.
Dabbing
Dabbing includes using a stiff bristle brush to paint the surface with light pressure. You can also use a paper towel to apply the paint. This technique uplifts the look of dense greenery. You can also add multiple layers of paint.
Sponging
As the name suggests, sponging includes the usage of a cellulose sponge to apply the paint on the surface. It is the same as the dabbing technique. It is popular among beginners since it is hard to mess up.
Detailing
The detailing technique is used to enhance the complexity of a painting. It needs a small, fine brush to apply detail and clean lines with acrylic colors. This technique is used in flower or landscape painting.
Underpainting
Underpainting, or dead coloring, is a technique to create the foundation of the painting. When the artist wants to create contrasting and tonal effects, this technique allows them to layer the colors.
Supplies Needed for Painting Flowers in Acrylic
To make a flowers acrylic painting for beginners, you will need the following supplies-
- A high-quality set of acrylic paints
- An A4 size drawing sheet
- Paint Brushes – filbert, round, or angular brush, fan brush, and thin-pointed brush
- An HB pencil and eraser
- Painting palette
- Masking Tape
Step 1: Sketching the Flowers

Let us begin with the drawing part. We will start by sketching three flowers of different styles and designs for our acrylic floral painting. Remember, our main aim is to capture the general shape of a flower. You do not need to focus a lot on the characteristics of the flower, such as shading or detailing, in the beginning.
The First Flower
We will draw the first flower in the center of the drawing sheet. Begin by drawing two thin lines from the bottom of the sheet. These lines are the stem of the flower. Draw two oval-shaped leaves on either side of the stem.
At the open ends of the stem, draw two small inverted V lines. At the top of it, begin drawing the petals of the flower. Draw 4-5 curved triangular petals in one row. Above it, draw three more rows of petals. Do not create a structured form of these petals – give them a loose form so that they look like real flowers.
The Second Flower
We will draw the second flower to the right of the first flower. It resembles the design of a tulip.
Again, draw two thin lines from the bottom of the sheet to make the stem of this flower. However, make them curved towards the right to give them a slanted look. For the petal, draw a U-like shape on the open ends of the stem. Join them at the top small open triangular pattern. You can make two more small petals behind these large ones to make them look like densely packed petals. They will look like peeking out from behind. Also, draw three inner petals at the heart of the flower. Do not forget to make small leaves on the stem.
The Third Flower
For the third wildflower, begin sketching at the left of the first flower. We, again, first make the stem of the flower in a curved manner. However, this time, make it slanting in the left direction. At the open ends of the stem, draw an inverted tear-shaped petal. Make two more petals on either side of it, but keep them joined. You can make more petals at the back of it. Also, add small leaves on the stem on either side.
You are now done with the flowers. Let’s move on to drawing the leaves in the blank space. Fill all the white space by drawing different leaves.
That’s it! You’re done with the sketch.


