Next use your round brush and add yellow and pink over the white reflection lines.
how to paint a wave: a step by step tutorial using oil paints
Learn how to paint a wave with five easy steps. It’s easy, you can do it.
Just follow the steps and you will be amazed what you can do!
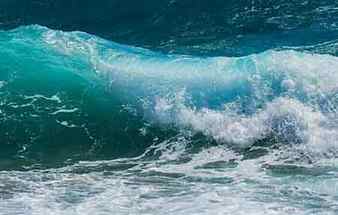
When we go to the ocean, there is nothing as awesome as God’s gift of the ocean. The crashing waves are mesmerizing and a wonderful subject for painting.
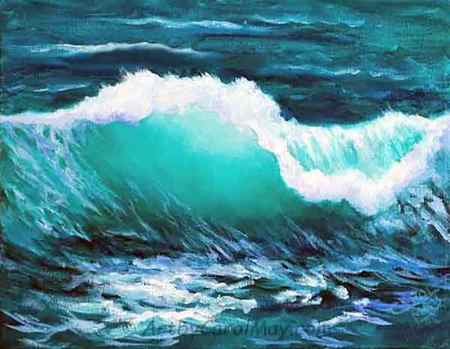
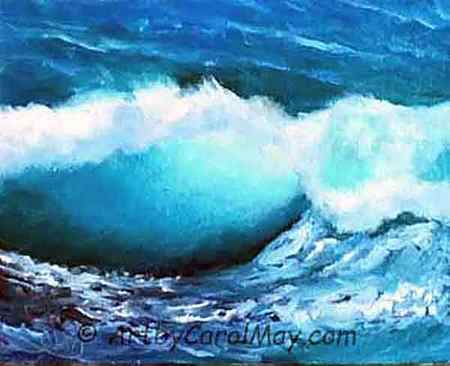
Paint this wave step-by-step
what makes a wave?
We have a better idea of how to paint a wave, when we know how waves are made.
Out in the ocean, energy movement under the surface of the water makes the waves. The energy is the result of winds and currents.
This energy under the water causes the waves to go up and down.
The top of the water stays basically in the same place. This is why a surfer can sit out on the ocean in the same place going up and down on the waves until he decides to catch a big one.
- The front of the waves are concave.
- The back of waves are rounded.
- The base of the waves is level.
No matter how windy it is or how rough the sea is, the baseline of the waves remains level with the horizon.
Waves are awesome!
how do waves form?
When waves approach the shore, they appear to be growing.
Actually they are the same size. They just rise up taller because the ocean bottom is closer to the surface. So the volume of water in a wave has less space.
As a wave builds higher, more water is sucked into the wave. The front of the wave becomes more concave and creates a trough in front of the wave.
When a wave gets so large it can no longer support itself, it falls forward.
Understanding how waves form helps us learn how to paint a wave. Waves make the awesome subject of seascape paintings.
painting seascapes takes practice .
Practice, practice and more practice is what makes a painter. And it makes painting fun!
A little practice painting on canvas board.
We can take any part of a reference photo and do a practice painting.
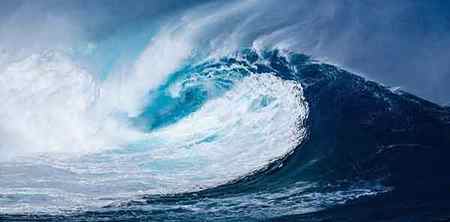
Here are a couple of shots from Pixabay.
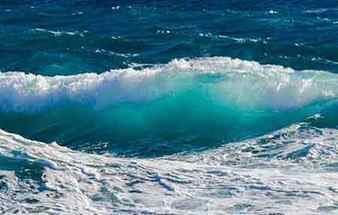
Transparent Wave
Breaking Wave
what do we need to paint an ocean wave?
We will be doing this wave painting with oil paints. You could use much the same methods for acrylics. Oil Painting Supplies
- Blue – Ultramarine Blue or Thalo Blue
- Green – Viridian Green or Thalo Green
- Yellow – Cad. Yellow Light or Naples Yellow
- Orange – Burnt Sienna
- White – Titanium White
- Optional – Alizarin Crimson
Hog hair bristle brushes are great for seascapes.
You may use synthetic brushes of your choice. However sable or other soft brushes normally are not suitable for seascapes.
Stretched canvas is the traditional choice for seascapes. Canvas boards are good for practicing how to paint a wave.
Project Description:
Beginner Acrylic art lesson How to paint a Wave Step by step. The Art Sherpa will fully guide you through every part of this Easy water painting online Tutorial. Wave Painting tutorial that is completely fun for new artists. Tips and tricks for paintig water. This fully guided step by step acrylic painting lesson will have you handing your own art on your wall in just a few hours. This is a lot of fun and all you have to do is just believe you have art in your heart! Love wave ad water paintings Love rainy paths into the forest. 100% free all this will cost you is a touch of elbow grease. This is a really fun art lesson. We talk about art and other fun subjects. How does art help your brain. Tips and tricks to make painting a party at home. With help and guidance anyone can paint. You can paint. Just open your heart and we can access your art together. Acrylics are a fun and enjoyable painting medium. What brushes do I like . Creative Mark. What paints am I using. liquitex heavy body, Matisse Derivan, and golden colors. We have lots of support tools for new artists. Want to see something just comment.
Materials:
Below is a list of recommended materials. This includes the ‘Amazon Affiliate’ program, and you support The Art Sherpa when using it. It is linked here to make things convienient and easy for you.
16×20 canvas, pre-gessoed
Paint Brushes
Black Pearl® Bright Size 4
Black Pearl® Bright Size 6
Black Pearl® Round Size 4
Black Pearl Filbert Size 2
Black Pearl Filbert Size 4
Black Pearl Filbert Size 8
Sterling Studio Round Size 0
Sterling Studio Round Size 1
4002 Series Bright Long Handle Size 10 – Goldilocks™ Brush
4006 Series Angle Long Handle Size ½
1900 Bristlon®
2100 Cambridge™
2500 Ruby Satin®
6400 Black Pearl™
Have fun Live with The Art Sherpa during this BEGINNER HOW TO PAINT art lesson in acrylic art tutorial. This is an easy, fun, social art lesson for canvas. We talk about art and other fun subjects. With help and guidance, anyone can paint. You can paint!
Want to see something? Just comment! Tell me what you’d like to paint, or what you want to know about art. This is YOUR art journey. Open your heart and access your art.
HEART MAIL:
Art Sherpa 204
9490 fm 1960 RD W
suite 200
Humble tx 77338
Artwork is the property of Cinnamon Cooney and The Art Sherpa LLC. and is intended for the personal enjoyment of the student. Did you sell a painting of my original design via private sale? Congratulations and big art high fives!
For commercial use or licensing in the painting party, social painting, or other venues; please visit our business website:
If you’d like to share our tutorial/original painting design with a church group, skilled nursing facility or other nonprofit interest, do get in touch. We have ideas, guides and a few fun little extras to make bringing the Art Sherpa to your community one big party. Let’s collaborate!
This artwork is under copyright and is intended for the viewer’s personal enjoyment.
If your paintings of my original design are offered for sale in a retail setting of any kind, please attribute ‘Original design by Cinnamon Cooney, The Art Sherpa. www.theartsherpa.com’
Please, create no prints or mechanical reproductions of your paintings of my original design.
Beginner Acrylic art lesson How to paint a Wave Step by step. The Art Sherpa will fully guide you through every part of this Easy water painting online Tutorial. Wave Painting tutorial that is completely fun for new artists. Tips and tricks for paintig water. This fully guided step by step acrylic painting lesson will have you handing your own art on your wall in just a few hours. This is a lot of fun and all you have to do is just believe you have art in your heart! Love wave ad water paintings Love rainy paths into the forest. 100% free all this will cost you is a touch of elbow grease. This is a really fun art lesson. We talk about art and other fun subjects. How does art help your brain. Tips and tricks to make painting a party at home. With help and guidance anyone can paint. You can paint. Just open your heart and we can access your art together. Acrylics are a fun and enjoyable painting medium. What brushes do I like . Creative Mark. What paints am I using. liquitex heavy body, Matisse Derivan, and golden colors. We have lots of support tools for new artists. Want to see something just comment. Acrylic Paint colors- Phthalocyanine Blue (green shade) Dioxazine Purple Cadmium Yellow (hue is ok) Burnt Sienna Cadmium Red (hue is ok) Titanium White Mars BLACK THAT WE NEVER USE THE WHOLE PAINTING LOL 16×20 Canvas pre-gessoed Slo Dri Blending Medium by Liquitex Paper towels water cup chalk a few colors ruler Table easel Assorted Brushes for acrylic painting medium flick resistance ( synthetic or natural fiber is ok) Bright 1” Bright 3/4″ Scrumbling brush Old round brushes for wacking splatter or a tootthbrush
“Acrylic Painting Techniques for beginners”
Delicious snack or beverage smile
Paint the sun
If you are doing this as a “duo couples painting” you can have your sun right in the middle. Otherwise paint your sun anywhere on the horizon line.

Then paint some more white/ yellow reflection lines below the sun.
Paint the heart
This is a reflection on the bottom of the canvas. You can pair your canvases together and draw a heart with a piece of chalk.

Then draw white/ yellow reflection lines inside the heart shape. When the paint dries, you can erase the chalk with a clean wet paint brush or a damp paper towel.


Finished!
I decided to finish this painting off by painting the sides of the canvas black! You can paint the sides of your canvas the same as the painting (gallery wrap) or choose a solid color.


Don’t forget to sign your name and show it off!


