When the bunnies’ silhouettes are dry, you can add more details to the moon to depict its many craters and uneven surface. Again, use light strokes and keep a few white highlight so that it looks more realistic. If there are any leftover pencil marks from your sketch, you can also erase them gently with a kneaded eraser (but only do so when the paint is dry!). Once you’re satisfied with the overall look, you’re done! It’s such a quick and effortless project using one of the easiest watercolor painting ideas, right? You can view the video version of this tutorial by clicking on the link below.
Watercolor Painting Ideas: Painting Bunny Silhouettes With A Full Moon
One of the easiest watercolor painting ideas is painting silhouettes, which gives you the opportunity to create beautiful backgrounds while bringing focus to your subject through the use of the contrast between the foreground and background. In this tutorial, we’ll be preparing for the Mid-Autumn Festival by painting some bunnies with the full moon as a backdrop.
- Watercolor cold press paper (140lb, size 5″ x 5″)
- ½” artist’s or masking tape
- Watercolor palette
- 2 containers of water
- Clean rag or paper towel
- Kneaded eraser
Holbein Artists’ Watercolor
Brushes
- BABARA 600R Squirrel Hair Series: Round mop brush (no. 3)
- BABARA 20R Series: Round brush (no. 4)
Step 1: Sketch the Bunnies and the Moon
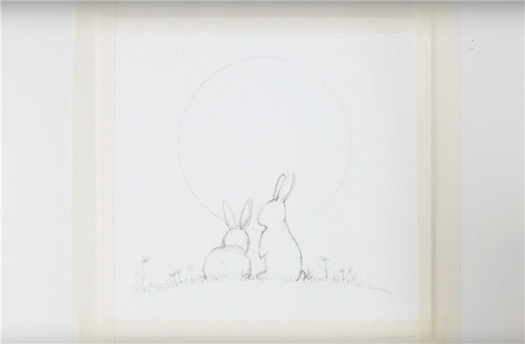
Just like the usual jumpstart of most watercolor painting ideas, secure your watercolor paper with some artist’s tape around the edges, then quickly sketch your bunnies enjoying the full moon. We recommend using a compass or a round object to get a good circle for the moon! Sketching the bunnies in different poses will also make your overall painting more interesting. You can add some grass and flower details on the ground as well to make your painting come to life. Remember though that the foreground will just be a silhouette, so you don’t need details like eyes or fur for the rabbits.
Step 2: A Night Sky Via the Wet-In-Wet Technique
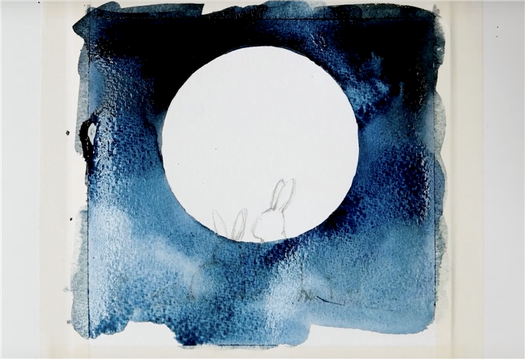
Using the wet-in-wet technique, lightly dampen your paper first with water and a large mop brush. Be careful to avoid the moon though, as we want to keep that a very light color. While the paper is still wet, start dropping in Indigo paint. Add more saturated paint in the upper section of the sky for a deeper and more saturated color.
DIY: Moon Mural

July was the month of the Full Buck Moon, named so because bucks begin to grow new antlers at this time. Inspired by this seasonal event we set out to create this stunning and artistic moon wall mural. With the launch of our new collection of beautiful gray colors, finding the perfect selection of hues was both easy and fun.
Materials and Tools:
Paint- we used Smokey Lilac PPU26-20 for our light tone, Summer Storm PPU26-22 for our mid-tone, and Chimney PPU25-22 for the deep. Painter’s White PPU18-8 was used on the wall as our base color.
Vinyl decal
Paint tray
Paintbrushes
Pencil, String, Thumbtack
Sponge brush
Black Glitter
Mod Podge
Ruler/measuring tape
Continue reading for the how-to steps or watch the video below:
Step 1: Position your circle on the wall
Measure your wall and find out where you want to paint your moon, and how wide you’d like it to be. Make a small mark in pencil for each measurement.


Step 2: Find your center
Press your thumbtack into the wall in the center of your measurements. 
Step 3: Decide the size of the circle
Measure a length of the string from the center point to the edge of your width mark. Tie one side of the string to the pencil and tie the other side to the thumbtack. 
Step 4: Draw the circle
Pull the string straight to outline the circle. 
Step 5: Paint the moon
Once you have your circle outlined, begin painting the dark side border of the moon with Chimney PPU25-22, and the light side with Smokey Lilac PPU26-20. Use your brush and fill out the center of the circle with summer storm PPU26-22. 
Step 6: Paint moon texture
The most important part of this project is the surface texture. Dip your sponge into your paint, dabbing off any excess onto your tray. Then, starting with the dark side, lightly dab color in a random pattern blending the two sides together. This will create a gradation from shadow to light. Bring a little of your background color into the moon in order to create depth. 
Step 7: Make your moon shiny (optional)
You can buy black glitter from your local art and crafts store. Using a clean sponge brush, mix the glitter with Mod Podge and add it to the mural. Doing so will add texture and depth to your work. 
Step 8: Apply the vinyl decal
Allow your moon to dry. Once dry, position your decal in the center of your artwork. Starting at the bottom corner, peel the white backing paper off the transfer tape, rolling it up as you go. Make sure the decal is flush to the wall and gently remove your transparent tape.


Step 9: Paint in grass
With a sponge brush paint some grass, in your wall color, on the bottom part of the moon to blend your decal into the wall. 
You do not have to be an accomplished artist to paint a mural. With just a few simple steps and techniques you can create a work of moon art on your wall! 
Colorfully yours,
Lala


