This wood burning pen is excellent for beginners and is what I learned with. It’s also very affordable so I like to do tutorials with this pen to show you can make art with any type of burner.
Thinning Pine Trees by the Leave Tree Method
Although many forestland owners are well aware of the biological need for thinning, at the time of this revision, most are operating in a severe depression of the pine pulpwood market in Mississippi. Because of these poor market conditions, many landowners are waiting for pulpwood values to increase before attempting timber sales. However, we urge landowners to thin when biologically appropriate if possible in spite of the difficulties encountered in today’s markets.
The hope of increased revenue from potential increases in pulpwood value is overwhelmingly outweighed when considering potential economic loss from both slowed timber growth and the chances of insect and disease damage. See Mississippi State University Extension Publication 2732 Protect Your Pine Plantation Investment by Thinning for a detailed discussion regarding the need to thin pine plantations when they reach economic/biological maturity.
At some point after establishment, both natural and planted pine stands in the South need thinning, as tree crowns grow together and trees start to compete with one another. Thinning removes trees of lower quality and/or vigor, increasing overall health and quality of the residual stand.
Images of evenly spaced rows of similarly sized trees come to mind when most people think of pine plantations. However, in reality, many planted stands have a significant number of volunteer stems growing among those that were planted. These additional stems in plantations, as well as the large number often found in natural stands, can create extra challenges when attempting to reduce stand densities to appropriate levels.
While not always the case, current thinning techniques, rules, and systems may be overly complicated for some private landowners. Under actual sale conditions, testing has shown that leave-tree thinning in overstocked pine stands results in a more consistent silvicultural treatment and higher yields per acre than other methods. The relative simplicity of the leave-tree method makes it applicable on private timberlands by nonforesters.
Historically, marking timber was commonplace in management efforts, but it has become uncommon and is typically only used in second or third thinnings in pine silviculture. First thins are typically performed using “operator select” techniques where logging operators select trees to remove based on management objectives. The method is usually very successful if operators are experienced and expectations are clearly outlined. However, some situations still warrant marking, and some landowners are more comfortable knowing that the best trees present are designated and marked to leave as crop trees.
This publication details the method known as “leave-tree marking,” named so because you mark trees that you are going to “leave.” The method is different from the often-used selective-marking technique. With selective marking, the poorest-quality, diseased trees and trees that are undesirable to the goals of ownership are selectively marked to be cut. Leave-tree marking is used in early thinnings to leave the best potential crop trees. The method is especially applicable in young, dense stands where more trees are to be cut than left. After the first or second thinning, you can switch to selective marking because fewer trees will be cut than left. Selective marking is used in these later thinnings to remove poorer-quality trees.
Both methods are used to achieve the same end results—removing poor trees and retaining higher-quality trees. Regardless of which marking technique you use, make sure the method is written into the cutting contract between the landowner and contractor. Additionally, be positive that the logging crew is aware of which marking technique was used. With a little training and experience using the leave-tree method, you can choose the best tree in a small area and leave it marked as a future crop tree.
An additional item to consider when using any thinning method in a first thinning is the issue of access. Overall high densities encountered in both natural stands and plantations dictate removal of “corridors,” or rows of trees, so that equipment may access the remainder of the stand.
In stands that have been naturally regenerated, cutting corridors should be flagged or marked so that logging crews may remove trees within them. Width and direction of corridors will depend on several factors, including size of logging equipment to be used, topography, desired per-acre density of the residual stand, and management goals.
Cutting for equipment access in plantations is a somewhat easier process. Row thinning is used to provide the needed space for logging equipment. The process involves removing entire rows of trees, typically every third or fourth row. This provides access for logging crews to remove unmarked trees from other rows within the plantation.
Whether you are using corridors or removing rows, make sure not to mark leave trees in these areas. Remember, every tree within these areas will be removed. Some of the technical terms used in this publication may be unfamiliar. If you have questions regarding their use, please consult MSU Extension Publication 1250 Forestry Terms for Mississippi Landowners.
Advantages of Leave-Tree Marking
- Nonforesters more easily understand the concept of leave-tree marking.
- It may minimize marking costs because less paint and labor is used to mark leave trees than to mark cut trees in high-density stands.
- It is easier to see the spacing and quality of remaining crop trees before the stand is thinned.
- It typically results in more uniform thinnings.
- Cut marked trees are easy to spot at the loading deck, and stumps marked with paint provide evidence of improper tree removal.
- Logging crews may cut the wrong trees without thorough instruction.
- Marking costs may be greater in second or third thinnings because there will probably be more leave trees than take trees.
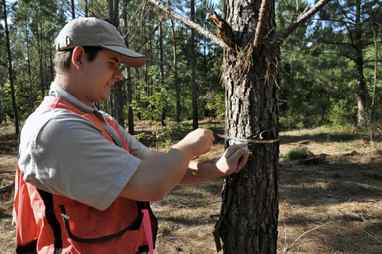
How to Measure Tree Diameter
Tree diameter must be used to determine proper tree spacing. Tree diameter is measured at 4½ feet above the ground. Measurements at this height are called diameter at breast height, or DBH. DBH can be measured with a steel diameter tape or a Biltmore stick. The Biltmore stick is quick and easy to use but is not as accurate or consistent as a diameter tape. For information on how to construct or obtain a Biltmore stick and on proper DBH measurement techniques, consult your Extension forestry specialist, or read MSU Extension Publication 1473 4-H Project No. 7: Measuring Standing Sawtimber.
EASY TREEZY

Join Lucy Thomas in EASY TREEZY, where you will learn how to paint stylized trees. Discover how Lucy paints a Back Yard Pine and a Christmas Tree. She has always found trees to be fun and easy to paint due to their “natural-ness. ” Tree shapes aren’t perfect so your paintings don’t have to be either! There is no need to get overly detailed with these so its a good chance to practice painting loosely.
We will use a basic tree drawing and use lots of color to make them unique and beautiful. That same basic tree can be used to represent both our subjects with just a few small tweaks. These trees are quick projects, as well, so with just a little bit of time you can complete something that will make you proud. AND…it really is easy! If you are worried you can’t draw a stick figure, this class is for you.


COURSE OBJECTIVES
By the end of this course students will have an understanding of the following concepts:
- Explore the fundamentals of negative space painting using acrylic paint
- Discover basic techniques and best practices of working in acrylics
- Learn to see the “Big Picture” and become less conscious of including all the details.
- Layer acrylic paint to get dimension and depth.
- Work from your imagination.
- Build and paint a basic tree shape which can be used in multiple ways
- This is a great warm up exercise or something to paint start to finish when you only have a hour or so to work.
- Have FUN!
Add Detail Where Needed

Now is the time to take a look at your tree and see if it needs any more details.
Want a thicker trunk for your tree? Now is the time to darken the trunk.
Pine Tree Wood Burning

Our wood burning is now complete!
There are many variations to wood burning trees. Trees come in all shapes and sizes! Use this pyrography tutorial to create your own style of trees. You will have fun, trust me!
Pine Tree Pyrography Tutorial
Thanks for checking out this pyrography tutorial and let me know if you have any questions in the comments below!
Want to see more of my work? Shop my original wood burning art for sale here. Thanks for the support!


