Since it went so well, we did another version last year. This time, the kids were rotating through various Easter stem stations so they completed it in smaller groups.
Easter Bunny Canvas Art
This post contains affiliate links. Which means I make a little something if you purchase through the link with no additional cost to you. Thanks for supporting Liz on Call.
This Easter bunny canvas art is a fun kid craft that is easy to do and is perfect to add to your Easter home decor. Download the free bunny silhouette cut file.

I feel like it’s been such a long time since I got out the paints and created with my kids. I was digging through my craft stash and found a bunch of fun spring colored paints and a couple of blank canvases I had bought when they were on sale. I decided an Easter craft would be the perfect activity to do with the kids while they were home for spring break. My kids love creating things and when they saw me pulling out the paint, they couldn’t wait to get started on a project.
This Easter bunny canvas art was such an easy project to make together. I drew this bunny silhouette and created it into a cut file. I found a couple scraps of vinyl so I could cut out enough bunnies that everyone could make their own bunny canvas art. I uploaded it to my Easter Bunny Canvas Art
We all loved making this Easter Bunny canvas art. It was such a fun activity to do together, I though maybe your family might like making them too. So I decided to share the cut file with you.
Download the free bunny silhouette cut file using the link below. You will have to unzip the file and then upload it to your cutting machine software.

The kids have put their Easter bunny canvas art up in their rooms. Now they are totally ready for the Easter bunny to visit!
Here are some of the products I used for this project.

Easter Canvas Painting
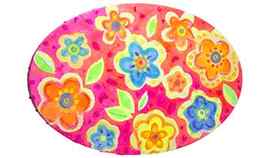
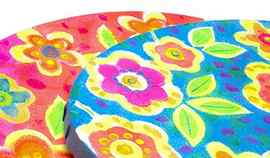
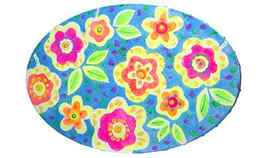
Add a splash of colour to your home with this vibrant Easter canvas painted with fluorescent flowers.

What you’ll need
Items you’ll also need
- Double-sided Tape
- Sticky tape
- Scissors
- A pencil
- A paint tray
- Cotton buds
Skill Level
Time to Make
2 hours + drying time for paint
How to Make
- Start by cutting out some flower masks from card. Draw 10 circles onto white card in varying sizes between 4cm and 8cm in diameter, draw 5 or 6 petals using the circle as a guide, then cut them out. Cut out some small card leaf shapes.
- Arrange the flowers and leaves onto the oval canvas, then lightly stick them down with smalls strips of double-sided tape.
- Choose a paint colour for the background then use a sponge dabber to apply the paint over the canvas, along the edges and over of the cut-out flowers and leaves. You could add a second colour to the background. Leave to dry.
- Carefully peel off the card flower and leaf masks. The canvas will now have a pattern with blank white flower and leaf shapes.
- Place each card mask onto a 10cm x 10cm piece of card. Draw around the masks using a pencil to make a series of flower and leaf outlines. Using the outlines as a guide, draw a smaller flower or leaf in the middle of each shape. Cut into the middle of each piece of card and cut out the flowers and leaves to make stencils. Tape over the join at the edge of the stencils with sticky tape.
- Lightly mark the middle point of each white flower on the canvas in pencil. Starting at the top of the canvas, place one of the flower stencils over the canvas so it is positioned over the middle of the flower. Sponge paint over the stencil then lift it away from the canvas. This should create a coloured middle on the flower with a white border. Use the card stencils in the same way to add paint to the middles of all flowers and leaves on the canvas. Leave to dry.
- Fill in the white areas around the edge of the flowers and leaves using the Day Glow Paint Sticks, or brush some fluorescent paint around the edges of the petals. Add middles to the flowers with paint sticks, and use them to make dotted patterns on the background and around the flower petals. Dotted prints can also be made using a cotton bud dipped into paint. Dip a small strip of card in paint to print lines on the leaves. Leave to dry.
Top Tip
Work out your colour combinations and practice sponging paint on scrap paper before painting the finished canvas. For sponging over the cut-out masks and stencils, apply the paint lightly to start with. To make a colour brighter, leave the first layer to dry then apply another light layer on top. Any excess paint on the sponge can be dabbed off onto scrap paper.
Kids Easter Canvas Paintings
- Start with 8×10 flat canvas panels. Wrapped canvases are harder to paint and less likely to survive the bus ride home.
- Use the templates (links at the end) to trace the outlines onto each canvas lightly in pencil.
- Before the kids begin painting, have them write their names in pencil on the back of the canvas.
- We used washable paint. The coverage is not stellar but the decreased risk of stains was worth it to me.
- Washable paints usually only come in bright colors. To get pastel paints, mix white paint with the brighter colors in other bottles or jars with lids.
- Small brushes are cheap and make it easier to do the smaller details and edges. Wider brushed make it go faster but are less likely to stay in the lines. We just went with the small, basic kids brushes.
- Each child will need one brush per paint color. Trust me. It is easier than setting out cups of water to clean them. Someone or several someones spill the water or mix the colors together accidentally.
- Use condiment cups or small bathroom cups for the paint. Each child will only need 1 Tbsp or so of paint. For the bunny they needed pink and one other color (we left all of the bunnies white – from the canvas – to keep it easy!) For the chick they chose a chick and shell color in addition to a small amount of orange.
- When the paint is dried, use cotton balls to make the cheeks. I had the kids dab the extra paint off on a paper towel until it got light enough to leave a blush effect.
- Finally, use black markers to add details. Permanent markers if you are brave. Some kids really got carried away with this part.
- It is definitely best to do this activity first if you are using it for a party. The paint can dry while having a snack or doing other games/activities.

I usually decorate the collage shelf in my living room with old pictures of the kids from around Easter. These canvases fit nicely with the framed photographs. Then I work in some other items that I have made for my vendor space at Sunbury Station.


I digitized the templates (mine are cut from old file folders) and saved them as pfd and svg files. You can print the pdf and cut it by hand or use a cutting machine with the svg files.


