Learn more: A Playing Card With a Twist at Just Your Everyday Art Teacher
How to Paint a Wolf with Acrylics
Rod Lawrence graduated with a fine arts degree, magna cum laude, from the University of Michigan in 1973. Since then he has been working full time as a professional artist.
Lawrence has exhibited in many group and one-man shows, including the prestigious Leigh Yawkey Woodson Art Museum’s “Birds in Art” and “Wildlife: The artist’s View” shows. From these shows, his work has been chosen several times for their national tour. His art has also appeared as covers, illustrations and features in many outdoor magazines.
A log cabin in the hardwoods of northern Michigan, overlooking the North branch of the Manistee River, is home for Lawrence and his wife, Susan. The symbol preceding his signature in each of his painting shows the importance of his family in his work. The oddly shaped “S” is for his wife Susan (an accomplished basket weaver and instructor), and the “M” and “B” represent their sons, Matthew and Brett.
To learn more about Rod, please take a moment to visit his website by following the link below:
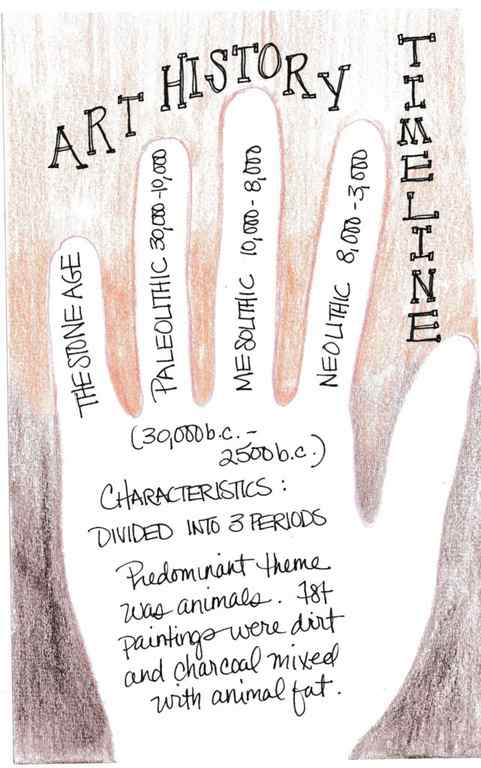
About this Demonstration
This acrylic painting demonstration is from the Book Titled: “Art of Acrylic Painting (Collector’s Series)“, published by Walter Foster Publishing. This demonstration was reprinted here with permission from the Artist, Rod Lawrence. All the artwork and text that appears within this demonstration is protected by Copyright laws and cannot be distributed, copied , republished or sold without the permission of the Artist. Thank you for your cooperation.

Cropping In
I especially liked the angle of this wolf’s head and the bright backlighting. When cropping in on the head, I left enough negative space around it to close in on the wolf without confining it too tightly.
Step One
First I mix the overall base color for the head using cerulean blue, white, and smaller amounts of burnt umber, violet, and ultramarine blue. For the background, I create several values using many different combinations of burnt umber, cerulean blue, ultramarine blue, white and violet–sometimes adding yellow ochre and cadmium yellow light. I apply these mixes wet-on wet, blending as I paint.
Step Two
Now I transfer the main lines of the background branches from my sketch to the painting, beginning with the background mixes from step one. I apply washes of both lighter and darker values to soften the edges and slowly build up the foliage forms. Then I use a darker value on the area just to the left of the wolf, and I apply both light and dark values to the areas above and to the right of the wolf’s head. In the lower-left corner, I start to add some lighter value “holes” (the negative spaces) to the background.
Step Three
Now I wash in the background lights using a mixture of white, yellow ochre, and orange. I build the lightest areas using white mixed with yellow ochre, cadmium yellow light, and cerulean blue. Then I transfer the facial and fur details from my sketch, painting them with a slightly darker value than the base color; I also build up the eye and nose darks, applying several washes. And I add fur details with a value in between the base color and the darker values.

Step Four
When painting the lightest areas, I use thin washes and slowly build my paint into thicker layers. Then I lay on a darker value to create depth, indicating deeper areas of fur and dark markings. When painting fur, look for clumps of hair as well as color patterns. Fur varies in length and color, and it tends to clump in areas where it is thicker or where it is constantly compressed by movement. Take the time to really see how the clumps overlap, shadow each other, and weave in and out. This will help you paint fur more realistically.
Step Five
Now it’s time for color washes (see the samples below), which will enhance the wolf and begin changing the overall look of the base color in some areas. I use a lot of water, treating these mixes like subtle watercolor washes. When dry, these colors will look darker than they do when applied, so you must use some restraint when painting them. This wolf is primarily a grayish-white, so I do not want to add too much color to the body.
 |
 |
|
| Buff + white +cadmium yellow light |
Burnt umber + cerulean blue + ultramarine blue + white + violet + dab of yellow ochre |
More burnt umber + more cerulean blue + more ultramarine blue + white + violet + dab of ochre |
| Burnt umber + ultramarine blue + cerulean blue + violet + dab of buff |
Burnt umber + cerulean blue + ultramarine blue + white + violet |
More burnt umber + cerulean blue + more ultramarine blue + white + violet |
Step Six
I establish the eyes with yellow ochre and add a cadmium yellow light wash around the wolf to warm the highlights. Then I paint the next darker value, adding cerulean blue where I want a more grayish-blue and adding more burnt umber where I want more intensity and warmth.
Step Seven
Now I’ve finished with the darker values. Next I apply yellow ochre washes to the head and chest, sometimes adding burnt umber and cerulean blue. For the eyes, which need subtle washes to make them look more realistic, I also add a tiny bit of white and cadmium yellow light.
Step Eight
For more contrast, I emphasize the eyes, nose, and ears with a mix of cerulean blue, ultramarine blue, burnt umber, and violet. I start the wash above the eyes and between the ears, continuing over the base of the ear on the left. Next I use thicker paint to construct the darker areas. I continue adding the darker value throughout the wolf’s head, applying washes for small changes and several coats of paint to cover really dark areas. Then I mix my darkest value–burnt umber, ultramarine blue, and violet–and apply it over the last wash.
Step Nine – Final Step
With a cerulean blue, yellow ochre, violet, and white mix, I punch up the detail of the fur tips around the eyes, in the cheek and muzzle, and on the chest. Next I use white with a hint of violet to paint the backlit edges, starting with washes and then switching to thick layers of paint. I drag the tip of my round brush into the background to create the finer hair highlights. Next I add the final details, beginning with washes of white tinted with yellow around the left ear. I also paint some darker and lighter fur in the cheek and throat area to emphasize contrast. I apply a bluish-purple tint on the nose; then I stroke in the fine, delicate whiskers.
Giant-sized comic strip
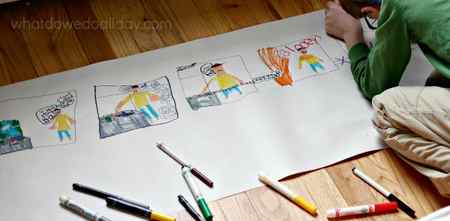
Regardless of your artistic abilities, creating comic strips is a fun way to express yourself. We especially love the idea of getting down on the floor and creating a larger-than-life story. You can also use this as a collaborative art project and have different groups of students tackle different parts of a story that you come up with together as a class.
Learn more: Make Your Own Giant Comic Strip at What Do We Do All Day?
Oil pastel candles
Before tackling this project, have your students try out creating oil pastel gradients in their sketchbooks. Then, use a guided drawing to have students draw their candle shape and size on blue pastel paper. This is so creative because while everyone has the same subject matter, no two candles and no two flames will look the same.
Learn more: Oil Pastel Candle Art Lesson at That Art Teacher
Mixed-media collage
ADVERTISEMENT
Before doing this project, teach your students about a number of different collage artists. Then, have students thoughtfully compile different things to include in their collage. This project is particularly personal and will reflect each student’s individuality.
Learn more: Mixed Media Collage at Anita Sagastegui


