- This tomte tutorial is so simple, it’s almost too easy. The only thing which is critical is the placement of the beard and nose… That’s it.
- Rather than hitting my craft store this time, I popped over to the home improvement store and grabbed a single 2×4. You could make this with a thinner wood, but the 2×4 really gives it a nice base to stand on.
- To make the noses, you could use wood beads. I didn’t have the right size, so I used polymer clay to hot glue to the wood. But wood beads like these would look great.
- When you’re cutting the wood for these DIY Christmas gnomes, you should measure from the middle of the wood. Otherwise, your hat will be off-center and the whole gnome will be off-kilter.
- Decorating with Scandinavian gnomes is really easy. Just place your Scandinavian Christmas gnomes on your mantle or on a bookshelf with your other Christmas decorations. They add a touch of whimsy.
- You can paint your gnome hats whatever color you want. I was going for a more farmhouse style with a distressed look and muted colors. But if you want a red cap on each one, do it. They’re your gnomes – make them how you want.
Original Winter Scene GNOME Painting on Raw Wood Cross Section Signed JC 2021
Refresh your browser window to try again.
Refresh Browser
Shipping:
US $31.24 eBay International Shipping . See details for shipping
Located in: Raleigh, North Carolina, United States
This item may be subject to duties and taxes upon delivery
Delivery:
Estimated between Tue, Nov 28 and Fri, Dec 8 to 00-510
Estimated delivery dates – opens in a new window or tab include seller’s handling time, origin ZIP Code, destination ZIP Code and time of acceptance and will depend on shipping service selected and receipt of cleared payment cleared payment – opens in a new window or tab . Delivery times may vary, especially during peak periods.
Please note the delivery estimate is greater than 11 business days.
Returns:
30 days returns . Buyer pays for return shipping . See details – for more information about returns
Payments:
Shop with confidence
eBay Money Back Guarantee
Get the item you ordered or your money back.
About this item
Shipping, returns, and payments
Seller assumes all responsibility for this listing.
eBay item number: 325214215108
Last updated on Jul 05, 2023 10:18:52 PDT View all revisions View all revisions
Condition
Used: An item that has been used previously. See the seller’s listing for full details and . Read more about the condition Used: An item that has been used previously. See the seller’s listing for full details and description of any imperfections. See all condition definitions opens in a new window or tab
Artist
Signed By
Size
Small (up to 12in.)
Signed
Date of Creation
2000-Now
Material
Acrylic
Item Length
Framing
Unframed
Subject
Gnome, Winter
Type
Painting
Year of Production
2021
Original/Licensed Reproduction
Original
Item Height
8 in
Style
Fantasy
Painting Surface
Wood
Production Technique
Acrylic Painting
Country/Region of Manufacture
United States
Handmade
Seller assumes all responsibility for this listing.
eBay item number: 325214215108
Last updated on Jul 05, 2023 10:18:52 PDT View all revisions View all revisions
Item location:
Raleigh, North Carolina, United States
Ships to:
Afghanistan, Albania, Algeria, Andorra, Angola, Anguilla, Antigua and Barbuda, Argentina, Armenia, Aruba, Australia, Austria, Azerbaijan Republic, Bahamas, Bahrain, Bangladesh, Belgium, Belize, Benin, Bermuda, Bhutan, Bolivia, Bosnia and Herzegovina, Botswana, Brazil, Brunei Darussalam, Bulgaria, Burkina Faso, Burundi, Cambodia, Cameroon, Canada, Cape Verde Islands, Cayman Islands, Central African Republic, Chad, Chile, China, Colombia, Costa Rica, Cyprus, Czech Republic, Côte d’Ivoire (Ivory Coast), Democratic Republic of the Congo, Denmark, Djibouti, Dominican Republic, Ecuador, Egypt, El Salvador, Equatorial Guinea, Eritrea, Estonia, Ethiopia, Fiji, Finland, France, Gabon Republic, Gambia, Georgia, Germany, Ghana, Gibraltar, Greece, Greenland, Grenada, Guatemala, Guinea, Guinea-Bissau, Guyana, Haiti, Honduras, Hong Kong, Hungary, Iceland, India, Indonesia, Ireland, Italy, Jamaica, Japan, Jordan, Kazakhstan, Kenya, Kiribati, Kuwait, Kyrgyzstan, Laos, Latvia, Lebanon, Lesotho, Liberia, Liechtenstein, Lithuania, Luxembourg, Macau, Macedonia, Madagascar, Malawi, Malaysia, Maldives, Mali, Malta, Mauritania, Mauritius, Mexico, Moldova, Monaco, Mongolia, Montenegro, Montserrat, Morocco, Mozambique, Namibia, Nauru, Nepal, Netherlands, New Zealand, Nicaragua, Niger, Nigeria, Norway, Oman, Pakistan, Panama, Papua New Guinea, Paraguay, Peru, Philippines, Poland, Portugal, Qatar, Republic of Croatia, Republic of the Congo, Romania, Rwanda, Saint Helena, Saint Kitts-Nevis, Saint Lucia, Saint Pierre and Miquelon, Saint Vincent and the Grenadines, San Marino, Saudi Arabia, Senegal, Serbia, Seychelles, Sierra Leone, Singapore, Slovakia, Slovenia, Solomon Islands, South Africa, South Korea, Spain, Sri Lanka, Suriname, Swaziland, Sweden, Switzerland, Taiwan, Tajikistan, Tanzania, Thailand, Togo, Tonga, Trinidad and Tobago, Tunisia, Turkey, Turkmenistan, Turks and Caicos Islands, Uganda, United Arab Emirates, United Kingdom, United States, Uzbekistan, Vanuatu, Vatican City State, Vietnam, Wallis and Futuna, Western Samoa, Yemen, Zambia, Zimbabwe
Excludes:
Barbados, French Guiana, French Polynesia, Guadeloupe, Israel, Libya, Martinique, New Caledonia, Reunion, Russian Federation, Ukraine, Venezuela
| Shipping and handling | To | Service | Delivery* See Delivery notes |
|---|---|---|---|
| US $31.24 | Poland | eBay International Shipping | Estimated between Tue, Nov 28 and Fri, Dec 8 to 00-510 |
* Estimated delivery dates – opens in a new window or tab include seller’s handling time, origin ZIP Code, destination ZIP Code and time of acceptance and will depend on shipping service selected and receipt of cleared payment. Delivery times may vary, especially during peak periods. Notes – Delivery *Estimated delivery dates include seller’s handling time, origin ZIP Code, destination ZIP Code and time of acceptance and will depend on shipping service selected and receipt of cleared payment. Delivery times may vary, especially during peak periods.
| Handling time |
|---|
| Will usually ship within 2 business days of receiving cleared payment. |
A Wise Looking Gnome Surrounded By Chess Pieces Photo
A gnome with a long white beard and hat sits among a variety of chess pieces. There is a wooden box full of pinecones to the left of the gnome.
Previous Next

High res Download free photo Low res Download free photo

High res Download free photo Low res Download free photo

High res Download free photo Low res Download free photo

High res Download free photo Low res Download free photo

High res Download free photo Low res Download free photo

High res Download free photo Low res Download free photo

High res Download free photo Low res Download free photo

High res Download free photo Low res Download free photo

High res Download free photo Low res Download free photo

High res Download free photo Low res Download free photo
Get first access to free photos and other Burst content. Unsubscribe anytime.
Tips to Make Gnomes from Wood

- This tomte tutorial is so simple, it’s almost too easy. The only thing which is critical is the placement of the beard and nose… That’s it.
- Rather than hitting my craft store this time, I popped over to the home improvement store and grabbed a single 2×4. You could make this with a thinner wood, but the 2×4 really gives it a nice base to stand on.
- To make the noses, you could use wood beads. I didn’t have the right size, so I used polymer clay to hot glue to the wood. But wood beads like these would look great.
- When you’re cutting the wood for these DIY Christmas gnomes, you should measure from the middle of the wood. Otherwise, your hat will be off-center and the whole gnome will be off-kilter.
- Decorating with Scandinavian gnomes is really easy. Just place your Scandinavian Christmas gnomes on your mantle or on a bookshelf with your other Christmas decorations. They add a touch of whimsy.
- You can paint your gnome hats whatever color you want. I was going for a more farmhouse style with a distressed look and muted colors. But if you want a red cap on each one, do it. They’re your gnomes – make them how you want.
I’m so glad you asked. Below is our written tutorial. Because you all loved this one so much, I made a painted wood block gnomes video tutorial here. Keep this page open and follow along. If you have any questions, leave them in the comments.
First, start by making the gnome noses. To do this, take a small portion of light brown clay (one-half section of a clay pack) and a little larger portion of white clay (one full section of a clay pack) and work them together until combined completely.
Break this ball into three varying-sized neat balls rolled smooth. The sizes are what you want the noses of the gnomes to be based on the measurements of wood. My largest nose was one inch and went down slightly from there.
Bake the noses per the directions on your clay’s package and allow to cool completely.
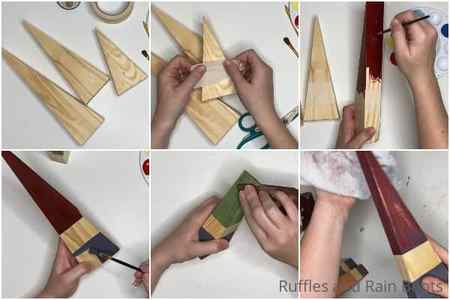
Cut the 2×4 into one 8-inch long section, one 12-inch long section, and finally a 16 inch section. Save the remainder to use on another project.
Mark the center of each of your blocks of wood. Cut a 15-degree angle from the center of the wood all the way to the edge, flip and repeat. I found this easiest to do with my chop-saw, but this can be done with a hand saw, skill saw, or jig saw, as well.
Sand all faces and edges of each of the three triangle blocks.
Paint the bottom 1/3 one color on each block (taping edge is optional but recommended). Allow to dry.
Paint the top 1/3 a contrasting color on each block (taping edge is optional). Allow to dry.
Lightly sand all painted surfaces if a distressed look is desired.
Add a very light dry-brush coat of light grey wood stain to both painted surfaces of each block, staying clear of the center 1/3 section that is unpainted. Using the paper towel, remove as much excess stain as you can. Allow stain to dry completely.
Lightly sand all surfaces again.
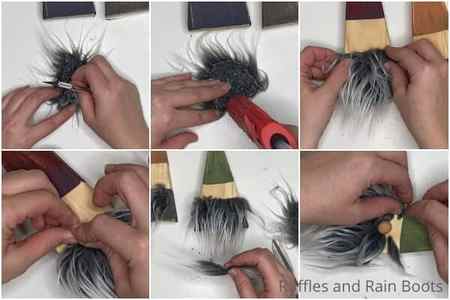
Using the craft knife, cut a triangle of Mongolian fur wide enough to cover the front of each block. Only cut on the back side of the fur (the fabric backing).
Cut 9 small rectangles of Mongolian fur (1/2 inch wide by 1/4 inch high). Brush the fur on 6 of them to one side to make eyebrows (3 in one direction, 3 in the other). For the remaining 3 pieces, split the fur and brush to each side from the center to form a mustache.
Hot glue the beards onto the front side of each gnome. Affix the mustaches to the top center of the beard and the eyebrows to each gnome’s face.
Hot glue a nose to the top of each gnome’s mustache.
More Christmas Gnome Tutorials You Might Like
- The BEST Christmas Gnome Tutorials – If you’re looking for a gnome, you’re going to find so many nisser and tomten here that you can make in minutes.
- DIY Chef Gnome – The perfect gift for a baker! This gnome is all you need to make a gift for someone that loves to bake.
- Nordic Viking Gnomes – Check out this cute and definitely perfect-for-all-your-gnome-needs Viking. He’s coming with his dragons.
- How to Paint a Christmas Gnome – This adorable guy all tangled up in Christmas lights is a fun craft to brighten up a rainy afternoon.
Please Save This to Pinterest
Your shares are how this site grows and I am sincerely grateful. Know a friend who’d like this? Please share it on Facebook or save it to your favorite gnome tutorials board on Pinterest.
Yield: 3
Wood Block Gnomes

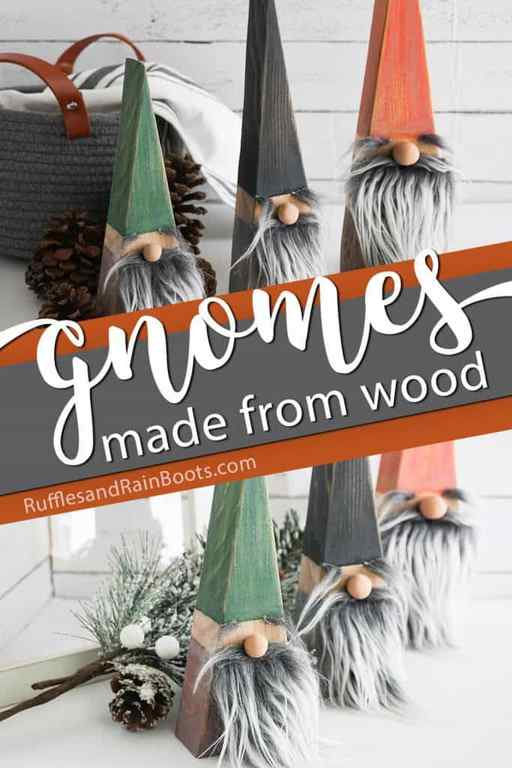
These easy wood block gnomes are a popular project because they are easy to cut, come together in minutes, and makes for a gorgeous gnome display.
Prep Time 5 minutes
Active Time 20 minutes
Additional Time 30 minutes
Total Time 55 minutes
Difficulty Easy
Estimated Cost $5
Materials
- Polymer Clay in Light Brown and White
- Paint (wood stain, acrylic paint, or chalk paint)
- Light Grey Wood Stain, optional
- 3″ Pile Mongolian Fur (scraps or 1/8th of a yard)
- 1 2×4 wood plank (or precut wood triangles from Etsy)
Tools
- Hand Saw or Chop Saw (if cutting the wood yourself)
- Oven
- Paint Brushes
- Paper Towel
- Sand Paper
- Pencil
- Hot Glue Gun and Glue Sticks
- Craft Knife or Razor Blade
- Optional, tape for painting
Instructions
- Start by making the gnome noses. To do this, take a small portion of light brown clay (one half section of a clay pack) and a a little larger portion of white clay (one full section of a clay pack) and work them together until combined completely.
- Break this ball into three varying sized neat balls rolled smooth. The sizes are what you want the noes of the gnomes to be based on the measurements of wood. My largest nose was one inch and went down slightly from there.
- Bake the noses per the directions on your clay’s package and allow to cool completely.
- Cut the 2×4 into one 8-inch long section, one 12-inch long section, and finally a 16 inch section. Save the remainder to use on another project.
- Mark the center of each of your blocks of wood. Cut a 15-degree angle from the center of the wood all the way to the edge, flip and repeat. I found this easiest to do with my chop-saw, but this can be done with a hand saw, skill saw, or jig saw, as well.
- Sand all faces and edges of each of the three triangle blocks.
- Paint the bottom 1/3 one color on each block (taping edge is optional but recommended). Allow to dry.
- Paint the top 1/3 a contrasting color on each block (taping edge is optional). Allow to dry.
- Lightly sand all painted surfaces if a distressed look is desired.
- Add a very light dry-brush coat of light grey wood stain to both painted surfaces of each block, staying clear of the center 1/3 section that is unpainted. Using the paper towel, remove as much excess stain as you can. Allow stain to dry completely.
- Lightly sand all surfaces again.
- Using the craft knife, cut a triangle of the Mongolian fur wide-enough to cover the front of each block. Only cut on the back side of the fur (the fabric backing).
- Cut 9 small rectangles of Mongolian fur (1/2 inch wide by 1/4 inch high). Brush the fur on 6 of them to one side to make eyebrows (3 one direction, 3 the other). For the remaining 3 pieces, split the fur and brush to each side from the center to form a mustache.
- Hot glue the beards onto the front side of each gnome.
- Affix the mustaches to the top center of the beard and the eyebrows to each gnome’s face.
- Hot glue a nose to the top of each gnome’s mustache.
Notes
For more fun gnome tutorials, visit Ruffles and Rain Boots.
Did you make this?
Please leave a comment or share a photo and tag me @rufflesandrain


