It’ll soon be that time of year again: “Trick or Treat!” These great spooky Jack o’ lanterns will really set the Halloween mood. Covered in white acrylic with details in black Lumocolor permanent markers, the lanterns are quick to paint and can be arranged on a sideboard or on the windowsill. They’ll give everyone a lovely shudder!
Guide for acrylic pumpkin painting

I made these neon paint pour pumpkins a few years ago but never got around to posting a tutorial! I’ve brought them out every Halloween since and love the pop of color they add to my home. They are a little messy to make, but that’s part of the fun! These pumpkins are made even more special with a subtle neon color palette and the addition of chunky glitter in fun shapes. I don’t do spooky so this cute and girly take on painted pumpkins is perfect for me. If you want to make your own, keep reading. You can use whatever paint colors you want to get the pumpkins of your (paint poured) dreams!
Keep reading for my step by step tutorial
Some of the below links are affiliate links and if clicked, I may make a small commission at no cost to you. As an Amazon Associate I earn from qualifying purchases.
Materials

- Craft pumpkins – white/cream is ideal for this project. (You could try this with real pumpkins, but I haven’t tested it out. Just a warning, that you may need to prime the pumpkin first before applying this technique. It may also be a little harder to lift and tilt if you have a big heavy one.)
- Acrylic paint – I used Deco Art Neon Lights in Light Pink, Peach, and Light Yellow
- Pouring Medium
- Mod Podge
- Glitter – pink, orange, yellow
- Cups
- Wood sticks
- Foam brush or paint brush
- Disposable tray
- Dropcloth
- Gloves
- Painter’s Tape
1. Prepare your working area
Cover your working area with a plastic covering or dropcloth. Remove any items nearby that might get hit with paint splatter.
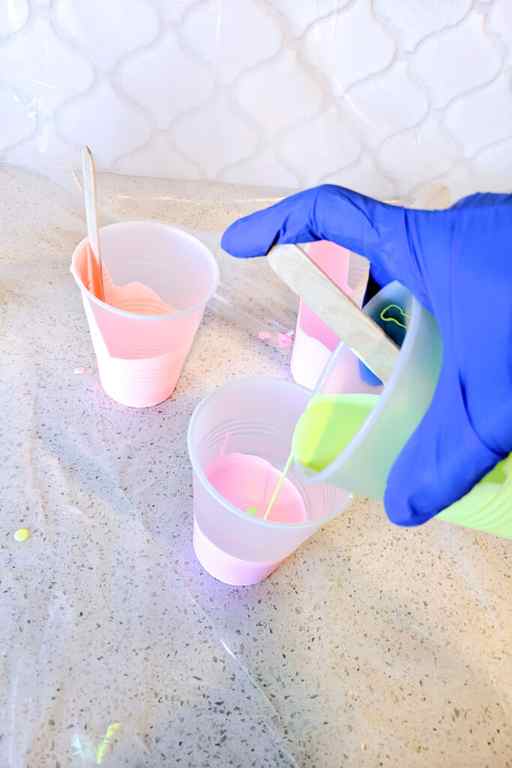
2. Mix paint with pouring medium
Mix 1 part acrylic paint to 5 parts pouring medium in a plastic cup. Do this for each color you’re using. Pour into one cup and swirl a little with your wood stick.


3. Pour paint mixture onto pumpkin
Tape off pumpkin stem with Painter’s tape if you don’t want them painted. Put on gloves. Pour your paint mixture over the pumpkin, using a tray to collect dripping paint. Gently rotate and flip the pumpkin to disperse paint and create a marbled effect.

4. Apply glitter
Allow paint to dry to touch. Use a foam brush or paint brush to apply Mod Podge in random strips all over the pumpkin. Sprinkle on glitter(s) of choice, collecting what falls into a folded piece of paper. Pour excess glitter back into the containers.


5. Make other pumpkins
Repeat steps 2-5 for other pumpkins. Allow to dry completely before putting on display.

What do you think of my paint pour pumpkins? I love how the marbled colors and iridescent swipes of glitter add a sweet and whimsical touch. If you end up making these, make sure to tag me on Instagram. I would love to see and share your projects.
Save these pins!

If you’re interested in another neon Halloween craft, check out my dip dyed ghost tassel project!
Head back to my blog for more colorful DIY ideas and inspiration!
Step-by-step tutorial

Before applying the white base coat to the pumpkins, make sure you clean them with a kitchen sponge and soap, and dry them thoroughly. This will help the acrylic paint stick to them better. Squeeze some paint onto the palette and then use the broad, dry paintbrush to apply white paint to the top half of each pumpkin. Leave to dry and then paint the bottom half. Once the whole pumpkin is dry, apply another layer of white. Then let it all dry completely!

To create the ring design, place the Lumocolor permanent marker at a slight angle at the top of the pumpkin and turn the pumpkin underneath it, so as to create an even downward spiral.

To create a spider’s web design on your pumpkin, trace a vertical line down each section with the Lumocolor permanent marker, maybe adding a few extra lines in between. Then draw in curved horizontal lines connecting all the vertical lines. Feel free to vary the pattern in the spaces to create your own exciting designs. A pretend spider will round off your design perfectly.

Use the soft Lumograph 4B pencil to copy, trace or sketch in advance any designs or lettering that you’re not going to draw on to your pumpkin freehand. Then cut round your template roughly, turn over and shade over the reverse side of the design using the soft Lumograph pencil to apply a really thick pencil layer.

Place the template on the pumpkin and if necessary secure with small strips of washi tape to prevent it slipping. Now trace your design onto the pumpkin. Remove the template.

Now go over your design with the Lumocolor permanent marker and colour in. The best Lumocolor marker to use for this is one with a broad chisel tip.
Material overview


What you need
| Product | Article no. | Quantity |
|---|---|---|
| Mars ® Lumograph ® 100 Drawing pencil – Single product 4B | 100-4B | 1 |
| Lumocolor ® permanent pen 317 Permanent universal pen M – Single product black | 317-9 | 1 |
| Lumocolor ® permanent duo 348 Double ended permanent marker with two bullet tips – Single product black | 348-9 | 1 |
| Lumocolor ® permanent marker 350 Permanent marker with chisel tip – Single product black | 350-9 | 1 |
| Lumocolor ® permanent marker 352 Permanent marker with bullet tip – Single product black | 352-9 | 1 |
| Mars ® plastic 526 50 Eraser in premium quality – Single product, size: 65 x 23 x 13 mm | 526 50 | 1 |
Differently shaped pumpkins, white acrylic paint, palette, broad, paintbrush, optional: washi tape, scissors, kitchen sponge


