6″ x 6″ inches 1.5″ deep( 21 cms x 14.5 cms)
How to capture a bumblebee in a painting
Small acrylic painting of a bumble bee balancing on pink flowers whilst extracting pollen.
This little painting can be hung two ways. With bumblebee on top of flowers or to the left of flower.
Acrylic on exhibition quality boxed canvas. Signed & Ready to hang. Edges are painted white with signature on one side.
6″ x 6 x 1.5 d” inches = 15 cms x 15cms
Lightweight to ship
Presently available at The Art Shed, Crab Farm Winery, Napier, New Zealand
Kangaroo Painting
130,00 NZ$
An expressive Kangaroo portrait painted in acrylic paints on canvas paper. It is inserted/mounted with a black or white mattcardboard frame, ready for you to place in a frame of your choice. You can choose whether you prefer black or white mount.
Lightweight and ready to post.
6″ x 6″ inches ( 21 cms x 14.5 cms) without card mount =
9 3/4 ” x 7 1/2 ” inches (25cms x 19cms) to edge of cardboard mount
Sugar Glider Painting
130,00 NZ$
An expressive portrait painted in acrylic paints on canvas paper of a Queensland Sugar Glider.
I started painting her when I visited Australia in 2019.It is inserted/mounted with a black or white mattcardboard frame, ready for you to place in a frame of your choice. You can choose whether you prefer black or white mount.
Lightweight and ready to post.
6″ x 6″ inches ( 21 cms x 14.5 cms) without card mount =
9 3/4 ” x 7 1/2 ” inches (25cms x 19cms) to edge of cardboard mount
How to capture a bumblebee in a painting

- 2023 Grid Cells
- The Basics
- Instructions
- Finding Franklin’s
- Bumble Bee Data
- Data Entry Help
- Highlights
- Explore Data
- Point Surveys
- Roadside Surveys
- Habitat Surveys >
- Species Illustrations
- Profile Pages
- Live Events
- Recorded Trainings
- Training Materials
Photography Tips
Photography is an essential tool for recording – and identifying – bumble bees in the field. Dark, distant, or blurry images can make identification difficult – or even impossible – which can result in wasted time and effort, loss of vital data, and an unnecessary annoyance for the bees!
This is why we have adopted the capture/chill protocol included in the training for the NW Bumble Bee Atlas. This has proved to result in the best quality, most useful, images. All bumble bee watchers will find some gems in the tips below. The majority of these tips were graciously provided by Kevin Schafer – a top contributor to the PNW Bumble Bee Atlas, and a professional photographer. If you have questions for him, his contact information is available at the bottom of this page. He is also active on the Facebook Group page (where you can also see many of his beautiful images).
- Digital SLRs: These cameras offer the most control, and generally produce images of the highest quality. They are especially valuable if paired with a macro lens, which allows you to focus very close, and capture essential details. Note: If you are using a DSLR but don’t have a macro lens – go ahead and shoot from your closest focusing distance and then crop the picture (in the “lab”) to show the bee larger in the frame – cropping photos before submitting them makes verification much easier. Most cameras today have large enough sensors to allow cropping without significant loss of detail.
- Point-and-shoots : So-called “pocket cameras” are quickly being replaced by camera phones, so few people seem to use them anymore. But if you have one, be sure to test out its ability to close-focus, and provide exposure compensation (more on these two subjects later). A camera that has proved exceptionally useful at taking detailed photographs for this project is the Olympus Tough TG-5 (to be clear we have not received any support from Olympus in this project – this is a true experience based recommendation). We’re not suggesting that you go out and purchase one of these for this project, but if you are in the market for a field camera – we’ve found that this one is great for macro photography – and is field ready for drops and spills.
- Camera phones : For many of us, these are an obvious choice, since we normally have one conveniently tucked in our pockets! This fact alone makes phones a useful tool, especially for incidental sightings : capturing a bee in the garden, or finding one unexpectedly on a hike. But these cameras also have distinct limitations: they may not be able to focus close-up and adjusting exposures can be difficult. What’s more, resolution and sharpness generally remain inferior, especially in older models. For that reason, when conducting surveys, best practice is to use your camera phone only if you have no other choice.See below for some camera phone tips.
- Capture bee with net.
- Transfer to numbered glass vial or jar
- Remember to capture the host plant information. One way to do this is to photograph the jar number and associated plant (I use cellphone for this). Another way is to label the jar directly with the plant name, or to place a bit of the flower in the jar with the bee.
- Pop jar into cooler, being sure to cover with ice (using crushed ice is a great option if you have access to it). (Note: Repeated opening and closing of the cooler allows warm air inside and slows – or prevents – the chilling process).
- While bees are chilling it can be a good time to take some sample photographs in your studio (of a small bee sized object) and change/practice your white balance, etc. to be sure you are ready to take clear photos when your bees are ready.
- (NOTE: Setting up “studio” on the hood of your car creates a good working angle – e.g. eye-level and allows rotation of the background)
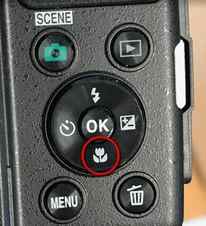
Look for the macro setting on your camera.
Camera Settings
If your camera has one, use the macro setting (usually an icon of a flower)! This usually lets you focus on objects closer to the camera.
Photo of the western bumble bee taken with the Olympus TG-5 using the photo stacking function. Note the depth of focus and the level of detail on the entire bee.

Photo of the brown belted bumble bee taken with a cell phone camera (and then cropped). Note the muted colors and lack of detail. ID is still possible, but not as readily as the photo to the left.
BACKGROUNDS :
Whatever camera you use, after you have chilled your bumble bee, choose a clean, uncluttered background on which to place it for photography. Some people shoot the bee inside the vial or jar, but these can cause distortion, and make it hard to get very close, or shoot from multiple angles. A simple alternative is to use a sheet of white copy paper attached to a clipboard. This white surface reflects light onto all parts of the bee and reduces distracting backgrounds. Bring some rubber bands along to keep the paper from moving in the wind, or use a stiff white board — a movable white wind-break can also be helpful. (NOTE: chilled bees are often wet with condensation and your paper/board can get wet – bring extra!)
Photo backgrounds matter immensely for clarity. Choosing a container with a flat viewing lens is much better than a rounded vial.

Getting cameras of any kind to focus with a rounded vial can be very challenging and lead to difficult photos to use for verification.
POSING:
After being properly chilled for a few minutes, a bumble bee will typically be motionless, and tightly curled up to stay warm. This can make them difficult to photograph properly, e.g. hiding key features. For that reason, one tip is to let your subjects warm up slightly (in anything except blazing hot sun). It is not a bad idea to snap a couple of photos of a chilled bee, just so you don’t miss the opportunity to photograph the bee should it warm up and fly away quickly – you can later choose the best photos to submit. If the recovery seems slow (or if you have 20+ more bees to process!) you can speed things along by breathing lightly on your chilly bee. In a minute or so, it should start moving, and will normally strike a more natural standing pose, spending some time preening and stretching (in warm temps bees sometimes warm up quickly – especially if not completely chilled – so be careful to not let them get away before documenting them). This is a perfect time to take your photograph, rotating the paper/board to get a variety of angles: eg top, back, side and/or underside (esp. with Yellow-faced species) Get as close as your camera will allow! (NOTE: Remember, the Bumble Bee Watch data entry template only has room for 3 photos of each individual, so make them count.) - With a DSLR or other stand-alone cameras, there is typically an Exposure Compensation function built-in, either controlled by buttons on the camera body, or found somewhere in the Menu. Look for a +/- symbol. Once you have located it, you will want to change the setting from O to +1.0 to start; This will brighten all your pictures significantly. (If the effect is not enough, try +1.3 or +1.7). But remember: if you change this setting, you’ll need to change it back to default O setting before taking non-bumble bee photos or all of them will be washed out!!
- If using a phone, this is more difficult. Most recent iPhones allow you to alter the exposure by dragging your finger up or down the image on the screen when in CAMERA. However, you will have to do this for every image since it doesn’t remember the setting, which is time-consuming and awkward!
Carpenter Bee Habits
Each female carpenter bee has her own private nest inside their wood tunnel. More than one carpenter bee can occupy the same wood, but they still live independently from one another.
Female carpenter bees prefer to nest in an existing wood tunnel or expand on an old one. She uses her jaws to create an entrance that is about ½-inch wide, the size of her body. A tunnel gallery can extend for 10 feet if used by many carpenter bees over a long period.
Nail holes, splinters, and cracks on the wood’s surface can help make her expedition much more accessible.
She’ll want to find a nesting spot near a garden or flower bed, such as a wooden deck, picnic table, utility pole, firewood, door, siding, or fence post.
Signs of a Carpenter Bee Infestation
The most apparent sign of carpenter bees nesting in your wood is their 1/2-inch tunnel holes.
Below these holes, you may find piles of yellow sawdust material. As the female carpenter bee digs her nest, she pushes the chewed wood out of the tunnel. She will also pass sticky yellow waste, which may gather outside the tunnel’s entrance. The waste product may cause yellowish stains to appear on your wooden structure, and may darken.
The nest of a single carpenter bee will not cause significant structural damage to your wooden feature. Yet many tunnels expanded and reused over several years may weaken the wood or cause a cosmetic concern.
The presence of carpenter bees may also be a sign of an infestation. You may first notice a carpenter bee by hearing it’s loud, reverberating buzz. (Sounds a little like a carpenter’s saw or drill, right?) Their blaring presence can be intimidating, mainly when carpenter bees dive and swirl around humans.
It’s often the male carpenter bee creating these disturbing sounds and high dives. Male carpenter bees do not have a stinger, so their robust and aggressive performance is all a bluff. Although female carpenter bees have a stinger, they generally remain calm and attack only when provoked.
When to Call a Professional
If you wish to avoid a female carpenter bee’s sting, call a pest control professional near you. If your carpenter bee infestation is severe, a pest control professional may provide the appropriate solutions to prevent and manage these pests.
Main Image Credit: Eastern Carpenter Bee by Judy Gallagher / Flickr / CC BY 2.0
Related Posts
Jane Purnell
Jane Purnell is an artist, writer, and nature lover. She enjoys teaching readers about the importance of eco-friendly lawn care, integrated pest management, biodiversity, and sustainable landscaping.


