Photo sixteen
How to make your own large Easter bunny
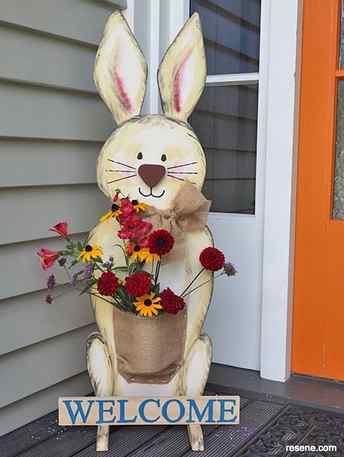
House colours
Weatherboards – Resene Triple Ash
Trim – Resene Quarter Thorndon Cream
Door – Resene Clockwork Orange
- Wood, 90cm of 280mm x 18mm untreated pine, 60cm of 24mm x 24mm untreated pine, 60cm of 60mm x 10mm untreated pine
- Pencil
- Jig saw
- Sandpaper, medium grit
- Resene testpots in your choice of paint colours, Fleur used Resene Quarter Canterbury Clay, Resene Putty, Resene Ebony Clay, Resene Black, Resene Blumine, Resene Burnt Crimson
- Resene Quick Dry
- Paintbrush, plus a small artist paintbrush
- Small piece of foam
- Wood glue
- Tin can
- Blu Tack
- Hessian fabric
- Scissors
- Staple gun
Instructions
Step 1: Start by using a pencil to sketch out the bunny shape on to your piece of board. (Photo 1).
Step 2: Use a jig saw to cut out the bunny and sand the edges smooth with a piece of medium grit sandpaper. (Photo 2).
Step 3: At the bottom of the bunny, make two square notches 24mm x 24mm on either side. This is where the legs for the stand will go. (Photo 3).
Step 4: Use Resene Quick Dry to prime the bunny. (Photo 4).
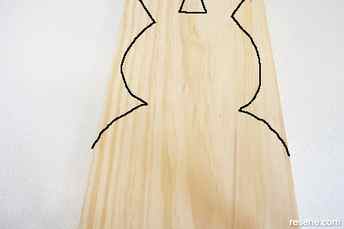
Photo one
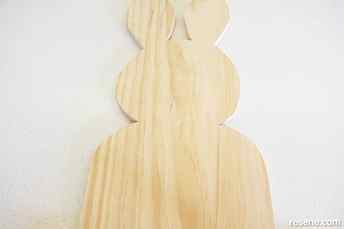
Photo two

Photo three

Photo four
Step 5: Paint the entire bunny with Resene Quarter Canterbury Clay. Then, with a dry brush, paint on Resene Putty, following the outline of the shape and giving form and contour. (Photo 5).
Step 6: Repeat this again but this time using Resene Ebony Clay to outline the body shape and to give definition to shadow areas. (Photo 6).
Step 7: For the face, use Resene Black for the eyes and use a dry piece of foam to dab on Resene Burnt Crimson for the cheeks and the inner ears. (Photo 7).
Step 8: Add a nose by cutting out a piece of left over scrap wood into a soft triangular shape. Sand any rough edges smooth and paint it Resene Burnt Crimson. Once dry, use wood glue to glue it to the face. Finish by painting on a mouth and whiskers. (Photo 8).
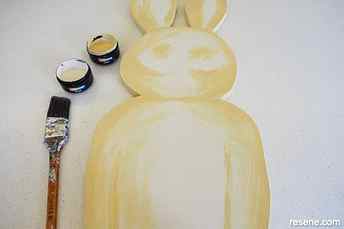
Photo five
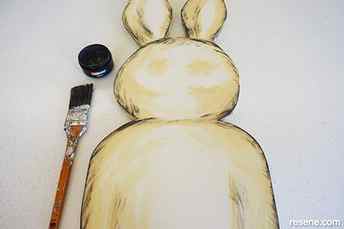
Photo six
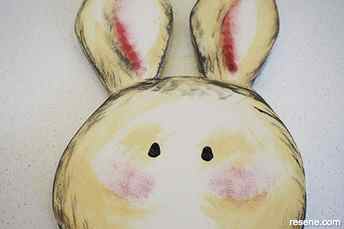
Photo seven
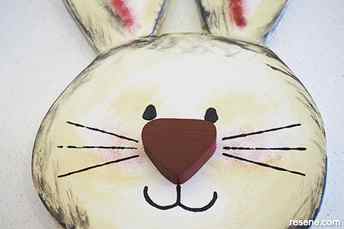
Photo eight
Step 9: For the tummy pouch, Blu Tack a tin can to the front of the bunny to stop it rolling around while you sort out the hessian. (Photo 9).
Step 10: Stretch a piece of hessian over the tin and use a staple gun to hold the tin in place. (Photo 10).
Step 11: To make the legs for the stand, cut 24mm x 24mm untreated pine into two 30cm lengths. I rounded the ends to give it a more finished look. Paint the legs in Resene Putty and use a dry brush to add some Resene Ebony Clay. (Photo 11). Screw the legs into the notches that you cut earlier. (Photo 12).
Step 12: Measure the height of the piece of wood that you’ll use for the sign and print out the word WELCOME so that it will fit on the wood. (Photo 13).
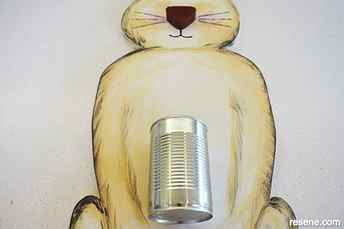
Photo nine
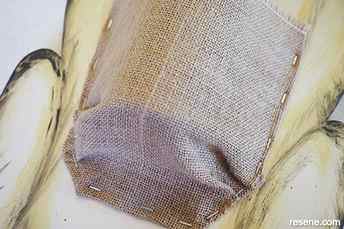
Photo ten
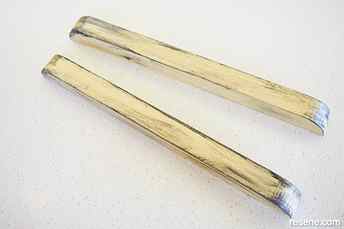
Photo eleven
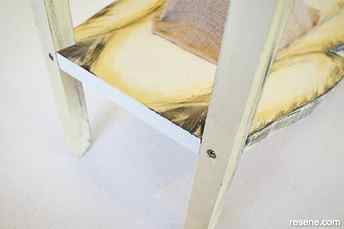
Photo twelve
Step 13: Cut your bit of wood to size and then sellotape your print-out to the wood. Use a ballpoint pen to trace around the letters, pressing hard so that it leaves an imprint on the wood. (Photos 14 and 15).
Step 14: Use a small artist paintbrush to fill in the letters with Resene Blumine and glue the sign to the top of the legs. Fleur used a bit of scrap wood at the back of the sign to help hold it in place. (Photo 16).
Step 15: Finish off with a bow of hessian around the bunny’s neck, fill the tin can with some water and get the kids to choose some favourite flowers from the garden. Happy Easter! (Finished project).
Top tip: As an alternative to dry brushing, you could mix the second colour with Resene FX Paint Effects and apply in a random brushing motion to add a two tone effect to your bunny.
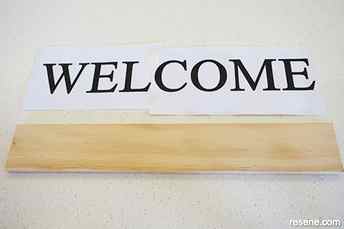
Photo thirteen
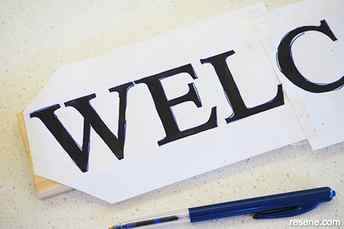
Photo fourteen
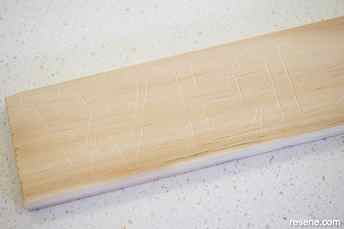
Photo fifteen
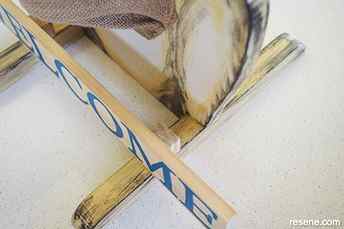
Photo sixteen
New video: ‘Easter Bunny’ Easter acrylic painting tutorial

We are painting Easter bunnies in this week’s special Easter acrylic painting tutorial. So cute! This step-by-step acrylic Easter acrylic painting tutorial is designed for beginner painters, as always. Make sure to subscribe for step-by-step acrylic painting tutorials for beginners posted every Saturday! Check out my new course on Color Theory, available on Udemy and Skillshare. Use the code, “Paintalong” on Udemy to get it for the lowest listed price of $12.99.
We are painting Easter bunnies in this week’s special Easter acrylic painting tutorial. So cute! This step-by-step acrylic Easter acrylic painting tutorial is designed for beginner painters, as always. Make sure to subscribe for step-by-step acrylic painting tutorials for beginners posted every Saturday! Check out my new course on Color Theory, available on Udemy and Skillshare. Use the code, “Paintalong” on Udemy to get it for the lowest listed price of $12.99.
This course will help new artists succeed in my free weekly classes here on Youtube!
The colors that you will need for today’s tutorial are:
- Cadmium Yellow: https://amzn.to/2wKn1kK
- Cadmium Red: https://amzn.to/3cHJ23V
- Thalo Green: https://amzn.to/2TIJFTs
- Ultramarine Blue: https://amzn.to/2Ypn2oS
- Titanium White: https://amzn.to/2TLri0p
- Mars Black: https://amzn.to/2THaMy5
And you will need three standard types of brushes that I use in most classes:
- A 1-inch wash brush: https://amzn.to/3aa5D8z
- A medium-sized, round brush: https://amzn.to/39z51bh
- A tiny round brush too, like this: https://amzn.to/2VRkCPC
To see a full list of materials that you need to paint along each week, click here: https://skyepratt.com/materials/
About Paint Along With Skye If you are new to acrylic painting, this is the place for you! I post a new video, always a step-by-step acrylic tutorial for beginners, every Saturday. So subscribe if you would like to learn how to paint with acrylics step-by-step! This video is designed for artists at home to be able to paint along with this real-time acrylic painting tutorial for beginners. It’s also a super fun idea to offer an in-home art party with all of your friends! Let me know what you thought of today’s acrylic painting tutorial in the comments section. Free easy acrylic painting classes are offered every Saturday, right here, so make sure to subscribe!
About the artist
I’ve taught acrylic painting for beginners for almost 10 years on a freelance basis through a number of different studios. I also have been offering “pop up” in-home paint parties for private groups. I LOVE teaching painting, and my favorite thing is when my students unlock a love or a knack for creative expression because of taking my classes. I started this Youtube show at the end of the year in 2019, with the hope of offering my “beautiful but do-able” paintings and step-by-step instructions with a worldwide audience. I hope you enjoyed today’s step by step acrylic painting tutorial for beginners. Let me know what you thought of today’s easy acrylic painting tutorial in the comments section! Check out the shop, stock up on art supplies, and until next time, stay creative!
*note, some links above are affiliate links. Purchasing through these affiliate links does not raise the cost for the consumer.


