STEP 3: With your rinsed flat wash brush, mix together blue and white to make a light blue. Block in both the eyes with this color. To get to the edges and finer areas, you can switch over to your filbert brush.
Creating ‘A Coat of Red’ Cat Acrylic Painting
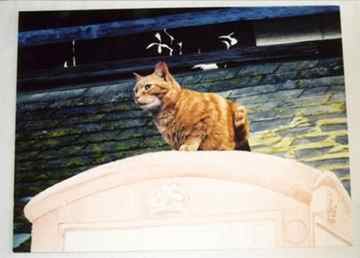
Cat artist Jacqueline A. Gaylard explains how she paints using the medium Acrylic, in a realism style. She describes some of her artistic techniques and how her intricate paintings of animals are created. Jacqueline loves painting all cats, whether wild big cats or domestic moggies. In this blog she describes how she created the cat art painting ‘A Coat of Red’, a cute ginger cat sitting on an old red telephone box.
‘A Coat of Red’ Cat Acrylic Painting
by professional cat artist Jacqueline A. Gaylard S.O.F.A – Artist Biography
Before beginning any painting, I like to carefully observe the subject before progressing to sketching and photography. I try to sketch from life whenever possible, to gather as much information about the animal’s form, colour and individual characteristics. Photography also plays its part in the research process, for animals never stay still for long!
I rarely paint on canvas, but prefer to use an acid-free watercolour board which consists of mould made watercolour paper which has been applied onto strong board, this is great as it eliminates the need for stretching and means I can apply multiple washes. I also prefer the NOT surface so that where I want the paint to remain thinly applied, I can still achieve smooth brushstrokes.
My main medium is Acrylic paint, but I also enjoy painting in Oils and the watercolour medium Gouache. I enjoy the fact that Acrylic provides me with the best of both worlds; a water-based medium that can be thinned for washes and a paint that can be applied as Oils, in thicker layers that when dry becomes permanent and completely stable. View more of Jacqueline’s Wall Art
My main palette consists of the primary colours and two whites, usually Titanium and Zinc. I also love to use Yellow Ochre and Burnt Sienna. I occasionally use a Mars and Ivory Black, but I always mix with other colours in order to achieve the right tone for the situation. When painting a black animal’s fur, for example, the colour is never just black. If you look closely you will see many tones of blues, browns, purples etc. Click link to view one of my black cat paintings Black Cat Painting.

I use my preliminary sketches and drawings, with photographs as reference to draw out the desired composition. Using a pencil I lightly draw the subject in the desired position, directly onto the painting surface.
I gradually begin to refine the drawing until I have enough general detail to work with.
Using light washes of Acrylic paint I quickly apply wet on dry washes of colour to define some areas of the composition. For me, the animal’s eyes are the first thing I need to render, aiming to project the personality of the animal from the very outset of the painting.
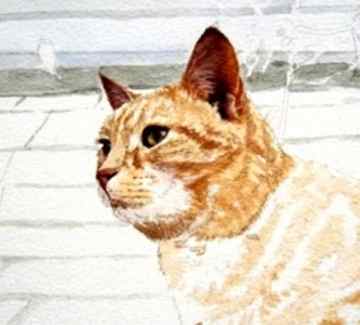
Once the eyes are complete I feel that I am now getting to know the animal’s character. I give the ears and nose my full attention before moving on to develop the cat’s face. Applying thin layers of orange colour, I define the individual markings of the fur and begin to create the cat’s facial structure.
At this stage I am able to use a smaller brush and begin to apply more accurate layers of thicker paint. I apply many brown/orange tones to portray the soft fur over the face and always work the brushstrokes in the direction of the fur.
I use many sizes and types of brushes depending on what I am painting. I always have plenty of Size 00000 which are small enough for me to accurately portray the texture of fur.
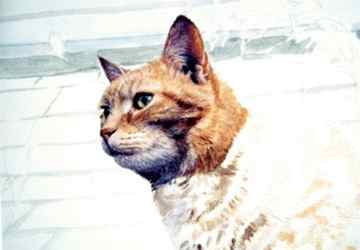
Leaving the face for a while, I now continue the layered wash process again, creating the body of the cat. Thin washes of orange colour followed by thicker layers of paint; I work my way down the body and build up the desired depth of colour.
Once I am happy with the form and colouration of the cat, I move on to the background.
I used a base wash of blue/green colour to define some of the roof slates and then applied much deeper blue/grey colours.
More washes were applied to the right hand side roof slates. Concentrating on texture and beginning to incorporate the colourful moss.
Gradually adding more detail to each row of slates and then incorporating the different shapes of moss as I go along.
Using small brushstrokes, I define the slates shaded areas and lighten the moss with a vibrant lime green colour.
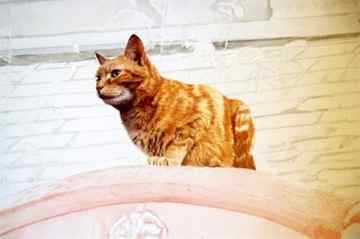
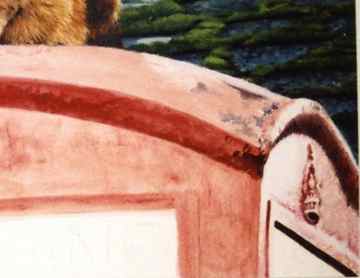
The old phone box was very interesting to paint as it was full of character. I began working from the right hand side with some darker tones to begin to create the shadows of a hard structure.
I wanted to achieve the flaking paint on the phone box roof first, so I used smooth brushstrokes all over the arch of the roof before highlighting the surface of the flakes. For the side of the phone box, I used a rougher wash technique, quickly applying the paint in the same direction as the paint on the phone box. Eventually, I added deeper tones of red and highlights of light pink colour.
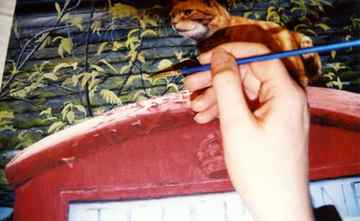
I now added in the branches of the tree using a deep brown/grey colour and blocking in the position of the leaves using a light yellow/green. Using a smaller brush I worked on the detail of each branch and each individual leaf.
Returning to the cat, I worked on any areas that I felt required some extra attention, helping to create a life-like portrayal. With a light flicking action, I go around the outer edge of the cat creating the effect of individual fine hairs.
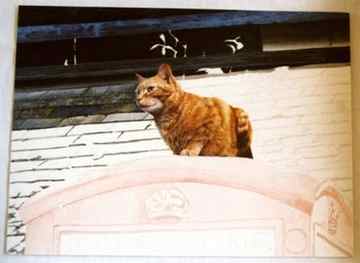
I now accentuate any areas of the painting which require more light or shading, therefore drawing the attention of the viewer to certain areas and bringing all the elements together.
The final things to be painted are the cat’s whiskers, followed by my signature.
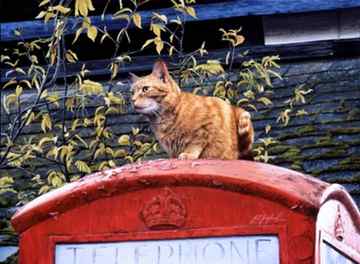
The completed Acrylic painting has the title “A Coat of Red”.
View more of Jacqueline Gaylard’s fabulous original CAT Wall Art and CAT Art Prints
How To Paint Or Draw A Cat Easy
One of the easiest ways to paint a cat is painting it’s silhouette. Breaking down the cat’s body into simple shapes like ovals, circles and triangles makes this cat drawing easy enough for anyone to tackle.
You can use the steps below in a painting or a fun drawing activity with the kids. The applications are limitless!
Check out the infographic below to learn how to draw a cat in 6 easy steps.
For the complete “cats and a city skyline” painting, check out the full tutorial at the end of this post.

Yield: 1
How to Paint Cats and a Night City Skyline
Learn how to paint cats and a night time city skyline painting this step by step tutorial.
Active Time 2 hours
Total Time 2 hours
Difficulty Beginner
Estimated Cost $10
Materials
- Canvas 9″x12″
- Mars Black
- Titanium White
- Ultramarine Blue
- Cadmium Yellow Medium Hue
- Cadmium red medium hue
- 3/4″ flat wash brush
- small round brush (size 5)
- 1/4″ angled brush
- paint palette
- jar of clean water
- rag/paper towel
- pencil
- ruler
- small round object (to trace moon shape)
- Optional: white paint marker
- Check out the full YouTube painting tutorial here.
- Add a few drops of black on the top 1/4 of the canvas, and a few drops of blue in the middle section of the canvas. Leave bottom 1/4 canvas blank.
- Using your 3/4″ flat wash brush, blend the paint on your canvas using horizontal back and forth strokes. Leave the bottom 1/4 of the canvas blank. When done blending the top of the canvas should be darker and gradually gets lighter towards the bottom. Let dry (3-5 minutes) or use a hairdryer for faster drying time.
- Thin down some white paint with water so that it’s a liquid consistency. Grab some liquid paint on any brush then start tapping it on the handle of another brush to create splatter stars. Move the brush around the canvas to fill the entire night sky.
- Using a pencil and ruler trace in a fence shape on the bottom 1/4 of the canvas. You can also skip this step and just free-hand the fence design in the next step.
- Mix brown paint by mixing equal parts yellow, red and blue to get a dark brown. Then mix in a bit of titanium white until you get a nice chocolate brown color.
- Using the angled brush, apply the brown paint to the fence portion of the painting.
- Add a tiny amount of black to the brown paint to make a darker brown for the wood grain pattern on the fence. Black is a highly pigmented paint so a little goes a long way. This darker shade of brown should have contrast to the brown in the last step. As long as you can see the contrast it works.
- Using your angled brush, pick up some of the darker brown paint. Using the chiseled edge of the brush use light sweeping vertical strokes along the fence to create the wood grain pattern.
- Mix an even darker shade of brown by adding a bit more black to the mix. Using the same angled brush add vertical lines to separate each fence panel. Optional: you can also add a top border to each of the triangular fence posts to give extra dimension. You can move to the next step while paint dries.
- Using a pencil and a ruler trace in the shapes of the city skyline/buildings. A fun idea would be to find pictures of your own cities skyline and add in your cities building shapes.
- Mix a medium grey paint by mixing 2 parts black to 1 part white. Using your angled brush fill in the building shapes with the grey paint.
- Mix a pale yellow paint by mixing 3 parts white to 1 part yellow. Using your angled brush paint in the windows of the building. You can have fun here and paint in different window shapes. In fact, the more variation in window shapes you have the more interesting the painting looks also. Use squares, rectangles, circles, thin lines as some inspiration to your window shapes. And don’t worry about making them perfectly straight/angular – just enjoy painting them :). You can move to the next step without paint fully drying.
- The following 6 steps, you’ll be painting the moon. For a detailed tutorial, check out this how to paint the moon post.
- Trace a circular moon shape in the sky using a round object and a pencil. Alternatively you can skip this step and freehand painting in the moon.
- Fill in the moon shape with white paint using the small round brush.
- Mix some dark grey paint by mixing 2 parts white with 1 part black. Using the small round brush paint in the shapes in the picture below.
- Mix a lighter grey paint by adding a small amount of white into the dark grey paint from above. Use a small round brush and use the light grey paint to outline around all the dark grey shapes (it’s okay if the all the paint is still wet, as it helped with blending). Wait for the paint to dry before the next step.
- Paint some small speckled dots over the whole moon surface, using white paint on your smallest round brush. These will be your smallest craters.
- Mix some more dark grey paint if you don’t have any left from step 15. This should be the darkest grey you’ve used for the moon. Using your small round brush paint rings around the “white specs” from the step above. You can also add some more of this dark grey paint in other parts of the moon in varying shapes/sizes. The more variations of grey you have, the more realistic the moon will look. The paint can still be wet to move onto the next step.
- Now for the cats! Paint in an oval shape for the right cat’s body, using black paint and your small round brush.
- Continuing with the black, paint in a circle shape on top of the oval – the cats head.
- Paint 2 triangle shapes for the cats ears.Now for the cats legs! Paint in 2 ovals on either side of the bottom of the larger oval.
- Now for the cats legs! Paint in 2 ovals on either side of the bottom of the larger oval.
- Finally, paint in the cats tail in a fun squiggly shape. Cat #1 is done!
- For cat #2 repeat steps 19-23. You can also add in a couple of shooting stars into the sky as an optional touch, Use a white paint pen or a small round brush and white paint.
- All done! Below is a quick infographic on the steps to paint a cat.
Paint in Highlights
With your detail brush dipped in white, add a small highlight line on each of the pupils as well as a few small lines around the fur to create a few highlights, including the fur in his ears and along the whiskers.
Once you are satisfied with your work, step back and admire your newly made Cheshire cat.
Want the Full Tutorial + Traceable Stencil (with no ads)?
If you want to get the entire step-by-step painting tutorial (without ads), printable supply list and stencil for 3 standard canvas sizes, check out this painting printable here in my shop.
How to Paint a Sunflower with Acrylic (Step by Step Tutorial)
Spooky Skeleton Tree Acrylic Painting Tutorial for Beginners
Bela Lugosi Dracula Pop Art | Acrylic Painting Tutorial for Beginners | Halloween
How to Paint Tim Burton’s Cheshire Cat | Acrylic Painting for Beginners
Pin it for later! ⤵


