When you start a painting, you can’t see the finished product. You don’t know how it’s going to turn out.
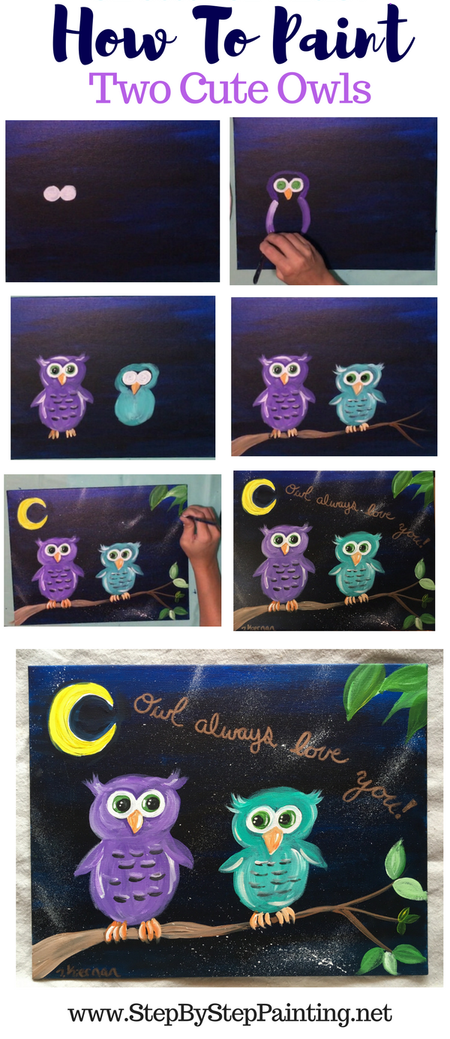
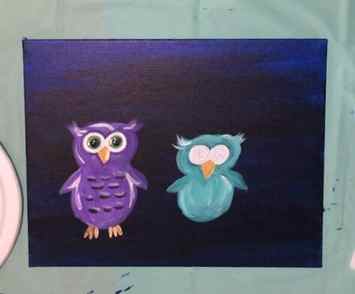
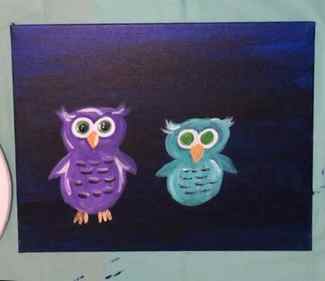
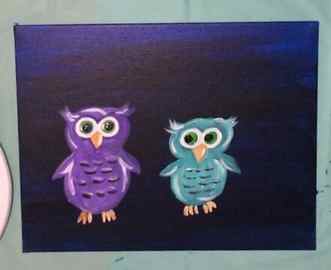
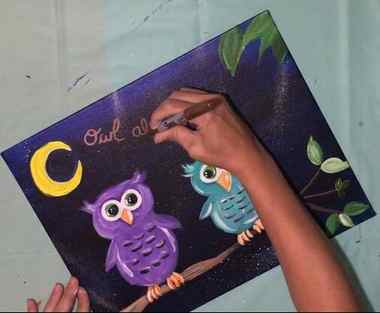
Owl Painting “Owl Always Love You”

Learn how to paint these bubble eyed owls perched on a branch under a crescent moon with a galaxy sky background! You will be guided step by step with process pictures and a video.

This is a great painting do do with kids! Make one side by side with your little artist. I did one on an 8×10 canvas and the other on an 11×14 canvas.
Materials:
- 11″ x 14″ canvas or 8″ x 10″ canvas
- Acrylic Paint (I used Apple Barrel This Time Around!)
- Orange “Jack O Lantern”
- Bright Yellow
- Shamrock Green
- Bimini Blue
- Too Blue
- Black
- White
- Purple Iris
- Nutmeg Brown
- 1″ Flat (Large flat brush)
- 1/8″ Flat (Small Flat Brush)
- #3 Round (medium round brush)
- 1/4″ Flat (12 bright brush)
- Toothbrush (for splattering stars)

If you struggle with painting the owls free handed, that’s okay! You can use the provided traceable. Print it on standard size computer paper and use a sheet of white graphite paper. You can also rub white color pencil on the back of the paper and trace.
Directions At A Glance:
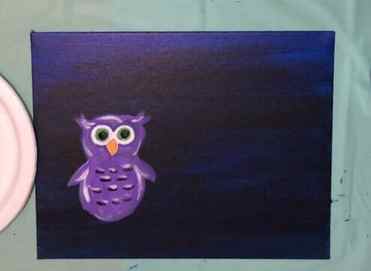
1. Paint the entire canvas dark blue.
Drizzle out some “black” and “Too Blue” onto the canvas. (Mars black and phthalo blue if you’re using Liquitex). Use a 1″ flat brush to spread the paint out and fill the entire canvas. The color will turn a very dark blue, almost black!


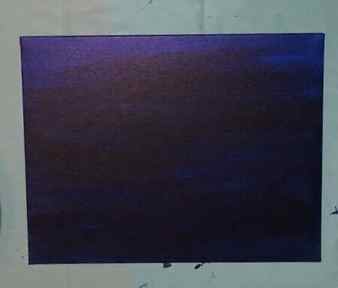
When I painted this, I did not mix the black and blue all the way on the canvas. In fact, if you notice at the top, there is a little more blue than black (it’s lighter on the top).
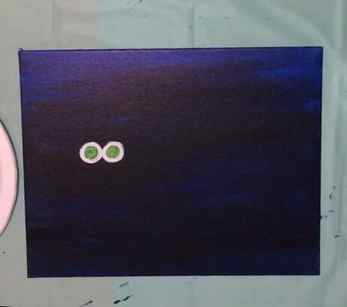
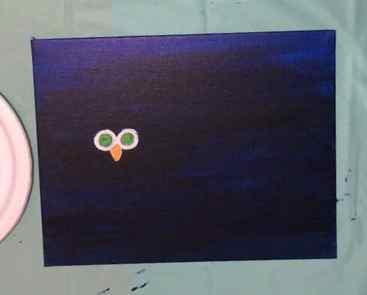
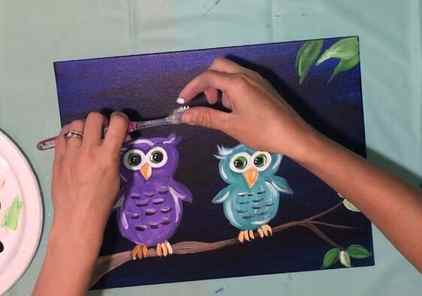
2. Paint owl eyes and beak.
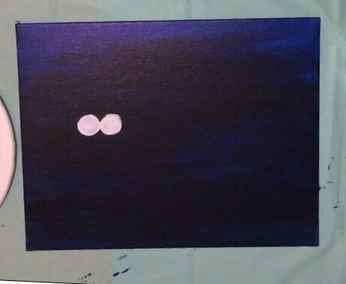
Use a 1/8″ flat brush to paint two small circles for the first owl. Wait for the white to dry a bit then add two green circles inside the white circles. Add an orange beak under and in between the two eyes. I used orange and a bit of white (orange tends to be translucent so adding white to it helps!)
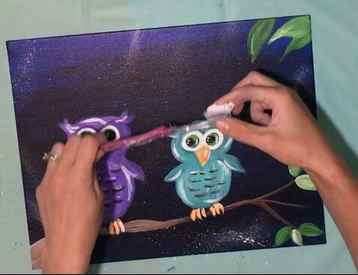
3. Paint the head and body outline.
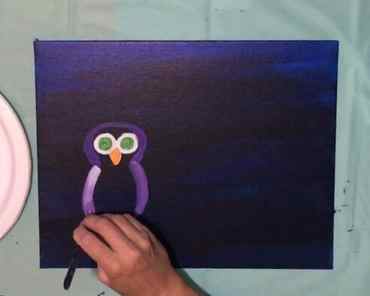
Next I used a 1/4″ flat brush and “purple iris” to outline a head and body of the owl. I also dipped my brush in some white to create some color variation with the purple and allow it to show up against the dark background. Fill in the owl with curved strokes that go with the shape of the owl. Also, paint some wings and ears!
4. Paint Some Owl Feathers
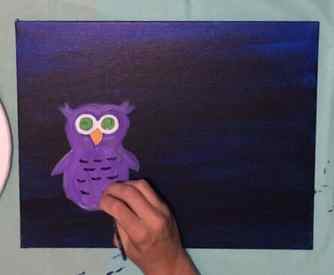
I switched to a small #3 round brush and black to paint the feathers on the belly. Paint little “u” lines.
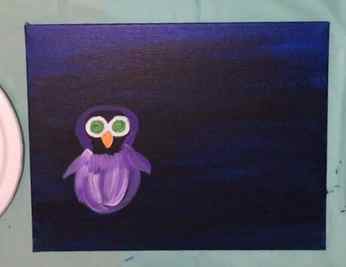
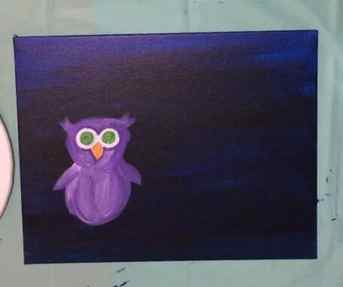
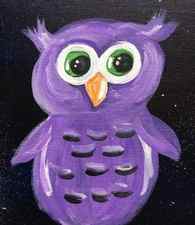
5. Finish The Owl Eyes
Paint in two black circles inside the green circle. Wait for the black to dry and then paint white dots on the inside of the circle.
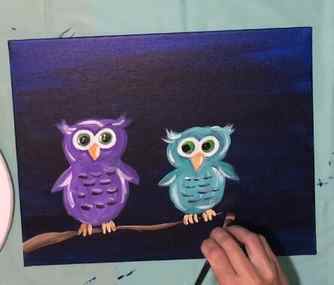
6. Paint the feet of the purple owl then continue on to the next owl.
I used a #3 round to paint the feet of the purple owl orange with a little bit of white on the brush. Then I went on to pain the small turquoise owl. This time I wanted to paint a smaller owl so I painted the eyes lower than the first one.
7. Paint the body of the second owl.
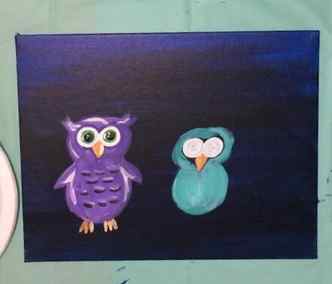
I used “Bimini Blue” for the second owl and the same brush (1/4″ flat). Paint the head and the body in around the eyes. Continue on painting the arms, ears and feathers and then the feet.
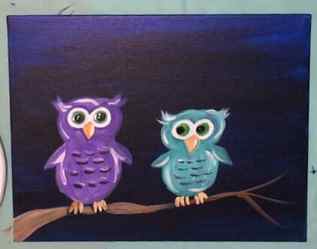
8. Paint A Tree Branch
I used a 1/2″ flat brush dipped in both Nutmeg Brown and White (Raw Sienna and Titanium White). Use the tip of the brush to paint a branch. Press firm for a thicker brand and press lightly when you want your branch to get thinner. Use the very tip of the brush to paint small branches.
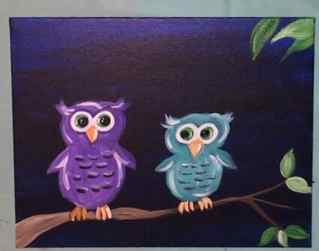
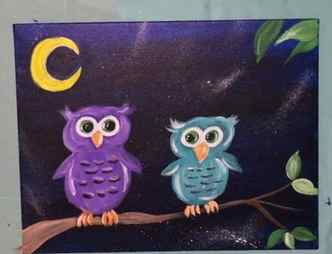
9. Paint Some Bright Green Leaves!
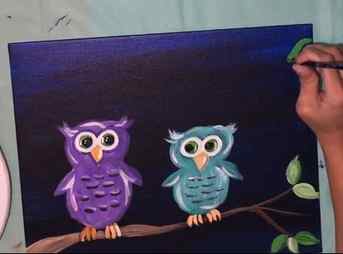
I used a #3 round brush and “shamrock green + white” to paint the leaves. Load the brush with both the green and white. Paint leaves on the tips of the branches. I also painted some leaves sticking out in the upper right corner.
10. Splatter Paint Stars!
This is always my favorite part! Use an old toothbrush to flick stars on the canvas. Dip the brush in white (NO water!!). Flick it with your finger! Test out different angles of the toothbrush. Try flicking it close to the canvas or far away. You will get different consistencies. I was able to create a “galaxy” effect by angling the toothbrush really close to the canvas.
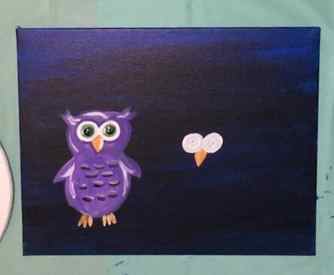
11. Paint a crescent moon white and then paint yellow over the white.
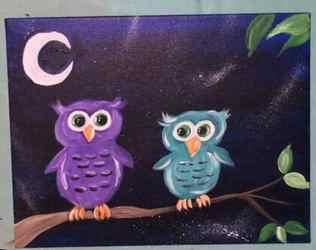
You won’t be able to see that yellow unless you paint white first! Use a #3 round brush to paint a crescent shape. Wait for that white to dry and then paint a layer of yellow on top.
12. Write “Owl Always Love You” with a gold or bronze sharpie.
I just love this bronze sharpie! It shows up so nicely against dark colors on the canvas! I wrote the quote “Owl always love you” in the sky.


13. Finished! Easy, simple and totally adorable!

I ended up doing this painting twice!
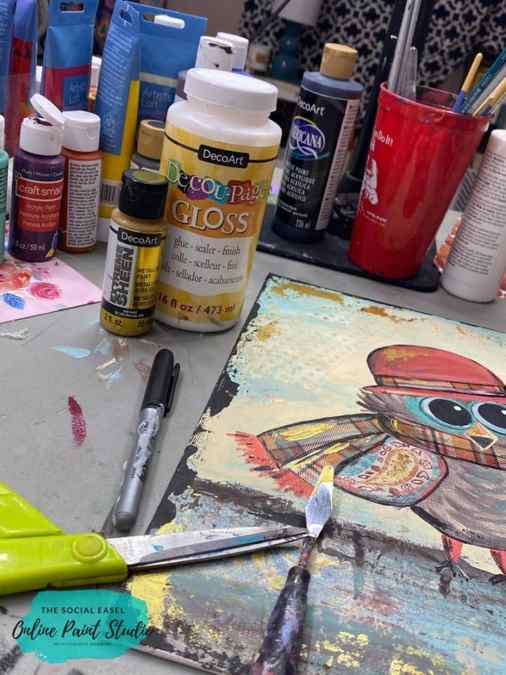
Let’s Learn How To Create This Adorable Mixed Media Owl
I love mixed media art. It can be a bit messy, but there are literally no rules! Mixed media is when you layer more than one type of material like paper, ink, paint, stencils, stamps ect. to make a unique piece of art.
You don’t have to have a solid plan, but you definitely have to trust the process and create as you go. I like to have a few cute scrapbook scraps and tissue papers to choose from.
Materials Mentioned:
- Canvas Board
- Acrylic Paints
- Paintbrushes
- Palette Knife
- Scrapbook Paper
- Tissue Paper
- Stencils
- Decoupage Glue
Start with the background first by adding a little bit of ripped paper to parts of the background. Use a thin layer of decoupage on the canvas board, place your paper, and seal in with another layer of decoupage.
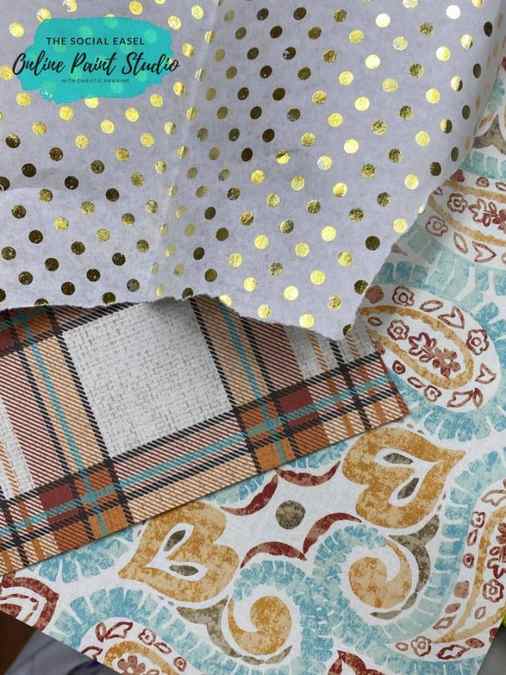
A lot of my background paper will be covered by paint, but you will see the gold polka dots, patterns, and texture of the torn paper peeking through.
Don’t worry if there are bumps and creases as you apply it because that will add to your painting’s character.
After decoupaging my background papers and letting it dry a bit, paint in the background color and foreground. I paint right over my paper! You can use a little bit of paint or sheer it out by watering it down so you can see more of the patterns. You get to decide how much of your paper shows through.
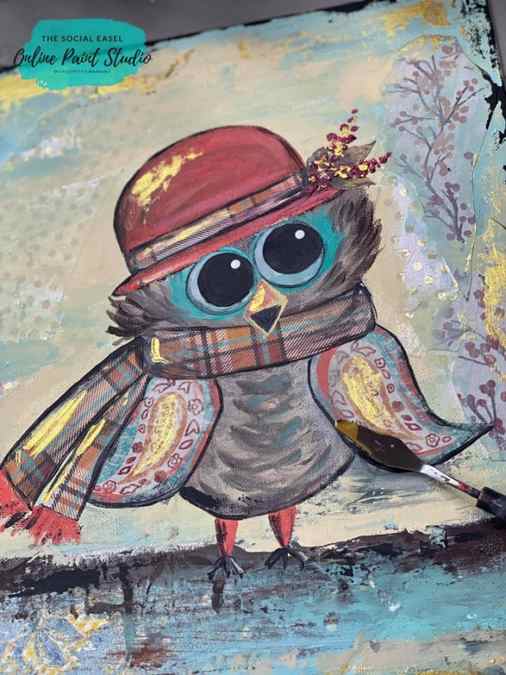
Mixed Media Fall Owl
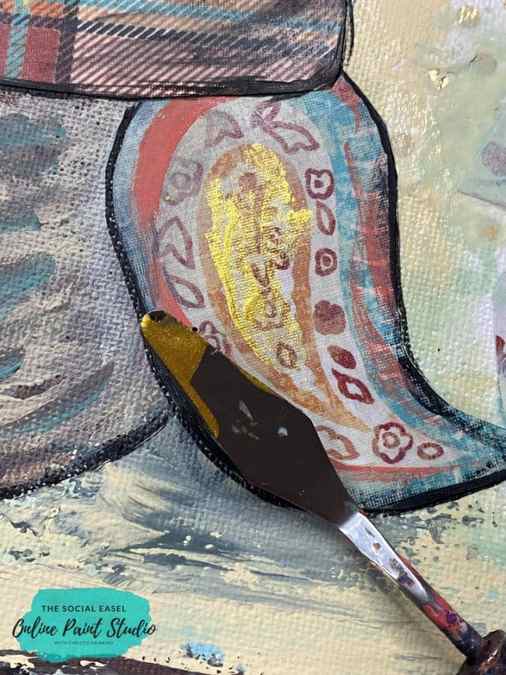
While that is drying, paint in your owl. I used feathery strokes by flicking outward on the body and head to make this owl fluffy and then paint in the little legs and the eyes.
I had a paper with a paisley pattern that was perfect for my owl’s wings! When you are working on a project like this, you get to decide how much of your piece will have mixed media. It doesn’t all have to have scrapbook paper and I will be adding paint to all my elements.
When you are creating, play around with the mediums you have on hand. In my fall owl painting, I ended up using a lot of paper.
I couldn’t resist the paisley wings and even had a berry branch pattern to add to the background and an acorn for the hat. All of the things you can add just make your painting stand out with texture and uniqueness.


