Of course, at this point, you can do whatever painting you’d like but I’ll share with you my super technical (read not technical at all) artistic tutorial of what I did next to give you some inspiration. The fabric of the drop cloth, while thick, does not have a super tight weave so if you were to paint directly on it, it would probably need several coats. You can also add a coat of primer or gesso. I planned on adding some texture to my painting from the beginning so I first added a layer of joint compound. I’m really glad I did because I think it really helped with the overall look of the painting. With a two-inch-wide putty knife, I smeared the joint compound all over the canvas. I was really liberal with the joint compound. Leaving some thicker lines of it in places and keeping it a little clearer in other spots. After the joint compound dried, I came back with some dark blue paint. I just used these foam brushes because it’s what I had on hand. I painted the entire canvas with a layer of blue. After a layer of blue, I painted over it with a layer of white. Then, another layer of a light beige-y white. Several times I came back with the previous color to add a little more in some spaces until I got a layered base that I really liked. After that, I added the loopy swirls. I used a small paintbrush and just free-handed the loops. My first attempt at this, I didn’t like so I painted over it again with the beige-y white and started over with the loopy swirls, and that time I got it right. It was a perfect piece of art. We framed the canvas using a simple mitered corner technique that is featured in this DIY canvas frame tutorial. The only difference is, this time we used the brad nailer and finishing nails to actually attach the canvas to the frame instead of allowing it to just fit snugly around. We used a combination of these two stains I found at Home Depot. First applying the stain Special Walnut, followed up Sunbleached. In the photo above you can see the Special Walnut before adding the Sunbleached on the bottom there. On the top, the Sunbleached color has been applied on top of the Special Walnut stain. I’m so thrilled with how it turned out. This painting is so perfect in this space and I think it elevates the entire room. It’s one of those things where you didn’t know how much you needed it until you have it. Can you believe I made that? I made that! For your convenience, this post may contain affiliate links. That means, at no additional cost to you, I may make a small commission on your purchase. Click Have you ever done a project like this before? I’d love to hear about it. I’d love for you to share this on Pinterest or Instagram. You can follow me: @makinghomebase. You can also just send this link to someone you think will enjoy it! I appreciate you sharing my projects! You can also check out my other DIY art projects below: DIY Abstract Art from Plywood DIY Wall hanging from Wrapping Paper
How to Build a Canvas Out of Wood & Boards
This article was co-authored by Kelly Medford. Kelly Medford is an American painter based in Rome, Italy. She studied classical painting, drawing and printmaking both in the U.S. and in Italy. She works primarily en plein air on the streets of Rome, and also travels for private international collectors on commission. She founded Sketching Rome Tours in 2012 where she teaches sketchbook journaling to visitors of Rome. Kelly is a graduate of the Florence Academy of Art.
This article has been viewed 206,022 times.
Making your own canvas panels can be a very satisfying project for any artist. Not only is your work showcased on the canvas, but your work is also the panel itself. This project is simple enough to create numerous panels at a time at a fraction of the cost of buying pre-made canvas panels. Simply gather the correct materials, set aside some time, and you will soon be on your way to making your own canvas panels!
Things You Should Know
- Slide the ends of a long and short stretcher bar together. Push in the remaining 2 bars to make the frame, using a hammer to tap and secure each corner.
- Then, lay your canvas on a table and place your frame on top. Make sure the canvas is long enough to fold over the sides of the frame, then cut it to size.
- Fold 1 side of the canvas over the frame and secure it with a staple gun. Pull the canvas taught on the other end, staple it in place, and repeat with the other sides.
Steps
Method 1
Method 1 of 2:
Using a Wood Frame
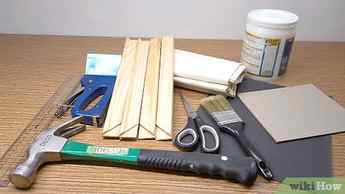
- A long piece of art canvas. You should get a canvas that is long enough to create your ideal canvas size.
- Four stretcher bars. These are wooden bars that have notches on one end. You should get two stretcher bars that are the ideal width you want for the canvas and two stretcher bars that are the ideal height you want for the canvas, for example, 16 x 24 or 11 x 15.
- A hammer.
- A staple gun.
- A pair of scissors.
- Acrylic based gesso.
- A paintbrush.
- Sandpaper.
- Palette paper.
Fit the stretcher bars together. Take one long stretcher bar and one short stretcher bar. Slide the notched ends of the stretcher bars together, pushing with your hands until the two ends side together. They should be flush with each other, forming a diagonal line where the two ends meet. [2] X Research source Artist Kelly Medford suggests “holding each corner in a door frame and making sure it’s square. The bigger it gets, the more challenging it is to get it right,” and the more important it is to double check straightness.
Repeat this with the two remaining stretcher bars until you have built a wooden frame composing of all four stretcher bars.
Advertisement
Tap the sides lightly with the hammer. To ensure the sides of the canvas are fitted properly and securely, you can use the hammer to tap the sides. Do this on the outside of the wooden frame and tap lightly so the ends are firmly joined together. [3] X Research source
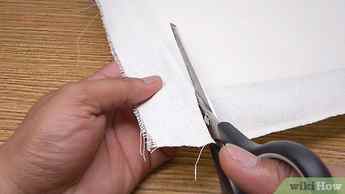
Cut the canvas to fit the wood frame. Spread the canvas out on a flat surface, such as a table. Then, place the wooden frame on top of the canvas. Gently fold the canvas so it covers the length of the wooden frame and the ends fold over the wooden frame so the stretchers are covered by the canvas. [4] X Research source Artist Kelly Medford recommends using a stretching tool, “which is like pliers that you pull the canvas over the stretcher bar with.” This can help you get a tighter stretch.
Use the scissors to make a cut and then use your hands to tear the canvas so the excess canvas comes off. Do this by holding down one half of the canvas and tearing the excess canvas off at an angle. Repeat this on the other side of the wooden frame until the canvas fits the wooden frame.
- Rotate the frame and pull the canvas very tightly on the opposite end. Then, attach the canvas to the other short side of the canvas with three staples. Leave the centre staple for last. Artist Kelly Medford notes that you can also use this technique if you are using a hammer and nails: “put one nail on each side and work your way out from the center towards the end, continually rotating each side while you’re doing it, so that way you should be pulling it evenly. Then, if you get really big bubbles or bumps as you’re going, you can just take one nail out and redo it.”
- Turn the frame to the longer side. Fold the canvas over the frame. You will notice a notch of canvas that sticks out when you fold the canvas over the frame. Use your index finger to gently push in this notch so it tucks into the fold. Then, pull the canvas up as tight as possible and push it down over the frame. Attach the canvas to the frame with a staple over the folded corner.
- Repeat these steps for the other corner, making sure to push down the notch, pull the canvas tightly and fold it over. Secure the canvas with a staple.
- Finish attaching the rest of the canvas to the frame by pulling tightly on the canvas and staple it down. You can put six staples on the longer ends of the canvas to ensure it is secure.
- Start by shaking up the acrylic based gesso. Then, pour the gesso onto a sheet of palette paper.
- Use the paint brush to paint the entire area of the canvas. You should do one thick coat of the paint, making sure to get the sides of the canvas as well.
- Let the gesso dry. Then, use the sandpaper to sand the canvas. Sand the canvas using small, circular motions. Do one layer of sanding on the canvas and don’t worry too much about making it very smooth.
- After one sanding session, pour gesso onto the palette paper and use the brush to add another layer of gesso to the entire canvas. You can use a hair dryer to dry the gesso faster.
- Once the gesso is dry, sand the canvas one more time. Try to make the canvas really smooth. After a good sanding, the canvas is ready for use.
Advertisement
Method 2
Method 2 of 2:
Using a Board

- Linen or cotton canvas material. This usually comes in rolls and can be found at arts and crafts stores. A typical precut canvas size is a 21 inch (53.34 cm) height x 50 inch (127 cm) width roll of canvas, which will give you two 20 inch x 24 inch (50.8 cm x 60.96 cm) canvas panels.
- Miracle Muck Glue
- Rotary blade and/or scissors
- Ruler
- Pencil
- Rubber paint roller
- Heavy rubber roller
- Paper towels
- Sand paper
- Rotary saw (for masonite, hard board, and/or birch plywood)
- Brown wrapping paper
- If your board is non-buckle board such as Gator Board, use a rotary blade to cut along the lines you drew.
- If your board is masonite, hard board, or birch plywood, you will need to use a rotary saw to cut it down to size. Cut along the lines that you drew on the board.
- Make sure that you are in a safe area, such as outside or in your construction garage. Always wear goggles when cutting, and make sure that your hands do not get near the blade.
- No matter what board you are using, after it is cut, sand the edges down gently so that they are smooth.
- For example, if your board is 20 X 30 inches, the rectangle you draw onto the canvas should be 22 X 32 inches.
- Cut the rectangle out with either a pair of scissors or a rotary blade. If you use a rotary blade, make sure that you are cutting on top of a safe surface such as a cutting board.
- Then pour some glue onto the middle of one side of your board. Take the same roller and begin to spread it around. The corners and edges are especially important.
- The glue spread over both surfaces should be a relatively thin layer. Do not pour too much otherwise it will ooze out the sides when you place them together.
- While you are rolling the board, you may have to readjust the board as it might slide.
- After you have rolled against the board, press down with your hands. Place one hand overtop of one another and apply pressure firmly and evenly throughout. This will further secure the board to the canvas.
- If you have not already done so, transfer this pile to a safe location. This should be somewhere where there is not a lot of movement going on. Do not place this near a children’s play space. The best place is a basement, or a secluded room.
- Your canvas will need an entire day to properly dry and set. The following day (after 24 hours) you can remove the books/weights.
- If you use the glue method, make sure that the glue is spread evenly over the entire strip so that it does not begin to peel away.
- The second method is to use sewing pins. Curve your edges backwards and stick two to three pins on each side, through the canvas and into the board. This method only really works on Gator Board; however, you can try to tick the pins into a harder surface.
Trim the excess fabric (option 2). Take your rotary blade and cut the canvas as close to the board as you can possibly get it. Make sure that you are cutting on a safe surface such as a cutting board. Depending on the thickness of the canvas you may have to pass over the same area multiple times in order to cut it. [17] X Research source [18] X Research source
How to Make a Canvas + Paint Your Own Abstract

Here’s a tutorial for creating your own DIY Canvas Painting beginning with a DIY Oversized Canvas made out of a $15 drop cloth. This project is a very budget-friendly way to make high-end-looking custom art. Living in a rental, I can’t invest $500+ on beautiful large-scale art because we move so frequently I would be concerned that it wouldn’t have a proper place or it might get damaged in a move. I still want beautiful art in my home.
I’ve made DIY art several times before. I made this DIY abstract piece on plywood a couple of years ago. I’ve done some oversized DIY Typography Art and then of course the beach print that was hanging in the spot on the wall prior to the swap was a photo snapped by yours truly. After living in this home for over a year, I kept looking at this wall and felt like it needed something more impactful above the sofa. I had been playing around with the idea of a DIY canvas painting for a few weeks but was unsure how I’d tackle it. I’d painted a plywood abstract from scrap wood before but for the size I wanted, I thought that would be too heavy. Canvas was a great option until I started pricing actual canvases. Even the lowest quality canvases in the largest size cost upwards of $75 and the largest size I found still wasn’t going to be big enough. It dawned on me that we could make a canvas and paint it so that’s what we did. Today is a two-part tutorial: How I built the canvas and then how to create a canvas painting.
Part 1: How to Make a Custom Canvas
You can make a large-scale custom canvas from a drop cloth and 1x2s.
Supplies you’ll need:
4×8 Drop Cloth (canvas material)
(4) 6ft 1x2s
Brad Nailer with 1in brad nails
Staple Gun  To create your own large-scale artwork, the first step is to make your canvas – deciding first the size canvas you’d like to make. The final measurement for the oversized canvas we built was 36×60. Matt cut the 1x2s to frame out the canvas. Here were cuts: (2) 60 in boards and (4) 35 in boards. We loosely laid them out like above. We did not worry about accurately space the support pieces because none of this would be seen once the drop cloth went over it.

 First, add a bit of wood glue to the edge then securing it with the brad nailer.
  You’ll notice that we attached the supports with the widest part facing out instead of the on its side like we did the outer pieces of the frame. We thought that this would give allow the dropcloth a little more tautness to prevent it from sinking in. To do this, we took a scrap piece of wood and placed it underneath to get it level with the outer frame, and used the brad nailer to secure it.
  The frame was all done and now it’s time to stretch the drop cloth over top to create the canvas.
  Right out of the packaging, the drop cloth was pretty wrinkled (not pictured) so I took the time to iron it before we started to attach it to the frame. Since it’s stretched quite a bit over the frame, I’m not 100% sure it was necessary but it’s what I did.
  To begin stretching the drop cloth over the frame start by laying the canvas down on the ground with the frame over the top. You’ll start in the middle of one of the long sides, stapling the drop cloth to the frame. For this part of the project, it’s helpful to have an extra set of hands.
  You’ll start in the middle, fold about two inches of fabric over the frame, and staple, working your way out to either side stapling every inch or so. Try to keep the fabric relatively even so it doesn’t go wonky when you get to the sides. You’ll want to be sure to leave about two inches or so on either end to make the corner folds.
  After you’ve completed the first side, move to the second long side, again, starting in the middle then working your way out. This is when it’s helpful to have an extra set of hands. I held the fabric taut on the one side while Matt tugged and stapled on the other side.
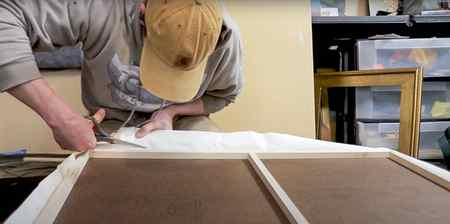
  Do the same on the two shorter sides making sure to pull it really snug before stapling the final side. Once all four sides are secure, you should see that the drop cloth is on there really tightly with no slack at all. Now it’s time to fold the corners. This takes a little effort.
 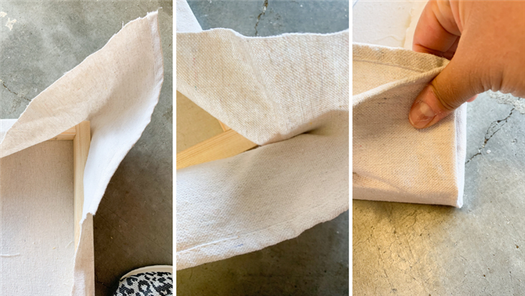 You’ll take the extra fabric that is gathered in the corners here to create a nice fold then staple. This will make your sides nice and crisp. This is really hard to explain with words but hopefully, the photos above help you understand better how to make this corner fold. Hold up the corner fabric with one hand. Gently move your fingers closer to the corner, pinching the fabric together until the pinch of your fingers lines up with the top of the wood of the frame. Then, fold the fabric over.
  Staple the corners to hold down the fold. Do that on all four corners and cut away any excess fabric with scissors.
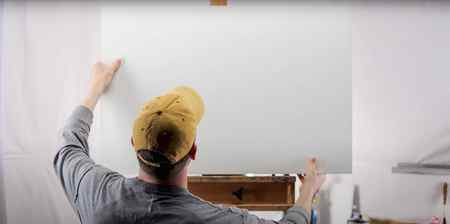
  Now you can stand it up and admire your work! Kidding, now it’s time to paint – this is a DIY canvas painting, after all.
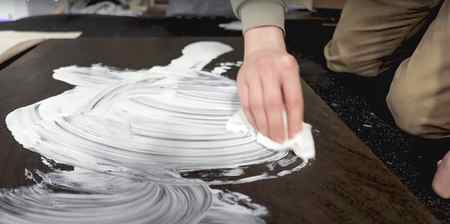
Of course, at this point, you can do whatever painting you’d like but I’ll share with you my super technical (read not technical at all) artistic tutorial of what I did next to give you some inspiration.  The fabric of the drop cloth, while thick, does not have a super tight weave so if you were to paint directly on it, it would probably need several coats. You can also add a coat of primer or gesso. I planned on adding some texture to my painting from the beginning so I first added a layer of joint compound. I’m really glad I did because I think it really helped with the overall look of the painting.
  With a two-inch-wide putty knife, I smeared the joint compound all over the canvas. I was really liberal with the joint compound. Leaving some thicker lines of it in places and keeping it a little clearer in other spots.
  After the joint compound dried, I came back with some dark blue paint. I just used these foam brushes because it’s what I had on hand. I painted the entire canvas with a layer of blue.
  After a layer of blue, I painted over it with a layer of white. Then, another layer of a light beige-y white. Several times I came back with the previous color to add a little more in some spaces until I got a layered base that I really liked. After that, I added the loopy swirls. I used a small paintbrush and just free-handed the loops. My first attempt at this, I didn’t like so I painted over it again with the beige-y white and started over with the loopy swirls, and that time I got it right. It was a perfect piece of art. We framed the canvas using a simple mitered corner technique that is featured in this DIY canvas frame tutorial. The only difference is, this time we used the brad nailer and finishing nails to actually attach the canvas to the frame instead of allowing it to just fit snugly around.
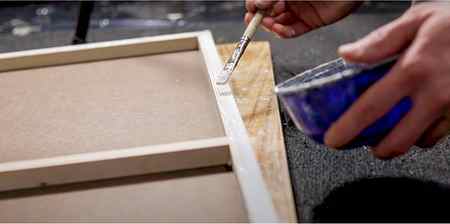
  We used a combination of these two stains I found at Home Depot. First applying the stain Special Walnut, followed up Sunbleached.
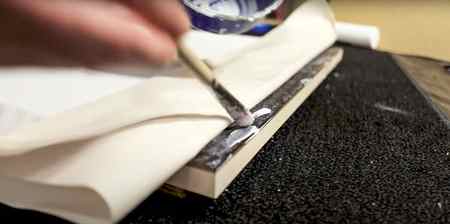
  In the photo above you can see the Special Walnut before adding the Sunbleached on the bottom there. On the top, the Sunbleached color has been applied on top of the Special Walnut stain. I’m so thrilled with how it turned out. This painting is so perfect in this space and I think it elevates the entire room. It’s one of those things where you didn’t know how much you needed it until you have it.
  Can you believe I made that? I made that!

 For your convenience, this post may contain affiliate links. That means, at no additional cost to you, I may make a small commission on your purchase. Click
 Have you ever done a project like this before? I’d love to hear about it. I’d love for you to share this on Pinterest or Instagram. You can follow me: @makinghomebase. You can also just send this link to someone you think will enjoy it! I appreciate you sharing my projects! You can also check out my other DIY art projects below:
 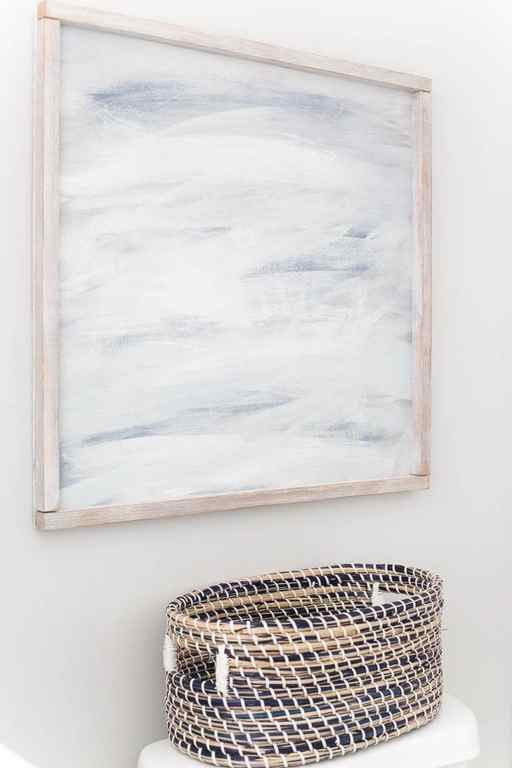 DIY Abstract Art from Plywood
 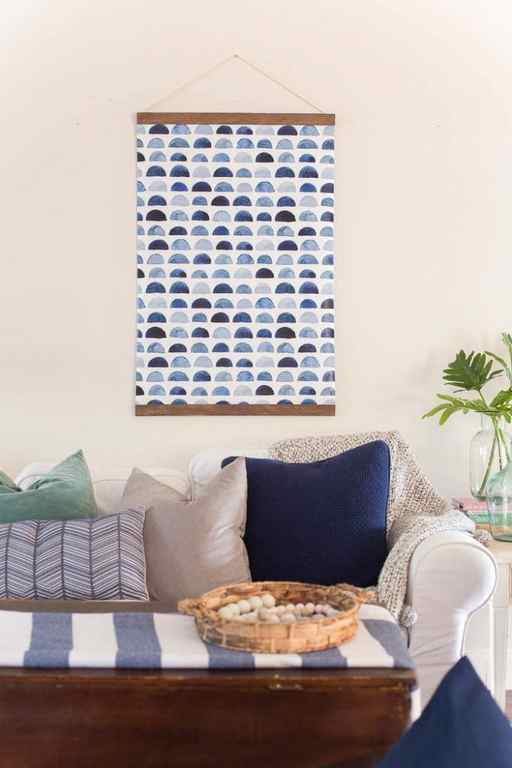 DIY Wall hanging from Wrapping Paper
Making Your Own Canvas Panels At Home- A Simple Guide for Beginners
So you’re interested in canvas panels? Well you’ve come to the right place. Over the years I’ve come to paint solely on canvas boards myself and making them at home to ensure consistent quality has been of high importance.
In this post, I’ll show you what supplies you’ll need along with step by step instructions to making your own professional canvas panels.
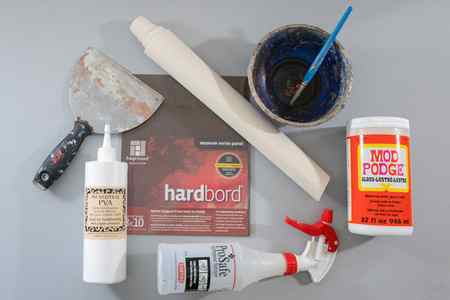
Let’s get started with the supplies you’ll need:
- rolled canvas
- PVA glue
- hardbord
- spray bottle
- something sturdy with a straight, blunt edge so you can scrape the surface of the canvas (like a jointknife)
- an old paint brush and bowl
- a couple of paper towels on hand.
If you read my post about canvas textures, you’ll know that my go-to rolled canvas is Fredrix Knickerbocker and my go-to for hardboard is Ampersand . Ampersand offers the most consistent products and have very little warping and bowing. Their manufactured fiber-core is non-absorbent, which means the PVA adhesive will create a strong bond between the canvas and surface. I have tried birch wood painting panels and was disappointed with the outcome, there was some warping to the panel when it arrived and when I attempted to glue the canvas to it, the birch absorbed the PVA adhesive and created air bubbles and divots in the birch wood itself.
Real quick, if you’re wondering what’s so special about PVA, here is the rundown: Basically, PVA is a professional grade acid-free (pH neutral), water-soluble, solvent-free adhesive. It’s a white color but dries clear. For the preservation of your artwork when creating your own canvases, it’s important to use an adhesive that has these qualities (I recently learned Mod Podge is a suitable alternative). Over time the pH of low grade adhesive vs paint vs canvas can degrade the canvas and thus the artwork contained on it.
______

For archival purposes, using a PVA adhesive will help ensure the longevity of your artwork. I use this PVA glue and it has worked exceptionally well for me.
Ready to put it all together?
Step 1: P lace your hardbord on a flat surface, I usually sit on the floor. a large table would work if you have one.
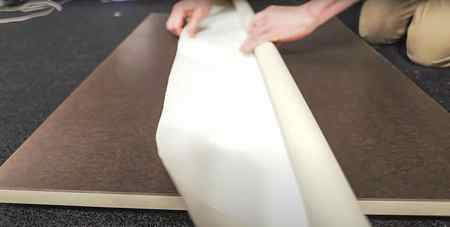
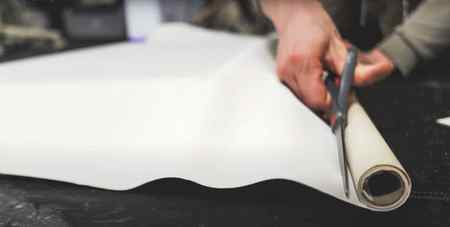
Step 2: I roll out the canvas over top the hardboard and make sure there is enough slack hanging over each side, about 3 inches of canvas for cradled board and 1 inch for thinner panels. Then I use scissors to cut the canvas from the roll.
Step 3: Make PVA mixture. Once the canvas is cut, I put it aside and grab my spray bottle and spritz a bit of water onto the panel and spread it around using my hand. I do this before I pour the PVA mixture so that it can help to spread better.
To make the mixture, I pour a generous amount of the adhesive into my bowl and since it’s water-soluble, I spray some water in it and mix it up. The PVA glue pours a little on the thick side, so I add water to help dilute the glue into a thinner mixture so that it’s easier to work with. Too much water will over dilute it, but I aim to create a fairly runny consistency.
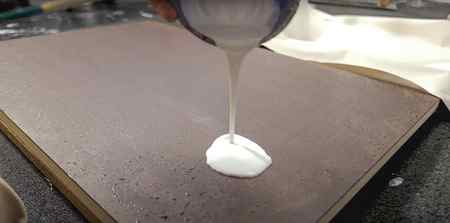
Step 4: Pour & Scrape. Once mixed, I pour it on the hardbord and spread it around into an even layer using a paper towel. I’ll lay the canvas over top as evenly as possible, making sure all sides have canvas overhanging.
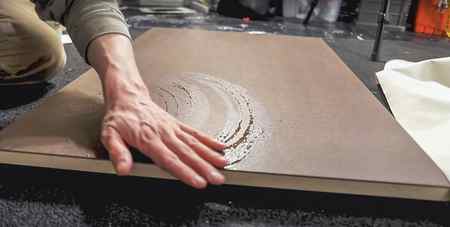
Once it’s on there, I grab my scrape tool and push the excess glue from underneath, always going from the middle towards the edges. This can get messy, so keep your paper towels handy to catch any drips. While I’m scraping, I pay attention to what’s going on beneath the canvas. You want your final product to be free of debris and air bubbles. If you do come across either or both of those things, you’ll have to lift the canvas as far as you need to, in order to remove the debris or flatten out the air bubble. When I go to lay the canvas back down, I’ll add more adhesive and continue scraping.
Step 5: Final panel check & initial cure. Depending on the size of your hardboard, this process can take up to 20 minutes. When all of the excess adhesive mixture has been scraped out, I check one final time for debris/air bubbles and then lay the panel canvas-side down to allow it to cure for a minimum of 30 minutes.
Step 6: Canvas edges, folding & more adhesive. Once the front side is finished with its initial cure, I flip it back over and gently lift up the edges of the canvas so I can add a little more adhesive with an old paint brush to really solidify the canvas before I fold the edges over. I do this on all four sides and I always use my scape tool to replace the canvas, check for bubbles, and debris.
Next, I check to see if I need to cut any of the overhanging canvas edges. I’m looking to be able to fold over to the back of the panel without too much excess canvas.
Sometimes I’ll trim a little off of the corners as well if there is excess material there that will end up becoming part of the blanket fold. When I make this cut, I’m usually cutting a small triangular off from each corner when I do that.
I then add adhesive one side/edge (for gallery profiles) at a time to the hardboard and the hanging edges of the canvas. I’ll use my scraper again to remove excess adhesive from under it. When you incorporate the other edges, you want to make sure you blanket fold the corners to keep things looking nice and neat. I add glue as I fold the flaps in the corners.
Once everything is folded and the excess adhesive is remov ed, cure for another 30 minutes minimum, and then you’re ready to get started painting! Depending on your texture preferences, you can add another layer of gesso or white acrylic paint .
At the end of the day, it is a simple process to achieving a really great high end-product. If you have the time for it, I highly recommend this canvas making process.
If you’d like to watch a short video on how I make my canvases, I made a YouTube video that shows a glimpse into my process. If you have any questions about this process, I’ll be happy to help answer! Again, this is a personal preference and opinion of mine, I just share it in hopes that it may offer help to a fellow artists.
Thanks as always,
Grow Your Painting Skills and Resources
Instant access to 1000s of royalty-free reference photos of landscapes and wildlife as well as step by step oil painting videos. Checkout My Memberships for more info.
I’m Chuck Black, landscape and wildlife artist based in Southwest Montana.
Explore More

Master the Art of Perspective in Landscape Painting: A Simple Guide

A Deep Dive into Realism in Landscape Painting: What It Is and How to Master It

The History of Oil Paint: From Crushed Berries to Modern Paint Tubes
Back to The Painter’s Block
Note: By purchasing through these links, you’re supporting our site at no extra cost to you.
© 2023 Wildlife and Art LLC,
Chuck Black
Subscribe to my newsletter for a chance to win a print each month


