Here is a fun little time lapse video that shows me during some of the process. It was fast, but not quite this fast. Hope you enjoy!
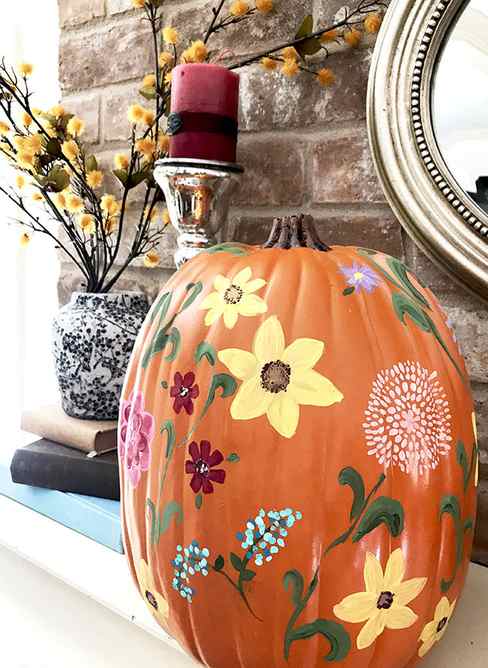
My Pioneer Woman Inspired Wildflower Pumpkin & How to Paint a Sunflower!
I love fall. The colors are vibrant and fun, the air smells like cinnamon and nutmeg and the best part are the pumpkins. I would say the cooler weather plays a part in it too, but I live in Houston, so that would be a lie. However, last summer while I was touring The Pioneer Woman’s lodge – yes… yes.. THAT lodge – I saw adorable wildflower painted craft pumpkins chilling in her supply closet and I fell in love with them.
Here’s the pumpkins that were at the Pioneer Woman’s Lodge:
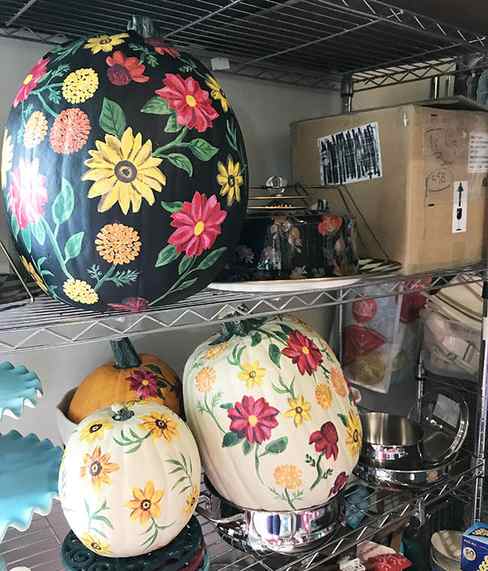
Cute right? And yes, that’s a Mackenzie-Child’s cake plate just hanging out next to them as if I wouldn’t drool on it out in the open like that…. There was also a huge storage bin full of chocolate baking chips. I should have just moved right into the Lodge at that moment but I didn’t have the guts. Next time, I’m taking my luggage and dogs. If you want to read about our trip to the Lodge, click here.
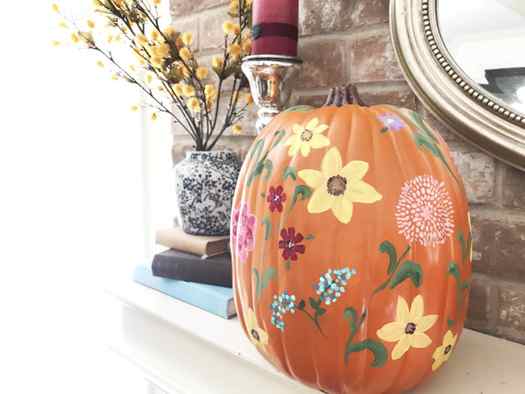
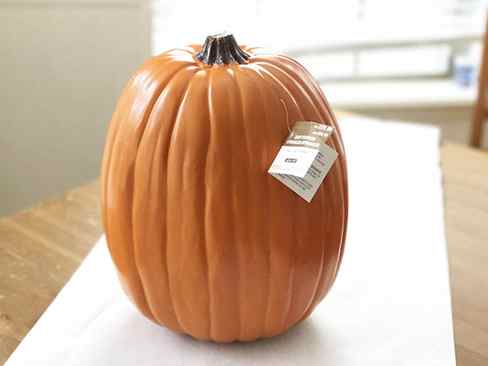
I knew that making these pumpkins would be on my crafty to-do for this fall. I started with just one pumpkin, one of the carvable craft pumpkins from the hobby store.
I would sit and paint a flower or two whenever I had some free time. It wound up being a really fun project because I could pick it up when I had a minute and then put it back on the shelf when I needed to do something else.
I do love how they turned out but I know what some of you are going to say;
“But I don’t know how to paint flowers!”
I get it but painting flowers are actually very easy and practicing is so much fun. Flowers are great items to paint if you’re not a painter because there are so many combinations, colors and types of flowers that it’s pretty hard to mess it up.
If you look at the pumpkins from the Lodge, you’ll see that one is all sunflowers. So today let me walk you through how to paint a simple sunflower that looks like you spent a ton of time on it. Add a few green leaves and vines and you’ll have your own cute sunflower pumpkin.
How to paint a sunflower:
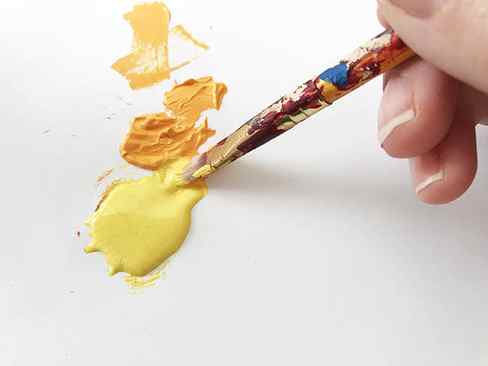
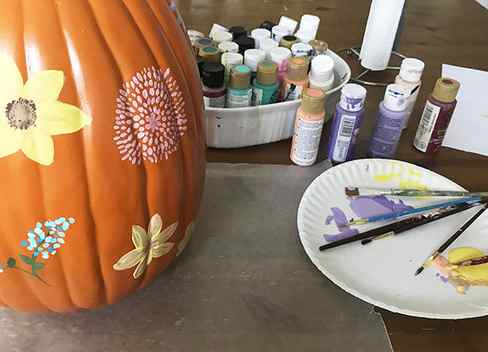
Step 1 – pick two similar colors for the petals of the sunflower. I picked a yellow and an orange. Using an angled brush, put one color on one side of the brush and the other color on the opposite side.

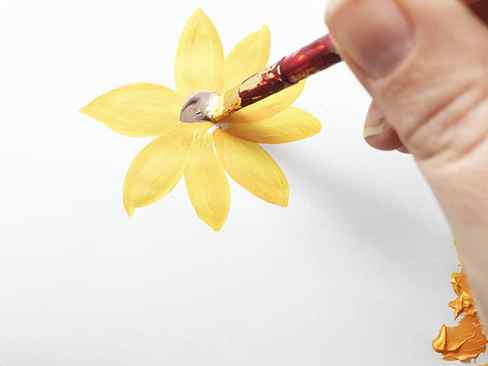
Step 2 – The pointed side of the brush will be at the top of the petal. Put the brush at the top and pull down in a bit of an arc, putting pressure on the brush as you pull down. Pick up your brush and place it back at the top of the petal, doing the same thing but arcing the opposite direction to make a complete petal shape. Fill in the middle lightly with the paint that is already on the brush.
If you need help making the round shape of the flower, draw a large circle with a pencil and a smaller circle in the exact middle of it. The outer circle will be your guide for the outside edges of the petals and the bottom of the pencil should reach into the middle circle. When your flower is done, erase the pencil.

The circle shape doesn’t have to be perfect because extremely perfect flowers are very rare.
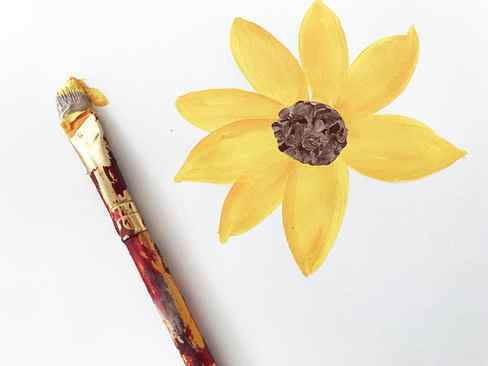
Step 3 – Make the middle of the flower. I like to mix two shades of brown together to do this. Then place your angled brush, the same one will work, in the middle of the flower shape. Hold one side of the brush bristles in place at the middle of the flower and swirl the other edge around to make a perfect circle.

Step 4 – Take the darkest brown paint you have and using the opposite end of the paint brush, dab little circles of dark brown paint into the still wet paint in the middle of the flower. You can do it all over the middle or just a circle of dots around the outside edge of the middle of the flower.
It’s easy and fast! The best news is that anyone can do it!
You still have time to make these wildflower pumpkins or Pin this idea to use next fall!
*affiliate links below
After you are done painting the pumpkin, I recommend spraying it with the spray paint polycrylic to keep the paint from scratching when it’s in storage.
I have always loved Sunflowers. I knew I wanted to bring some sunflowers into my house somewhere this Fall, but just never really found anything I loved when I was out shopping.

Some of the supplies I had at home and a couple came from Hobby Lobby. I will list them here and I will also include links to similar items (may not be exact) for you.
-
-
-
- Styrofoam Pumpkin (can use any size depending on how big your space is you want to use it). This is one similar to what I used from Hobby Lobby!
- X-acto Knife
- Faux Sunflowers (You could sub out another fall favorite floral if you would like, even succulents would be so cute!) These are the ones I got from Hobby Lobby!
- Preserved Moss (I used the natural color for this project)
- Hot Glue Gun/Glue
- White Paint (I used Blackberry House Paint (Color- Warm Milk-for this project) You could also use chalk paint or possibly even acrylic paints.

Look how easy that list is! Some of those things you may even already have at home! Here is everything all set out. I actually thought I would need a foam insert to put the flowers into, but I did not! It went right down into the foam that was inside the pumpkin! If your pumpkin is hollow, you will need to insert one of those once you cut off the top.
Here is what I did:
- I took my X-acto knife and cut a circle around the top. This took a few go arounds before I got it deep enough to start removing that top layer. I then removed as much of the top and foam as I could, piece by messy piece


- Once I had that done, it was time to start painting. 2 quick coats of Blackberry House paint and that part was done too!

- Next I took my X-acto knife and dug 3 deep holes into the Styrofoam, since that is how many sunflowers I was using.

- I then took the sunflowers and put them into the holes moving them around until I got them arranged how I wanted.
- You could see some of the gaps and the Styrofoam, so this is where I knew I wanted my moss to come in. I took my hot glue gun and and glued moss around the edges (up top) then applied the moss to the glue.
THAT IS IT!! Easy peasy, DIY breezy!! Now it sits proudly on my coffee table and I really do think its pretty cute!
Wood-Burning Stove Pumpkin
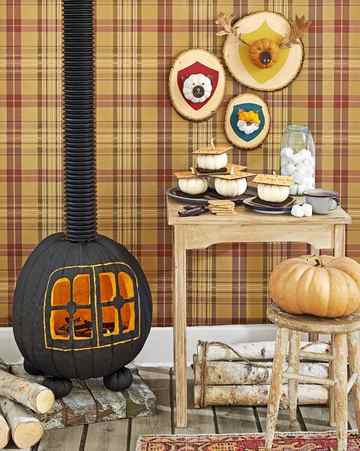
Brian Woodcock
No cabin evening is complete without a roaring fire.
TO MAKE: Cut a hole in the bottom of an extra-large pumpkin, and scoop out pulp and seeds. Trace the stove door template on the pumpkin, scaling up or down as necessary. Chisel out the outline, and use a knife to cut out the windowpanes. Paint the pumpkin (excluding chiseled section) black. Fill with sticks longer than the hole, and top with battery-operated tea lights. Remove the stems from four small pumpkins, and paint pumpkins black; place stove pumpkin on top. Rest a piece of solid, expandable drain pipe over the stem; attach pipe to the wall or ceiling to help it stay upright.
COMPLETE THE SCENE: Paint and decorate mini pumpkins to resemble the faces of a moose, bear, and fox; mount on wood slices (find details in our pumpkin painting ideas). Make “s’mores” with cardboard cutouts painted to resemble graham crackers and chocolate, with white mini pumpkins serving as marshmallows.
Hen and Chicks Pumpkins
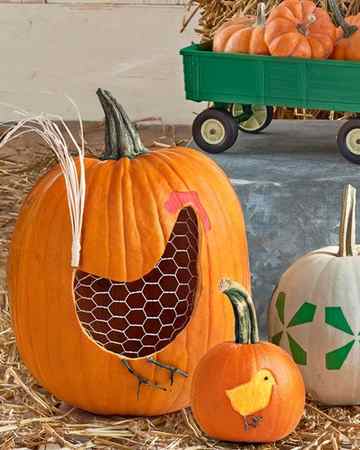
Celebrate your favorite feathered friends with this sweet, simple duo.
TO MAKE:
Hen Pumpkin: Cut a hole in the bottom of a large pumpkin, and scoop out pulp and seeds. Trace the hen template. Use a knife to cut out the body and a pencil to lightly trace the comb. Paint comb with red acrylic paint. Tie together several strands of raffia and hot-glue in place to create the tail. Insert a piece of white chicken wire behind the hen’s body, then adhere twigs with hot-glue to create legs and feet.
Chicks Pumpkin: Trace the chick template onto a smaller whole pumpkin. Use a potter’s needle to indent the outline, then chisel out using a potter’s ribbon tool. Insert a black pushpin for the eye; adhere twigs with hot-glue for the feet.
Jigsaw Pumpkin
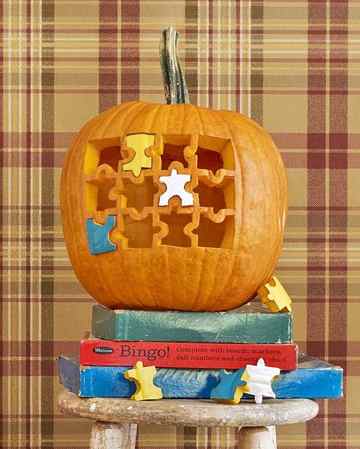
Brian Woodcock
Keep the kids entertained with a DIY jigsaw pumpkin.
TO MAKE: Cut a hole in the bottom of a pumpkin, and scoop out pulp and seeds. Trace the jigsaw puzzle template on the pumpkin, scaling up or down as necessary. Use a knife to cut out the puzzle pieces. Use craft paint to paint the puzzle pieces. Challenge kids to complete the puzzle for candy prizes.
-
-


