Understanding some of the tips that expert automobile painters use can help to turn what could be an ordeal into a true accomplishment.
Painting Your Vehicle
If another person will paint your vehicle, and you need to buy just the paints, ask them what you need and how much. This may include primer and clear coat, or the painter may want to supply these.
Do-It-Yourself
Popular Mechanics has a great rundown on vehicle painting, supplies, etc.
1. The best approach to painting your vehicle is to start from scratch, which means removing all the existing paint down to the metal. This will not only give you a solid foundation for your paint job, but expose all rust and other defects. You may also stop just at the original paint if it’s in good condition. Be sure to wear a filter mask for sanding, and a face mask for painting and any other chemical applications. If you are certain that the existing paint job isn’t hiding any defects underneath, you can elect to just clean the vehicle, wipe down with grease remover, and wetsand it using 320-400 grit sandpaper. Then you will paint over this without need for primer.
These guidelines are not detailed, and if you are painting your vehicle for the first time, you should consult a professional or obtain a good DIY book on the subject. Preparation is key. You will also want a suitable area for painting, such as a large garage with adequate ventilation. You should also use paint materials from the same manufacturer if possible, and not use different paint types (urethane paint over an epoxy primer is fine).
First begin by cleaning the car as you normally would. Then wipe it down with a wax and grease remover. If it makes sense, remove parts such as headlights, turn lights, etc. On many cars this isn’t practical, so you will just mask off these areas later.
2. There are three methods for removing paint from an automobile:
a) Mechanical stripping (grinders, dual-action sanders, wire wheels, Scotch Brite disc or pads). If you try to sand manually, it will take a long time and be labor intensive. A dual-action (DA) sander with an 8-inch wheel and 80-grit sandpaper is a usual method. You can also use a rotary grinder, but have to be careful that you don’t dig dings into your old paint job – these will have to be sanded down smooth or filled.
b) Chemical strippers. These can be sprayed or brushed on. Very messy and dangerous due to fumes, but it gets the job done with the least amount of effort.
c) Sand blasting. Normally done by a shop.
3. Once imperfections have been sanded down, and any rust is repaired, use body filler to make the auto surface as smooth as possible. Use a plastic spreader. Once the filler hardens, sand it smooth, 120-150 grit sandpaper. Now use acrylic glazing compound to fill flaws and pinholes in the filler.
4. Now you will want to mask off all areas to be protected. This includes window molding: To achieve best results, you can lift up the molding and run an 1/8-cord underneath. This will expose the body under the rubber just a bit, so your paint job will actually go under the molding. Be sure also to mask off everything you don’t want paint on … under the vehicle should be fine without masking, although building a skirt around the car is advisable.
5. If you have sanded down to bare metal, use an etching primer so that adhesion to the metal is ensured. The amount of primer need depends on surface area. In general, a motorcycle can use up to a quart; a mid-sized vehicle up to a gallon; large cars and trucks about 1.5 gallons. Your primer and other paint products will require a good spray gun (HVLP) and air compressor (3 HP or better). After dry, sand down wet (220 grit) or dry (150 grit) and wipe clean. Now spray with a regular primer (epoxy primer is best for bare metal). After dry, sand down (600 grit) and wipe clean.
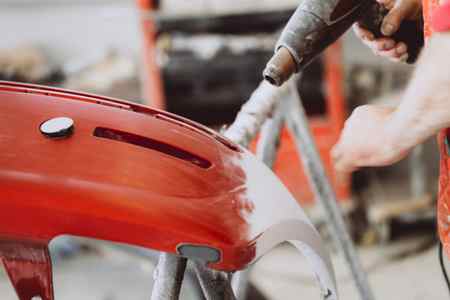
6. Now you are ready for your base coat. At it’s most simple, you would paint your vehicle with the desired color paint, 2-4 coats, then top with clear coat, 3-5 coats.
If you want a candy paint job, there are the main ways to go:
a) Use a white base coat, then heavily tint your clear with candy concentrate. This will result in a true color of your candy color, and bright.
b) Use a silver base. This will give you a more metallic candy color.
c) Use a similar color base, such as red paint with candy red in the clear coat. This will offer a deeper candy paint effect.
If you want a chameleon paint job, you will use a black base paint. This may be later dusted with another color to affect the hue. There are two methods for a chameleon affect:
a) A Mystic paint, which is sprayed
b) A chameleon powder, which is mixed into either a color blender or clear coat. The color blender allows for more flexibility, while clear coat is best for a straight chameleon effect.
Assemble Your Materials
Any extensive project requires planning and organization, and painting your car is no different. Take time to purchase and lay out everything you will need for your painting project.
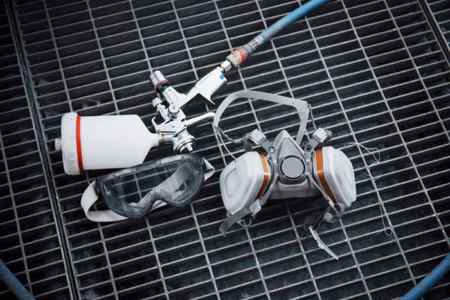
Ideally, find a place such as a shed or garage that is protected from the elements. After all, your project may take a few days or even a couple of weekends to complete. Be sure to have plenty of 1200- and 2000-grit wet-and-dry sandpaper on hand. You will also need an electric or air-powered sander, masking tape, plastic bags for taping off, an air compressor, paint gun, paint thinners, a buffer, face mask, safety glasses and your paint of choice. Although not absolutely essential, a dust extractor can be invaluable in keeping the area clean and neat.
If you have a small- or medium-sized vehicle, you will need approximately one gallon of primer, three gallons of topcoat and two to three gallons of clear coat. Larger cars require one and a half gallons of base coat, four gallons of topcoat and three to four gallons of clear lacquer.
Determine the Scope of Your Project
When it comes to painting your vehicle, you have choices to make. For instance, are you simply going to leave it assembled, tape it up and do a superficial makeover? Or perhaps you would rather remove the glass, the doors, the trunk and the hood to do a thorough job. The advantage of disassembling everything is that you can get the paint into even the smallest crannies of your vehicle while simultaneously having the opportunity to discover underlying damage or small repairs that need to be done.
Of course, leaving your vehicle assembled has upsides of its own. You can do the job more quickly, and you don’t need to worry about going through the aggravation of piecing everything back together again. Should you decide to go this route, however, do take the time to remove any small parts that you easily can. These include things like antennas, lights, wipers, locks, etc. Cover things that you will not be painting with high-quality automotive masking tape to avoid needing to clean up troublesome spots later.
Prepare the Canvas
Think of your vehicle as a foundation, a blank canvas that you will make beautiful with the addition of fresh and vivid color. To the extent that the foundation is smooth and flawless, so can be the coats of full color or car touch up paint that you apply. For that reason, your first step must be to remove any rust.
When steel or other metal is exposed to water or water vapor, it can begin to oxidize, resulting in an unsightly and flaky finish. Once this chemical reaction is in full swing, it is next to impossible to stop. The only solution is to either chemically halt the oxidation process or remove all of the rusty portions. Continuing on with the painting process without taking one of these actions will ultimately prove to be disastrous. Eventually, the rusting process will resume, causing your beautiful work to become bubbled and distorted.
In the majority of cases, the most efficient solution involves removing the rusty metal parts and replacing them. If you are reasonably comfortable with auto body work, switching out a rusty door or fender should give you little trouble. However, the task becomes a good deal more complex if you need to replace a quarter panel, door skins or floor pans. These jobs require more advanced tools including a spot weld cutter, clamps, grinder and cut-off wheels.
Welding contains its own potential for problems. For one thing, it is vital that you prime the area first and sand blast it after welding to prevent moisture from being trapped in the area and causing yet more rust. Another welding pitfall is that it generates a good deal of heat which can distort the shape of the piece you are welding. To minimize the chances of this happening, coat your metal with a heat-absorbing compound. Also, weld slowly and in short stitch-like pieces.
If you only see rust on the surface of the metal, you don’t necessarily need to go through the replacement and welding process. Instead, you can chemically remove the rust by applying a rust-inhibiting liquid or gel. Although there are several brands of these chemicals, all of them work in a similar way by converting active rust into iron phosphate. It can take up to 12 hours for this process to completely take place.


