Getting a little color on your walls is a great idea for when you’re looking to breathe new life into a room. Usually, it’s a matter of coating walls with a solid color of paint, adding contrasting woodwork, or creating an accent wall that uses another color. An option that is not much harder than painting walls a single color, which can give you stunning results, is sponge painting. It is an especially effective approach for creating an eye-catching feature wall that will stand out as the star attraction of a room.
Sponge Painting Techniques: Tips, Ideas and Instructions
Sponge painting is the decorative application or removal of paint glaze onto, or from the walls (or other flat surfaces).
The technique derives its name from the basic tool – a sponge, and its character from the kind of sponge you use – a sea sponge.
Sponging was one of the first decorative painting techniques to gain mass appeal in the 1980s.
And although sponging in high-contrast paint colors and with a heavy-handed technique has since fallen out of favor, this finish is still popular and can look very relevant if you follow the color advice and use updated color combinations as suggested on this website.
In fact, even today, sponging is usually the first faux finish most people attempt in their homes, and no wonder: it’s the most versatile decorative paint finish that’s quick, easy and inexpensive to create, with materials and tools readily available in any home improvement center or paint store.
Sponge Painting Is Just a Smart Finish
Paint sponging produces highly textured finishes that offer not only decorative value, but some practical benefits as well.
For example, they can:
- camouflage many flaws and disguise surface imperfections, making them an ideal painting solution for old walls in poor condition, and a cheap alternative to drywall replacement.
- hide dirt in areas prone to getting soiled and stained – kitchens, hallways, mudrooms and children’s rooms.
- withstand the use in high-traffic areas because oil glazes are durable, latex glazes can be topcoated with a sealer for extra protection, and the random patterns are easy to touch up inconspicuously if needed.
Sponging Does Not Always Look Like Sponging
Sponge painting techniques can be done on any flat, painted surface – walls, ceilings, floors and even furniture.
The look can range from delicate to bold, and can be adapted to any decorating style (the final result will depend on the colors you choose, the transparency and glossiness of your glaze, and how heavily you apply it).

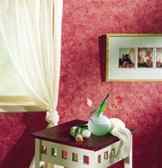
For the most common sponging process, sponging on, you use a large sea sponge to dab a glaze onto a painted surface.
See how the irregular shape and surface of a sea sponge has created a lively flecked effect in the photo example?
If you do it right, it should look like irregular mottled texture rather than a series of the same sponge imprints.
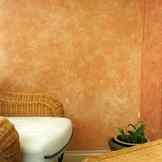
For sponging off, a related but quieter technique, you first roll the glaze over a painted surface and then lift off some of the wet glaze with the sponge.
This treatment will produce a subtler, softly dappled finish where the emphasis is more on the color play than on the texture.
In addition, these 2 methods can be combined for an even greater visual depth, or as part of other decorative painting techniques (for example, faux marble effects).
What Is Faux Painting And How Can You Modernize It For Your Space?

Faux (the word for “fake” in French) painting techniques are experiencing a renewed interest among designers and homeowners looking to bring texture and dimension to the most basic blank walls. Trompe l’oeil, or “fool the eye” painting, has its roots in the classical era and enjoyed great popularity in Europe throughout the centuries when artists created exquisite masterpieces. In more recent times, such techniques have often been used to create dramatic material and texture variations on modern walls that evoke natural elements or a sense of age or grandeur.
Faux painting can make ordinary drywall look like rustic plaster, wood, stone, or brick. This includes basketweave patterns that evoke linen or paper, as well as wood or laminate countertops painted and epoxied to look like shiny, authentic marble. The very best kind of trickery, faux painting techniques are also fast, inexpensive ways to transform an otherwise boring or bland space.
How different faux painting techniques work

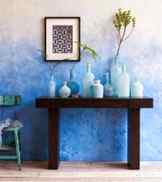
During the late 1980s and 1990s, sponge painting was one of the most popular techniques for creating a faux-painted effect, which mimicked the look of rustic Tuscan walls and the textures found in remote Italian villas. The process typically involved two to three shades of paint in lighter and darker variations, applied with a natural sponge. This created the mottled look of ancient plaster or stone. Colors varied from warmer neutrals and rich terra-cotta-inspired shades to sea-washed blues and greens. As wallpaper fell out of fashion for the first time in decades, designers and homeowners looked to find ways to bring a new freshness to the blank walls of modern homes, which were usually made of drywall in newer constructions.
While the sponge-painted look quickly fell out of fashion and can often look dated, other techniques have arisen that are being used to add texture and dimension to walls. They include using other materials like rags, plastic bags, and textured fabrics to create a more natural look. Recent ones also include subtle techniques like color washing with a glaze or limewashing, where matte paint with stone aggregates is applied for texture. Venetian plaster, which is thinner than traditional plaster, can also be applied to walls to create relief and texture before painting.
Updating a faux painted look

There are many ways to make the time-honored tradition of faux painting look new and fresh in today’s spaces. One thing to keep in mind is the existing style of your home and decor. While rustic plastered walls make be perfect in an Italian grotto or charmingly weathered farmhouse, it may be a little at odds with a modern ranch home where a more clean faux linen criss-cross effect would be more in line with the home’s architectural heritage.
Sometimes, a subtle touch is best. Consider a mix of neutral shades to add age to your walls using a rag technique or a color glaze wash — these look beautiful in farmhouse, cottage-core, and boho-style spaces. Typically, the more dramatic the technique, the smaller the ideal dose. Try a faux marble look on a tabletop or counter, or an accent wall of faux bricks. Paint your concrete patio or basement floor to look like beautiful floral or terracotta tiles. You can also add a golden patina to a darker shade, like forest green or midnight blue, for instant glamour in a powder room or guest bath.
What You’ll Need
Equipment / Tools
- Paint tray
- Paint roller
- Paint brush
- Bucket
Materials
- Base paint
- Topcoat paint
- Faux glaze
- Paint pan liner
- Roller cover
- Stirring stick
- Natural sea sponge
- Rubber gloves
- Glaze extender additive (optional)
Instructions

Paint the Base Coat
Using a base paint color of your choice, paint the walls. For complete coverage, apply a second base coat after the first coat dries.
Flat or eggshell paints are best for most situations, but in rooms that get heavy use or where you expect to wash the walls frequently, satin or semi-gloss paint is a better choice.

Mix Topcoat Color and Faux Glaze
After the base coat dries, thoroughly mix one part of your second (top) color of paint with four parts of faux glaze in a bucket. The more glaze you add, the more transparent the topcoat will be. If you want the topcoat to be darker or denser, use less faux glaze.
Tip
Choosing a good color combination can be tricky. If you choose a light color for the base coat, using glaze with a darker tone will darken the room’s look. To achieve a lighter look, choose a glaze that is lighter than the base coat. Select a base coat and glaze color that is close in intensity and tone. Too much contrast will look splotchy and spotted.

Prep Your Sponge With Paint

Dampen a natural sea sponge with water, then dip it into the bucket of glaze and blot or wipe the excess off the sponge. Be sure to use a natural sea sponge, not a synthetic sponge; it randomizes the pattern more.
Tip
Sponge painting requires you to work efficiently. Time is of the essence since the glaze dries quickly. This is not a project to tackle when you might be interrupted or distracted.
Start Sponging

Lightly press the sponge into the corners of the wall and work outward. Tap the sponge onto the wall in a random pattern, leaving a thin coat of glaze on the surface. As you work, do not press down too hard. You might put too much glaze on the surface. Another technique involves rolling the sponge over the surface to achieve a random appearance.
Tip
Avoid wasting paint by using a paint calculator to figure out exactly how much paint you need.
Add More Paint to the Sponge

When the paint mixture is depleted on the sponge, re-dip it and continue working around the room. Divide your work into small areas. Completing each area before moving the next. Always keep the edge of the painted area wet. If necessary, use a glaze extender additive to slow the drying time of the glaze coat.
Touch Up Areas for Consistency

Inspect the overall surface from a distance. Use a small piece of sponge to touch up small areas, get into corners, and help create a consistent and random finish. The goal is for all areas to have a similar “show-through” of base paint and a similar look to the glaze pattern.
Adding Additional Colors
After the first coat is dry, you can add additionally layers of paint. A second, third, or fourth layer can be added to create a sense of dimension. Often, this is done in a monochromatic color scheme, with an accent color added last. By the time you get to the accent color, the application should be minimal, adding the color only where you want to add a bit of interest or light.
How to Keep Paint Looking Fresh
Make sure to keep your remaining paint cans and label them with the room, date used, technique, or mixture ratio (if mixed with glaze). If you need to cover a stain or fix a damaged section of a painted wall, you can easily touch up or recreate the effect in that area.
You can use ordinary acrylic latex or alkyd interior house paint for a sponge painting project. Latex paint dries quickly. Its downfall is that it dries very quickly, and the sponging technique works best when mixing colors on wet edges. It’s good to use if you’re accustomed to sponging since you can get several layers applied in a short time, and it can be thinned with water and cleaned up with soap and water.
Alkyd paint dries more slowly, which is an advantage, but if you have to thin it and cleanup, you need to paint thinner. Semigloss- or satin-finish paint works nicely for sponging because the layers remain separate, enhancing the effect. However, never mix latex and alkyd layers on the same surface because they may peel.
What is the best sponge to use for sponge painting walls?
The natural shape and texture of a seagrass sponge creates a visually interesting pattern on walls and surfaces. It also works well with paint and stain, since it absorbs the color while also easily transferring it to the surface.
Are sponge-painted walls still in style?
While sponge painting had its heyday in the 90s, the painting technique can still look fresh if you pick colors that feel relevant today. You can try it as an alternative to wallpaper.
How do you smooth out sponge-painted walls?
If you have sponge-painted walls and want to paint over the finish, then you’ll need to lightly sand the walls with an orbital sander.


