
Today we are going to paint a simple night sky with a landscape and sky reflection. You only need two colors for the sky and black for the silhouette of the hills. This simple tutorial will help you get more practice in blending two colors of the sky smoothly and making a beautiful gradient. Don’t forget to paint mountains with different shapes and heights.
How to paint a starry night landscape for beginners
In this post, I will take you through step by step on how to paint a starry nighttime landscape with watercolors.
If you’re new to watercolors then this tutorial is perfect for you!
You’ll be painting a simple wet into wet background then adding stars and trees on top.
Let’s get into it…

Contents hide
Materials:
- Watercolor 300gsm cold pressed paper
- watercolor round brushes: Size 18, 12, 4. (you can choose the brush sizes that better suit the size of your watercolor paper.
- 2 jars of water
- Paper towel to remove exess water from brush.
Colors used:
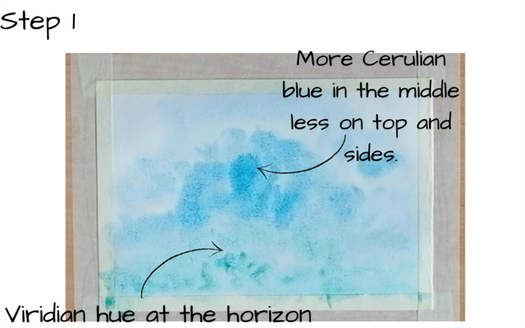
- The sky:
- Cerulean blue
- Prussian blue (you can use indigo as a substitute)
- Viridian
- White gouche (or opaque white watercolor)
- Paynes gray
Step-by-step tutorial:
Video tutorial
I have linked the video tutorial for this painting with subtitles. However, for further explanations, you can go through the written steps below:
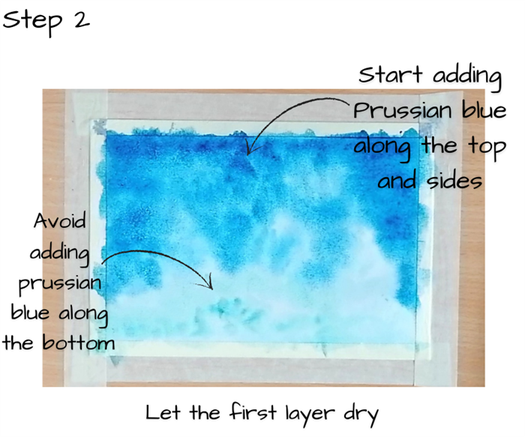
Once the first layer was complete it was time to let it dry…
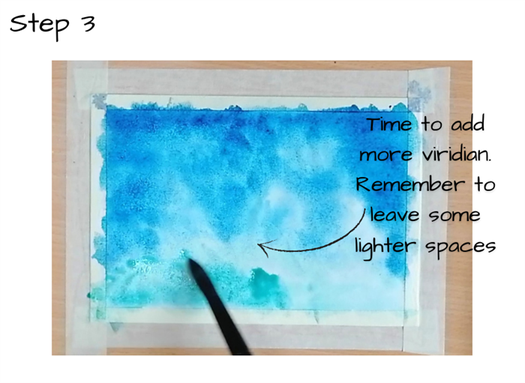
After the paper had dried I wanted to add darker values, I did this by painting a second layer using the same colors in the previous step.
This time I used the wet on dry technique.
To finish off the sky I painted more Prussian blue around the top and the sides, avoiding the middle and bottom.
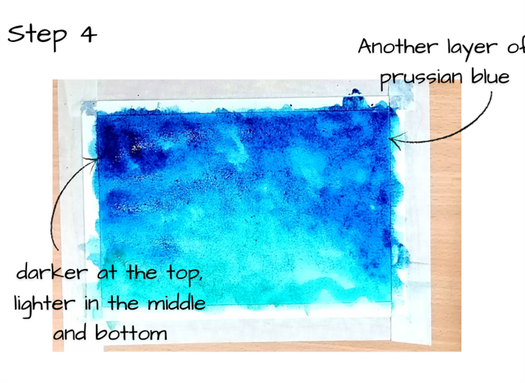
I finished the background then let it dry…
Painting the stars!
To paint the stars I used white gouache, if you don’t have any that’s alright! You can always use opaque white watercolor paint instead.
Only add the stars when the sky has completely dried otherwise you’ll get unwanted backruns.
I’m too lazy to paint every single dot… so I used the splattering technique instead. To do this I held the brush a couple of inches above my painting with one hand and with the other I tapped the brush handle.
This produces a splattering effect littering the sky with stars!
Tip: Be careful not to use too much water in your brush. Too much water will cause bigger dots and create unwanted blotches! It’s always a good idea to test the consistency of the dots on a piece of scrap paper first.
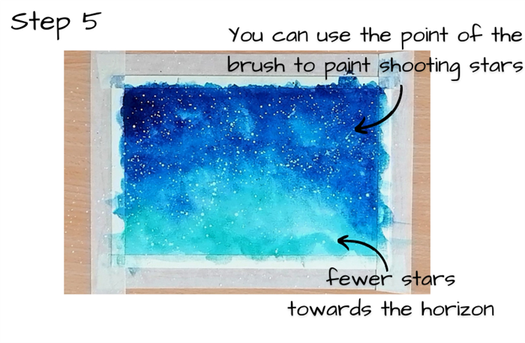
Alternative technique: If you do not feel comfortable with the first approach that’s alright.
You can also use a toothbrush instead, simply load the brush with the paint; then using your finger brush the bristles and let the dots splash onto the paper.
Additional step: You can use the point of the brush to create small lines indicating shooting stars!
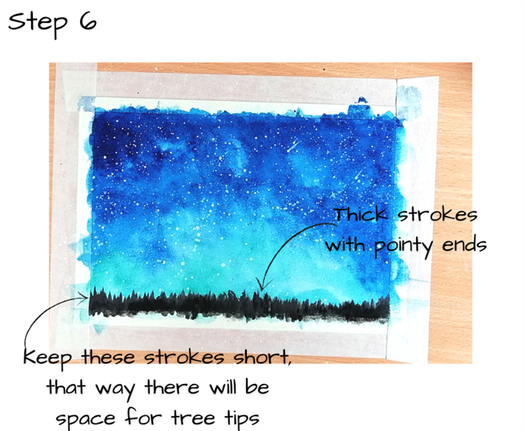
Painting the Forest
Here I used Paynes gray and a size 4 round brush.
I first painted the background of the trees by adding short brush strokes with slightly pointy tips as shown in the image below:
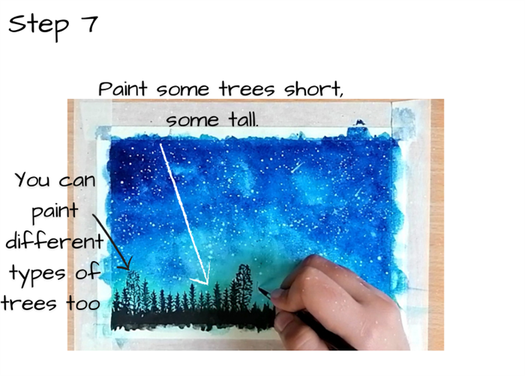
With the size 4 brush, it was time to add the tree silhouettes.
To make the painting more interesting and seem more realistic, I added different variations. I painted some tall some short and I even changed the shapes of some of them.
That’s the end of this watercolor landscape tutorial! If you’re interested in learning about different watercolor techniques, check out the articles below:
- Scumbling watercolor technique
- Watercolor texture techniques
- How to create unique effects with the watercolor salt technique
- Basic watercolor techniques
I hope you enjoyed this tutorial and found it helpful! Leave a comment below or email me if you have any questions, I would love to hear from you!
Supplies Needed
[Links to the products used for this project are affiliates. Thanks!]
- Higgins Eternal ink or other black nonwaterproof ink
- Indigo or Indathrone Blue or other deep blue watercolor paint (optional)
- Hansa yellow or other warm yellow watercolor paint (optional)
- Winsor & Newton white calligraphy ink or other opaque white ink
- Paint brushes
- An old toothbrush
- Spray bottle filled with water
- Quality paper*
*A note on papers: For this project, I used Strathmore 400 Series Mixed Media paper but a good watercolor paper will also work. If you plan to add any pen or calligraphy to your completed sketch, avoid a textured or cold-pressed paper which can cause issues with penmanship.

Step 1: Apply an inky base coat.
Taping your paper down is optional but it helps it to stay put while you are applying ink/paint. I just use standard painter’s tape. It works great and costs a fraction of those expensive artists’ tapes.
I highly recommend you take everything outside or put down a protective surface first. To do this technique, you are going to work fast while the ink and paints are still wet, and you are going to be splattering these mediums. I tend to make a mess when I do this indoors.
Whenever you are ready, paint a solid wash of black ink across the entire paper. Don’t worry if you can see the brushstrokes— this is is actually what you are going for!

I chose to use black ink instead of watercolor for several reasons, but mainly because ink tends to cover on the first stroke much better than watercolor. The photo above shows a comparison of one stroke of Ivory Black watercolor (top) versus one stroke of Higgins Eternal ink (bottom).
If all you have is a black watercolor, feel free to use it. Unless it is highly staining, it should work for this technique. I haven’t tried it, but a thinned acrylic may also also work, so use what you’ve got!

Step 2: Add a touch of blue.
Immediately after applying the black ink base coat, while the ink is still very wet, wash in a swipe or two of the dark blue watercolor.
I like to do this because it gives the sky more depth than just the black, but this step is totally optional! At the end of the post, I will show you a night sky I did just using black ink, which is great also.

Step-by-step instructions
1. Fix the paper with tape and make an easy sketch with a pencil.
2. Wet it with a flat brush loaded with clean water.
3. Grab mint and apply it with a round brush.
4. Grab Prussian blue and apply it to the top and bottom. Blend two colors. Make the gradient.
5. Add cadmium orange to Prussian blue and apply at the very top and bottom. Apply more intense colors making layering. Dry your painting.
6. Grab neutral black and paint the silhouette of the right mountains.
7. Paint the left mountains. Make different shapes.
8. Load white gouache into the brush and tap your brush to make stars. Dry painting and remove the tape.
That’s all. Happy painting!
You can find the full tutorial on my YouTube channel. Check this out!
If you love my tutorial, drop your comment below. I love to read them.
Share:
Like this:
Like Loading.
Related
Published by Maya
I’m an artist and instructor. I paint with watercolors, make tutorials, write inspiration, and design products. View all posts by Maya
Cass June 5, 2021 10:08 am Reply
Magic tutorial and painting, Maya Like Liked by 2 people
Maya June 5, 2021 10:31 am Reply
thank you so much, Cass Like Liked by 1 personLeave a Reply Cancel reply
Search
I like this. I love this❤️
‘Keep doing’ is always more difficult than simply leaving behind. But what if this is your life? Is it possible to just leave it? No, I don’t want it. I chose to go with the flow of the river, time will tell me what will happen ahead❤️
Sometimes I have a vision of what I want to draw and I make a sketch, fill it with paints and then I start to think whether I should follow the original plan or stop when I already like everything.
Making small sketches can be fun. For a long time, I had a block of small-size arches paper, and I was afraid to approach it and start from the first sheet. But when I decided to start the first work, I decided that I would draw something new for myself. Maybe, at first glance, everything is the same, but I try new colors, compositions, and techniques. And this gives more freedom, not to expect anything from the result, only the process
Every time I think what can I do with what I have. For the last year and a half, my living space has been my bed and I can’t film my painting process. I can only draw on my bed hurting my back. But this does not stop me and I really hope that soon I will have more space for creativity and beauty.
20/20


