Double dip is a face and body painting technique where the artist creates petals with a brush loaded with one base color and then adds another color to the brush tip.
Methods for painting a flower petal
It is no secret that best results are achieved with proper professional face painting tools, which will allow you to master the technique much faster and easier. In this article, you’ll find out what are the best tools for perfect double dip flowers.
Double dip is a face and body painting technique where the artist creates petals with a brush loaded with one base color and then adds another color to the brush tip.
This technique always creates a WOW effect when your customers see you using it, especially when you make a beautiful cluster of flowers, fast! Luckily, this technique is relatively simple to achieve but quite requiring in tools. But once you know what are the right ones to use, you can nail it easily!
For painting double dip petals you will need:
- #6 round brush
- base color (usually white)
- tip color (for double dip) or two tip colors (for triple dip)
Brushes
Number 6 round brush is the best size for creating bold pretty flowers. It is also important that the bristles are relatively short, the brush shape is bolder and the texture is firmer comparatively to the other round brushes used for linework.
I personally like the Loew Cornell 3000C #6 brush. I had it for 5 years and it is still one of my favorite brushes in entire kit. But unfortunately Loew Cornell discontinued this series of brushes, so it might be difficult to find one in face painting shops.
However, you may try to use the Loew Cornell 795 series #6 brush too. It is a bit softer than the 3000C brush and requires more tenderness when pressing on it, because if you press it too hard the bristles can split or slide, but is still a great one for double dip. Both of these brushes work well for creating any shape of petals, from long to bold and heart-shaped.
There are also a few of the special “flora” brushes on the market, specially designed for double dip petals. I call these “lazy” brushes because no matter how you’ll press on it, you’ll still get the same shape of a petal. The good thing about it is that you can do great flowers fast, while the bad thing is that you won’t have the possibility to create various shapes of petals.

Paints
The main color used for double dip is white, my experience shows that a bright waxy white will work the best way for this technique, so just choose any of these brands: Cameleon, Wolfe, Diamond FX, Kryvaline, Face Paints Australia.
The center of your flower will differ depending on the color that you will choose to dip the tip of your brush into. Pinks in all their shade variety will be the most popular color used of course. I personally like vibrant dark pink for the centers of my flowers. My favorites are Superstar Magenta, Cameleon Bollywood Pink and Global Magenta.
I’ve also seen some people loading their brush in a whatever color and then dipping the tip into white. In my opinion, this combination doesn’t look as pretty as the one described above.
First, all flowers have a depression in the center where petals are connecting and that’s the same effect that you recreate by having a darker color on the brush tip.
Second, when white is applied on top of a darker color, it loses its vibrancy because of mixing with it.
So, my experience shows that the best way to make beautiful double dip petals is to use white (or another light color) as a base and a darker color on the tip.
Don’t Miss Out: Subscribe today to receive expert tips and tricks, fresh face painting ideas, step-by-steps, and more.
Let me know in the comments below what are your favorite tools for Double dip and why?
Methods for painting a flower petal
In this demonstration, I am going to show you a couple of the same principles as the last watercolor demonstration. Those techniques are the wet-in-wet and wet-on-dry techniques of wa tercolor painting. Mastering these two basic techniques, you can create form and color variation, control the paint better, and achieve a whole lot more with watercolor.

1. Sketch: Start by l ightly drawing out the sketch with an HB or lighter graphite pencil.

2. Coloring the center of the flower with yellow: Since yellow requires clean water, I start with the yellow color, and I paint the bottom of the center with a slightly darker yellow. Then, I let it dry completely before I do anything further to prevent run-off.

3. Painting t he petals:
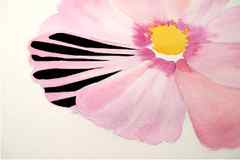
The Cosmos petal has a kind of stripy texture on it, so I use the wet-in-wet technique first to indicate the light area, the shadow, and the texture of the petal.
a. Take this petal, for example, I wet the area with clean water.
b. While it is wet, I apply the light pink on the petal and leave the light side of the petal not painted.
c. While it is still wet, I apply the magenta to the end of the petal that is closest to the center of the flower.
Paint one petal at a time, I wait for the petals to dry before I paint any petal to next to them.
Images for these steps are below:


I have some petals done in the image to the right, and you can get an idea of what you can achieve from this wet-in-wet techn ique. It gives the petals a little texture and a nice soft pink tone.
After I finish all the petals, I wait for them to completely dry.

4. The second layer on the petals (wet-on-dry): After it’s completely dry, I apply a layer of light pinkish purple to exaggerate the texture of the petals a little bit more.
Take this petal, for example, I have highlighted the area that I applied the second layer of paint.

When the second layer is finished, you can see the flower has more depth now.

5. Detail touch-up`: Use the wet-on-dry technique to finish the center of the flower and paint the cast shadow of the petals. For the center part of the flower, I apply dots of darker yellow to indicate the form.

We are finished Finished! Painting in watercolor needs both patience and practice. You need the patience to let the paper completely dry before you do the next step. Practice for the wet-in-wet technique, because it takes some time to figure it out. The more you do it, the more you will be able to use this technique and know what wet-in-wet can bring to your painting.
All About Spider Mums!
Halloween has come and gone and now it is time to focus on everything autumn! Mums are pretty much the iconic fall flower so we designed a sola wood flower to honor them! Below are several painting methods on how to achieve the perfect look using our spider mums!

First things first. Spider mums come in a plastic bag with a rubber band wrapped around them because they are a tight ball of small petals. They are unlike our other flowers in that sense but they are just as easy to work with!

Painting Technique: Hand Paint.
- Top Picture – raw, closed spider mum
- Bottom Left Picture – Use a spray bottle with a water/glycerin mix inside (8 parts water to 1 part glycerin) and spritz down the flower. Gently pull back the layers of petals from the center to open up the flower. Re-spritz as needed to ensure minimal petal tearing.
- Bottom Right Picture – using a paint brush, add a dab of green paint (craft smart “Lush Foliage”) to the center. Next, add a circle of yellow (Ceramcoat “Pale Yellow”) around the green and spritz with your water/glycerin mix to slightly diffuse the colors.

Painting Technique: Dip Dye.
One of the great things about the spider mums is that you can open them up as little or as much as you want. With just one flower size, you can create 3+ very distinct looks! The picture above shows how you can slightly open it (top right), open it halfway (bottom left) and fully open it (bottom right) during the dip dye process. As you pull the petals open, you want to re-dip the flower in your paint/water/glycerin mixture as you will continue to expose raw petals!

Painting Technique: Dip Dye and Hand Paint.
- Top Picture – Use the dip dye method to get your flower fully covered in your yellow paint (for this flower, we used Anita’s “Hay”).
- Bottom Left Picture – While the flower is damp but not soaked (give them around 30-45 minutes of drying time), use the spin method to add your outer color. Mix your burgundy paint (Ceramcoat “Black Cherry”) with water/glycerine in one container. While holding the center of the flower, turn it on its side and dip in the paint mixture. Spin the flower until every side has some paint on it but the center remains yellow.
- Bottom Right Picture – Spritz with your water/glycerin mixture so the darker color blends out from the center and creases. You can also use a clean paintbrush to help spread the paint out and towards the edge of the petals.

Painting Technique: Hand Paint.
Some mums have colors in the centers of the petals while there are white edges. Here is a hack to get that same effect without attempting to hand paint every single petal.
- Left Picture – While the flower is still damp from opening it up (using a spray bottle with a water/glycerin mixture), use a paintbrush to add paint to the creases of a few petals at a time.
- Right Picture – Use a spray bottle to diffuse the paint and use either the paint brush or your fingers to pull the paint toward the ends of the petals.

Painting Technique: Dip Dye and Hand Paint.
This uses the same techniques as above, just after the flower has already been dip dyed in a base color.

Mums come in all sorts of great color combinations and styles. You should try experimenting with different colors using the techniques above. The results can be amazing!


