Both the spray can and the airbrush gun should be moved evenly over the surface to be painted. The distance between you and the bicycle frame must remain the same in order to achieve an even coat. In addition, you should never spray too long on one spot, otherwise unsightly paint noses may form.
How to Paint a Bike – Guide on How to Repaint a Bike Frame
This post may contain affiliate links. We may earn a small commission from purchases made through them, at no additional cost to you. You help to support resin-expert.com If you want to revamp your old bike, you can have the bike painted or paint it yourself. For this, you have several options to choose from. Airbrushing has proven to be a good and practical method for this. How it works and what you have to consider, you will learn here in this guide. We also give you step-by-step instructions on how to paint your bike yourself.
- Reasons for Painting a Bike
- What Materials Are Needed to Repaint a Bicycle?
- Step-by-Step Guide on How to Paint a Bike
- Using a Professional vs. Painting a Bike Yourself
Reasons for Painting a Bike
There are various reasons as to why a bicycle should be painted. Often, the bike no longer looks nice due to scratches or peeling paint, but is still functional, so it would be a shame to dispose of the bike. Perhaps the bike is also associated with special memories and emotions, but now looks old-fashioned over the years. For some, bike painting also represents a creative hobby. Often, a child’s bicycle is passed on among siblings or acquaintances and needs a colorful makeover for this purpose.
To apply paint to a bicycle yourself, all you need is a little skill, patience, and the right tools.
Contents
What Materials Are Needed to Repaint a Bicycle?
If you want to give your bike a new coat of paint, you will of course need paint. But there are a some other materials that will also come in handy when painting a bike. These include the tools needed to dismantle and prepare the bike before it gets painted.
Preparation
Before you can apply paint to your bike, you must first disassemble it as far as possible into its individual parts and sand them down. Special tools are needed to disassemble the parts. You may already have the necessary screwdrivers and wrenches, otherwise these tools can be purchased at any hardware store or ordered online.

To sand the old paint off the bike, you will need sandpaper. You may find that some paints cannot simply be sanded away, and must instead be removed chemically. In this case, you would require a paint stripper such as this environmentally friendly option by Dumond, called Smart Strip Advanced Paint Remover.
It is not only important to thoroughly remove the old paint, but also to get all the parts to be painted free of grease. A degreaser can be used for this purpose. White spirits are particularly suitable for this purpose, but you can also use a glass cleaner.
You will also need masking tape to protect the parts of the bike that should not be painted. To protect the surrounding area from the paint mist, you can use a large sheet of painter’s tape as a base.
In order not to endanger health, you should also wear a protective mask, safety goggles, as well as disposable gloves when bicycle painting. A protective suit can also be worn if necessary, so that the clothes do not get any paint on them.
Suitable Bike Paint
Any paint that adheres to metal is suitable for painting bicycle frames. There are special paints for painting bicycles, but car paints can also be used, for example. The choice of paint is dependent on whether the bike is to be matte or glossy. You can find out what the paint looks like after drying on the paint cans, where the color is declared as either “matte” or “glossy”.
You should always use a high-quality paint. In addition, you should limit yourself to only one paint manufacturer, otherwise there could be unsightly reactions between the different paints.
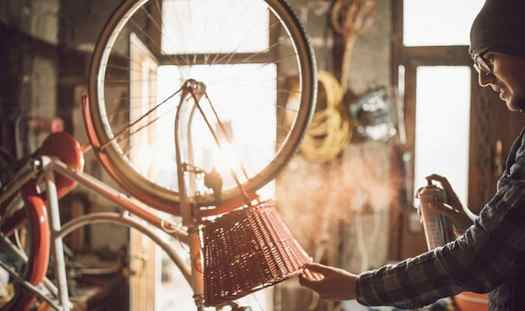
Bike Spray Paint
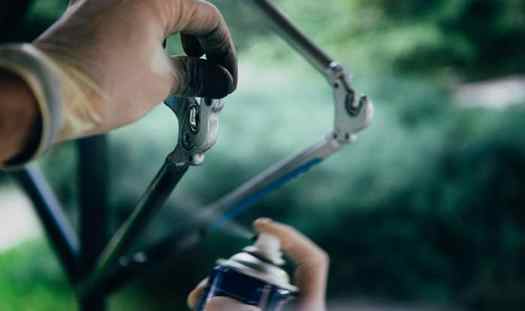
To create the most uniform paint application possible, you paint your bicycle with bike spray paint. The spray can contains the paint solution in the chosen color and has a spray head attached. Once the paint has been thoroughly shaken up, you can start applying the paint directly.
If you use a spray can to paint your bike, be sure to maintain the proper distance between the bike frame and the spray head. You should also spray a few thin layers of the paint instead of focusing on area, as this will prevent a nose from forming.
For an optimal spray pattern, you should always hold the spray can vertically during spraying. Before taking a break, turn the spray can upside-down and hold the sprayer down until no more paint comes out. Doing this will prevent the spray head from sticking.
If possible, the spray can should not be sprayed completely empty, because the last sprays usually lead to speckles and an uneven spray pattern. To avoid messy spots, you should therefore rather use a new paint can a little earlier.
Airbrush Bike Painting
To paint the bike with an airbrush gun, you will need a suitable compressor in addition to the airbrush gun, as well as a diluted paint, which is accordingly easy to atomize. While you do get pre-thinned paints specifically for use with an airbrush, these paints are unlikely to be durable enough for your bicycle. Thus, you will need a paint thinner in order to dilute and thin your desired paints.
Make sure that the airbrush gun is suitable for processing paints. For this, it must have an appropriately sized nozzle and the seals must be solvent-resistant. The compressor should have a working pressure of 1.5 to 3 bar.
As with spray painting bicycle frames, the paint must be applied evenly when airbrushing. An airbrush will spray a very fine mist of paint, which means that several layers are needed in order to get the perfect finish. In addition, the spray distance from the bicycle frame should be about 25 cm, so that the risk of paint noses is kept to a minimum.
A major advantage of painting bicycle frames with an airbrush gun is that the colors can be mixed yourself, allowing you to create individual color tones. With spray cans, on the other hand, the colors are already prefabricated. However, airbrushes do require you to dilute and thin your paints before use. We recommend using only paints and paint thinners from the same brand. This is especially pertinent when mixing colors, as using different paint brands can cause lumping and other unsightly effects.
Airbrushing is not only suitable for painting the bike in a color, but it can also be used to create beautiful works of art. Due to the unlimited choice of colors and with the help of airbrush stencils, various motifs can be also applied to the bicycle frame.
Reasons to Paint Your Bike
Personalize the appearance
Normally, you buy a bike that has the standard bike model appearance. The look is uniform and you might find the same exact model when you go out on the streets. There are some bikers who might want to do some revamping and repainting to get a more personalized look.
In this case, you have the option to choose the bike color, design, and put more personality to your bike. It is very common that bikers will make a total redo of the bicycle frame and choose the color they want.
Protecting your bike
Another reason why some opt to paint their bike is to protect them from external elements. Bike paints or coats directly protect your bike from substances that can harm the metal structure. Most bike paints have the ability to protect steel or aluminum bike frames from water and grit.
These substances can cause corrosion, which will damage your bike. To prevent it from spreading throughout the bike frame, it is ideal to treat the rust and repaint your bike.
Transforming old to new
Many cyclists find it hard to let go of their old bikes. After years of usage, your bike will look old-fashioned and needs a revamp. Bike painting or spraying is the best way to go when transforming your bike into a brand new one.
Factors to Consider When Painting a Bike
Before diving into repainting your bike, there are important factors to consider. This ensures a successful bike painting process.
Rust removal is vital
If you own an old bike, and you already have it for years, it automatically builds rust and dirt on the surface. Before you paint the bike, you should remove the rust and clean the bicycle. In this way, the paint will sit well on your bike frame.
You can use sandpaper or aluminum oxide paper in removing the rust from your bike. Also, it is advisable to use a miniature orbital sander or mouse sander during the removal process. Ensure that you completely remove the rust from your bike.
Degreasing is equally essential
Degreasing is another way to ensure a successful bike painting. You can use white spirit or soap to remove stubborn oil hugging your bike frame. It is important to degrease your bike an hour before you apply the paint product.
Steel treatment
One way of protecting your bike from further rust and corrosion is steel treatment. You can use a rust converter or anti-corrosion primer to treat your bike. You can brush your bike with thin layers of these substances, and let them sit before painting. The anti-corrosion primer is a helpful way to prevent rust from building up. It can also help fight against coat chipping.
Paint color
This highly depends on your personality. Before picking the paint color, it is essential that you have everything planned out. Meaning, you have a vision in your mind about how your bike will look after painting.
In this way, you will not waste your resources and put more damage to your bike. You can also consult an expert on custom bicycle paint. Ensure that you get the color of your choice, and test it in broad daylight to know whether the shade is accurate.
Paint brand
Getting the best paint for bike frame means resorting to a trusted and reputable paint brand. If possible, do not use bike paint from a generic brand. It cannot provide the protection and coating you desire for your bike. Some paint brands can easily wear off, wasting your spendings in the process.
Right Bike Paint to Use on a Bike
For the optimum result, here are recommended bicycle paint you can use in coating and transforming your bike. Depending on your budget and skill level, you can choose which type of paint is suitable for you.
Brush paints
Using brush paints is the most traditional way of painting a bike. For the best result, you can use the following for bike painting:
- Plasticote Enamel Paint – It is an oil-based paint that leaves no signs of brush marks. The Plasticote creates a hard gloss finish after coating your bike. The paint is very easy and quick to dry, requiring you to speed up the painting process.
- Humbrol Enamel Paint – Another paint brand you can consider is Humbrol enamel paint. Like the Plasticote, it is oil-based brush pain. It is a thick substance leaving you a bumpy surface when applied very thickly.
- Johnstone’s Professional Undercoat – This undercoat is an oil-based chemical ideal for a white topcoat for your bike frames. You can sand your bike after painting it with Johnstone’s. It requires sanding because the paint can leave brush marks upon application.
- Household gloss paint – The paint is very thick to apply and slow to dry. It requires you to wait for two weeks or more to finally sand your bike after coating. When applied in a gradual manner, it can still give excellent results.
- Hammerite – This type of paint can be used as a base coat. It comes in a very thick consistency, making it a hard material to work on your bike. It is marketed as paint and primer in one, but it gets hard using a paintbrush.
Spray paints
If you cannot work well with a brush, there are available bike spray paints on the market. A spray paint can create more uniform application for your bike frame. It does not require sanding after the paint application as well.
Spray painting bikes are easier compared to brush painting. It has a spray head that you can direct which area you need coloring. If you apply the spray paint properly, you will see a desirable result.
Next to brush paints, spray paint is a go-to choice for most bikers. The paint color is already mixed, so you just need to open the bottle spray and do the work. However, you have to take precautions when using spray paints.
It is important to maintain a considerable distance between the spray head and your bicycle. In this way, you can control how thin or thick the paint is being applied to your bike’s surface. For accurate results, hold the spray paint in a vertical position and spray the mixture gradually.
You can use Krylon’s Fusion All-in-One Spray Paint for bicycles or the RUST-OLEUM Enamel Spray Paint. Both finishes are glossy and can protect your bike from rusting when you spray paint a bike.
Airbrush paints
Airbrush painting is another innovative way to transform your bike. You will need an airbrush gun, a suitable compressor, and diluted paint. With this type of paint, you can keep the coating as thin as possible.
It will not require paint thinner to get a better paint consistency. Moreover, you can apply the paint more evenly. We recommend you use the Badger Airbrush for accurate results.
No matter what your bike is made of, you can use airbrush paint to coat and color it. Compared to spray paint, employing an airbrush when painting produces a more even and thin coating. It creates a fine mist on the surface and can be applied in several layers without appearing too thick.
Using an airbrush is one of the most excellent ways to paint your bicycles. Most airbrush paints can be used with any type of material and can provide you more versatility in painting.
Step 1: Frame Prep.
– To strip bike frames completely I use brush–on (not aerosol) Aircraft Stripper. With the brush on variety you can load it on, let it dry and get almost all the paint off in an hour or so. Be careful though, this stuff is EXTREMELY TOXIC!
– If you only want to sand down the current paint, my favorite method is to use 180grit wet/dry sandpaper. I keep a bucket next to me and rinse off the paper when its starts to clog with old paint. The wet sanding cuts through the paint pretty quick but it still takes awhile.
– I tape off all the holes and trim the excess with an exacto. I stuff a roll of newspaper in the seat tube because I’ve seen motorcycle builders do this so I feel cool. Get decent masking tape that sticks well but doesn’t pull off paint. I have found that the blue house painters tape doesn’t stick well enough for detail work but is fine for masking big areas.
– If you can, wait for a warm, dry day. It will help the paint bond well.
Add Tip Ask Question Comment Download
Step 2: Painting.
– Rustoleum Painter’s Touch primer and clear coat are my favorite. The primer dries super quick and bonds really well. The clear doesn’t yellow and doesn’t sag as much if you load it on too thick. I also really like Rusoleums American Accents paint. It comes in a ton of colors and they are almost all satin finish so each coat/layer bonds well. (No I don’t work for Rustoleum, it’s just what my hardware store had and I like it.)
– I lay down two coats of primer and generally two coats of paint for each color. On the Cannondale I used three for the base tan color.
– I do a light sanding between coats of color with 600grit wet/dry paper. The paper cuts through low spots pretty quick so don’t stay in one area too long. I don’t sand when doing the detail bits.
– I like to use allot of clear for extra protection. Don’t load it up in one big coat, use a couple light coats and let them dry in between.
Add Tip Ask Question Comment Download
Step 3: Creative Tips.
– The plaid on the Cannondale was done by smoothly wrapping masking tape around the tube. I started the tape at what looked like a 45 degree angle to the tube and rolled it around kind of like bar tape. I did the two brown stripes that face one direction. After it dried I removed the tape and laid new tape perpendicular to the first. I did the same for the thin white stripes but with a smaller gap between tape strips. If your tape stats getting closer together or spreading apart while you wrap you can carefully smooth the opposite edge to guide it back one track
– The checkerboard spiral was done using little square stickers I found at the hardware store. They were sheets of numbers in this case. The size of the sticker dictated the pattern size which is why I had a gap left over where I put the Twain quote (when you mess up get creative!). I already had the tan base color so I placed a spiral of stickers where I wanted that color to show through. Then I laid the next color and placed sticker next to the first row. I did this for all the colors until only one row was not covered with stickers and I sprayed the last color. Then I pulled all the stickers off very carefully with the tip of an exacto.
– When doing a pattern you should plan out all your layers and decide what order they need to go in. I could have sprayed all the brown stripes in the plaid at once but that would have made my masking job much harder. I separated them by color and direction and decided that I wanted the white on top.
– One trick that really saved me time was using freezer paper to cover the panels I wasn’t working on at the time. This allowed to panels to dry while I worked on the third. I rotated the paper wraps after I each layer on each tube. I wrapped the freezer paper waxy side in so it wouldn’t stick but I still waited 30 minutes after spraying to wrap a tube.
– For the Mark Twain quote I wrote it on a piece of masking tape to check the sizing. Then I copied it on a piece of carbon paper and lightly traced it on the tube. The ink you see is actually just blue sharpie which turned out kind of metallic on the bike.
– Another thing I like to do for text is use a reverse stencil. After the primer I spray the area where the lettering will go with the color I want it to be. Then I put down some vinyl sticker letters and spray the rest of the bike its final color. When I pull off the stickers I have nice clean lettering showing through in the color I wanted. You can get fancy by having a sticker shop make you a custom window sticker with whatever font or logo you want. Make sure you get the stickers that are letters cut out of vinyl and not a big rectangle with letter printed on it.
– No design is impossible. I thought the plaid would be impossible when I thought of it. Just picture you dream paintjob in you head then try to plan out how you could make it happen. It’s like a puzzle!
Add Tip Ask Question Comment Download


