How To Make Pinecone Christmas Trees
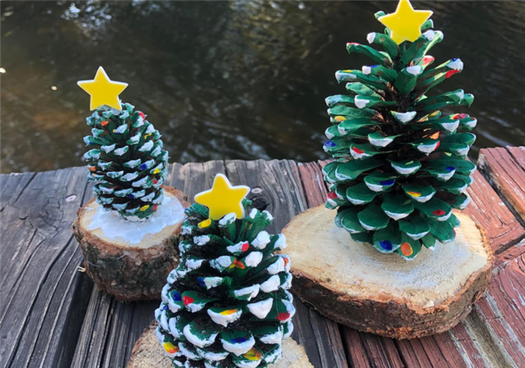
Pinecone Christmas trees are super easy to make and look great sitting on a table, on a mantle, or on a shelf during the holiday season. These easy pinecone Christmas trees also make great handmade gifts for grandparents!
It’s easy near our house to find pinecones this time of year for crafts like this. Don’t have any? Many craft stores carry pinecones as well, or ask at your local Christmas tree farm!
We also used wood slices for this pinecone Christmas tree project, which we got from our Christmas tree farm for free, but you can also purchase those at a craft store.
 |
Here’s how we made our pinecone Christmas trees:
DIY Pinecone Christmas Trees
- Pinecones
- Natural wood slices
- Paint (green and white, plus colors of your choice for your “ornaments”)
- Star or decoration for the top of the tree
- Paint brushes
- Hot glue
1. Paint your pinecone solid green. You can use green paint and a small paintbrush or you can use green spray paint. Try to make sure to get in all the little crevices. Let dry.
2. Using a small paintbrush and white paint, paint the tips of the pinecone to create snow covered branches.
3. Use a small paintbrush and add little dots of color for Christmas lights using colors of your choice.
4. Using a hot glue gun, glue a star or decoration on the top of the pinecone and then use hot glue to attach the bottom of the pinecone to the wood slice.
 |
DIY Christmas Trees With Marquee Lights
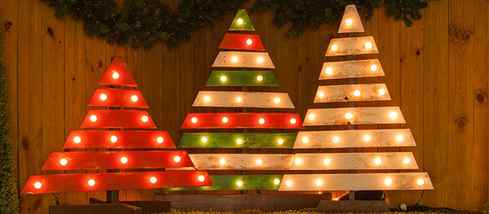
Amazing, beautiful and innovative. all for about $25! How often do you hear that phrase?
Steps to Make DIY Christmas Trees Using Pallets
- Find the perfect pallet
- Draw and cut out tree shape
- Paint boards
- Drill holes for lights
- Attach lights
- Plug in and enjoy!
Steps to Make DIY Christmas Trees Using Pallets
- Find the perfect pallet
- Draw and cut out tree shape
- Paint boards
- Drill holes for lights
- Attach lights
- Plug in and enjoy!
By Jason Abney | Updated Aug 24, 2021
As we discovered, this DIY Christmas tree project was not only fun, but it was relatively easy and the finished product turned out great. Creating unique Christmas scenes for front porches, walkways, or yards is popular but the decor has to withstand the weather and look great all season long. Very few stores sell products like this, which makes them unique and while we thought this project was
going to be challenging, all it takes is a few items and a little good old fashioned DIY ingenuity. We certainly learned some things along the way so take a look and you’ll see for yourself how neat DIY wooden Christmas trees with marquee lighting can be for you.
Basic tools needed
- Power drill
- Circular saw
- Pry bar
- Hammer
- Wood Drill Bits (a 13/16″ bit works perfect for our E12 stringers)
- Measuring tape
Materials
- 1 basic wooden pallet per Christmas tree
- A few wood screws (1 ” to 2 1/4″)
- Paint & brushes
- Sandpaper (60-80 grit)
- Safety glasses
- E12/C7 light stringers (lengths recommended below)
- Any bulbs with an E12 base (bulbs recommended below)
- And, don’t forget your favorite playlist so you can jam out while you work!
Let’s get started!

Supplies
How to Make DIY Pallet Christmas Trees
Step 1: Get Some Pallets
Your local hardware stores, grocery stores, or plant nurseries are great places to get free pallets.. try to pick out pallets with the most usable wood and the least amount of nails. This can be tricky because pallets tend to come either really well put together or made with cheap wood that splits easily. Use your best judgement based on the selection that’s available. Grab some extra pallets if available to use as backup material and then once you get them home give them a good brushing to remove extra dirt and debris.
Step 2: Think Before You Break It Down, We Didn’t?!
After we broke down the first pallet and started cutting slats to build a tree, it dawned on us that it would be far easier to cut our tree shape while the pallet was still intact. We also realized that the natural bottom slats of the palette form a rectangular box, which makes a strong base for the larger trees. No need to disassemble that either if you’re making a larger tree. To make your cuts draw a triangle shape of the tree you want to make from the center top point to the two end points on the bottom edge of the pallet. Use a circular saw and cut along your triangle shape lines. Exercise caution when cutting through knots and we recommend avoiding cutting through nails.

Perfect Pallet!

Draw and Cut Out A Tree Shape
Step 3: Pry Bars and Spines. Scared Yet?
Use a pry bar or the claw portion of a hammer to remove all the nails and the slats. The only exception would be keeping the slats intact on your base box if you know you’re making a large tree. Keep the middle column of your pallet intact as well because it will be the spine of your new tree.
Tip: If you are having difficulty prying the boards off use the pry bar to work the board up a bit then hammer it back down exposing the nail head. Then you will be able to pull the nail out more easily.
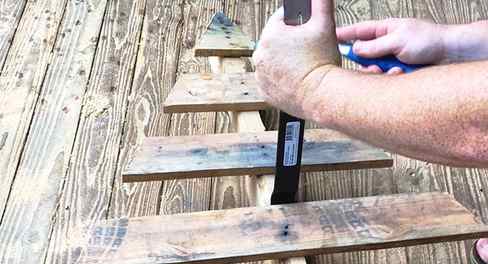
Pry Boards Loose
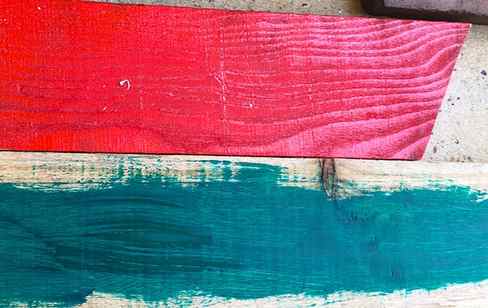
Paint The Boards
Step 4: Layout Your Boards and Paint
Lay out your boards row by row to form the tree shape you want. You may still need to cut some boards to fill out the tree shape you intended and that’s where the boards from the back of your pallet may come in handy. The spacing between the slats that will form your new tree shape is up to you, but we recommend keeping them about 1″ to 2″ apart. Next, clean up your boards a little bit with some 60-80 grit sandpaper to remove any unwanted bits and pieces, but be careful not to remove too much texture. Now it’s time to paint. If you plan to use multiple colors go ahead and decide the color pattern. Knowing the color of every board will save you time by sorting by color groups and painting all of the same color boards at one time. Test out the paint colors on scrap pieces of wood first. If the color is to your liking then you’re good to go.
Big Tip: Most hardware stores offer small paint samples that are perfect for this project because only a minimal amount is needed. Outdoor rated paint is preferred but not a necessity. Also, check the returned paints/mistake paints area. You can find great deals on paint that others didn’t want and a great discounted price.
Step 5: Now, it’s all about that base!
If you’re making a big tree your base can be the existing rectangular box shape formed by the bottom of your pallet that your spine (tree trunk) is attached to. However, if you’re making smaller trees that original base size will be too big and you’ll need to cut it down to size based on your preference. Using the other scrap 2″x4″ side boards that formed the edges of the original pallet, cut out four pieces 14-16″ long. Next, create an offset plus sign shape with the trunk 2″x4″ as the center using 2″ screws.
Step 6: Attach Your Slat Branches
Attach the painted boards to the spine in the layout you want and then use basic wood screws or deck screws to secure them. 1 1/4 ” to 1 1/2 ” screws should be fine.

Use Existing Base for Larger Trees

Reattach The Painted Branches to The Tree Spine
Step 7: Make Way for the Holes!
Your light bulb layout can vary widely depending on the pattern you want and the number of lights you intend to use. This is also dependent on the type of light stringers you need and the sockets available on them. We recommend keeping your light pattern and light count simple and then plan around common stringer sockets quantities like 10, 15, 20 or 25 count light socket stringers. See details on what we used below. Measure out and mark the bulb pattern. Keep in mind, the examples above are for reference only and would need to be adjusted by tree size. If you want to place light bulbs up the middle of your tree the spine will be in the way. In order to do this you’d have to create an off center spine or go with a two-spine assembly that gives you the flexibility to achieve the pattern you want. This is a little more complex though.

Pick Your Light Pattern
**The tallest and middle size tree both require the same 25′ C7 commercial light stringer, SPT1 green wire with 12″ spacing. The tallest tree requires 25 holes drilled while only 23 are needed for the middle size tree. The smallest tree has 15 holes drilled and requires a 15′ C7 commercial light stringer, SPT1 green wire with 12″ spacing.
Start drilling holes where you need. The light stringers for this project are E12 base sockets, so a 13/16″ drill bit is a perfect fit for the socket size. This is not the most common size but a 7/8″ bit is, which also can be used. Drill holes in a piece of scrap wood to test the fit for the stringer first as some stringers may vary in size
Drill Test Holes to Make Sure Your Lights Will Fit Snug!
Place Light Sockets Through Drill Holes
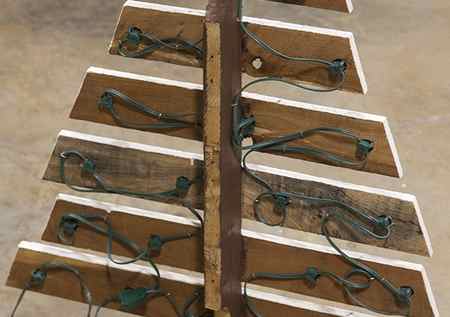
Step 8: Light it Up!
You can use any E12 base bulb (candelabra base) you want, but we recommend going with G30 clear globe bulbs because they look just like bulbs used in vintage marquee signs. Place your sockets through the backside of the holes. The first socket goes on the bottom and closest to the trunk so it can be plugged in the easiest. Weave the stringer up the tree on one side of the trunk, then back down the other side with the end of the string finishing back at the bottom. Now, add the bulbs to the front. You can use a staple gun to keep your stringer more organized on the back but keep in mind that staple guns can damage your wiring. If possible, use coated staples or cable clips to keep your wires tidy and hidden.
Safety Warning: If you have open sockets still on your stringer you don’t want to leave them exposed to the elements. You can wrap electrical tape around open sockets and position them face down to minimize water getting in. Or, you can cut the end of your stringer and place an electrical end cap on it, also wrapped with electrical tape. Please note that cutting stringers often voids their warranty but it also gives you the cleanest implementation on the back of your tree.
Now, plug it in, step back and enjoy your work. Make as many trees as you want to create the coolest vintage marquee lit wood Christmas trees on the street!
Now You’ve Made Your Own DIY Christmas Trees with Marquee Lights. Enjoy!
O Christmas Tree
3 reviews
Price Regular price $39.99 $39.99
Kit Type Kit Type
Most Popular
Junior Artist Kit $39.99
Set of 3 Brushes, Cardboard Easel, 11×14 Canvas, Acrylic Paints, Disposable Palette & Apron, Video Tutorial Access
Jr. Refill Kit $24.99
11×14 Canvas, Acrylic Paints, Disposable Palette & Apron, Video Tutorial Access
Video Only $14.99
Access to a step by step video tutorial for 2 years
- Bundle & enjoy 4 paintings for $99. Add 1 Junior Artist Kit + 3 Junior Artist Refill Kits of any painting to your cart.
Quantity
Using layers of color and special brush stroke techniques, painting this festive fir feels as merry as decorating the real thing. And just like a real Christmas tree, you can trim this terrific tree any way you like!
O Christmas Tree Sample Tutorial
Estimated time to complete painting: 70 minutes. This specific painting is recommended for kids ages 7+.
Painting to Gogh 101
Everyone has a creative side, and we want to help you uncover it! Our kits include easy-to-follow video tutorials & all the supplies needed to have a great time painting!
Painting to Gogh promises you will have a great time. Try out our kits, and if you don’t like your experience — though we promise you will — you can return your PTG kit with a full refund within 60 days.
Shipping Information
Standard shipping delivers in 3 to 6 business days (Monday through Friday) and includes fulfillment time.
Expedited orders must be placed by 12 PM CST to ship same business day. Add one businesss day to delivery time shown for orders placed after 12 PM CST.
All expedited orders placed Friday after 1 PM and all day on Saturday and Sunday will ship on Monday.
UPS delivers on business days. For example, a UPS Next Day order placed on Thursday evening at 5 PM CST will ship on Friday and deliver on Monday. Next Day delivers by 12 PM and Next Day Air Saver delivers by end of business day.
If you need expedited shipping to deliver on a Saturday, please contact [email protected].
WHY SHOULD I PAINT WITH PAINTING TO GOGH?
Painting can look intimidating, but it doesn’t need to be. We want to make it easy for anyone to learn to paint.
- Easy tutorials for kids to learn painting techniques and create beautiful art without frustration.
- With our kit, children can focus on creating art and having fun without worrying about complicated supplies.
- Our art instructors provide instruction, but also encourage kids to express their creative personality.
- Refill and reuse with our Junior Artist Kit and Refill Kit ($25) for endless painting fun!
MEET YOUR INSTRUCTOR
Whitney is painter based in Salt Lake City, Utah. She owns Smartest Artist, an art education studio for children and adults. Whitney loves teaching video tutorials through Painting to Gogh, so she can reach artists all over the world!
EACH PURCHASE SUPPORTS AN ARTIST
Each purchase contributes to a profit share with the instructor that created the painting & video tutorial. We partner with talented artists across the U.S to teach our video tutorials. Artists make the world a more creative place and we ❤️ artists.
BUNDLE & ENJOY 4 PAINTINGS FOR $99.99
Add 1 Junior Artist Kit + 3 Junior Artist Refill Kits of any painting to your cart. Discount applied automatically.


