- Faux Pumpkin*
- Blue Acrylic Paint (DecorArt Americana Blue Harbor)
- Gold Acrylic Paint (Folk Art Treasure Gold – 5535 Gold Or)
- Painters Tarp or Newspaper to cover table
- Small Bowl, Book or Pedestal to raise pumpkin
- Syringe (optional)
Make Your Own Gorgeous Pour Paint Pumpkins
Decorate these pumpkins in three easy steps—no carving or paintbrushes required! You won’t believe how easy it is to make these gorgeous painted pumpkins.
Sarah Martens is the Senior Editor overseeing food at Better Homes & Gardens digital. She has been with the BHG brand for over 8 years.
Updated on July 6, 2020
Project Overview
- Working Time: 30 minutes
- Total Time: 1 day
- Skill Level: Kid-friendly
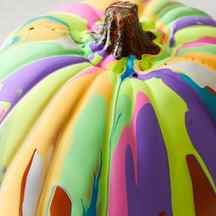
This pumpkin decorating project is so easy that anyone can do it. All it takes to make these colorful Halloween decorations is crafts paint and a few faux pumpkins. We’ll show you our easiest tips and tricks for creating gorgeous designs with paint poured directly out of the bottle—they’re called pour paint pumpkins for a reason, after all!
Of course, you can use real pumpkins for this project, but if you opt for faux, you’ll be able to use them year after year. Use bright orange, green, and black paint to make a festive Halloween decoration, or choose neutral colors to create a display all season long. No matter what colors you choose, we’ll show you how to pour the paint and tip your pumpkins for just the right look.
What You’ll Need
Materials
- 1 Faux pumpkins
- 1 Acrylic craft paint
Pour, Pour, Pour
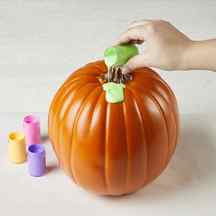
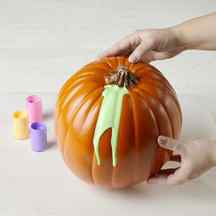
This project is insanely easy, but it can get messy. Start by choosing a pumpkin: We used an Artificial Carvable Pumpkin, ($25, Funkins), but the colors would pop just as much on a White Artificial Pumpkin, ($13, Amazon). When you’re ready to start pouring paint, put a large sheet of crafts paper or newspaper over your crafting surface to collect paint that may run off the end of your pumpkin as you work. To make the rainbow pumpkin, choose your paints. This 18-Count Acrylic Paint Set ($23, Amazon) has almost every color combination you could think of. We started with a base color and poured paint near the pumpkin’s stem. Once the paint begins to run down the side of the pumpkin, you can tilt, rotate, and tap the pumpkin against the table to keep the paint dripping. If you don’t want the colors to mix, let this layer of paint dry before adding more. To get a marbled look, apply another color directly on top of this layer before it dries.
Shake It Up
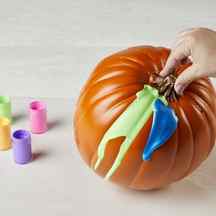
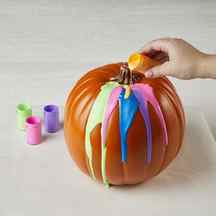
Add more colors and layers of paint to create a rainbow look. Shake and tilt the pumpkin as you pour to combine the paint layers as you go—experiment with different shaking methods to get a look you like. We used a neon paint set to create a rainbow paint pumpkin, but you can use as many or as few colors as you’d like. Add small areas of color around the pumpkin, or create a cohesive layered look by covering the entire pumpkin in one layer of paint and then adding more layers over the top.
Dry and Display
Once you’ve covered your pumpkin, let the paint dry thoroughly. Many layers of paint can create a thick surface (especially around the stem). We recommend allowing the pumpkin dry for 24 hours; check that the paint is completely dry before moving and displaying your paint pumpkin.
Painting pumpkins using acrylic paint
Select a Country

- Home
- Paint & Create
- Acrylic Pumpkin Painting Set, Classic Colors


Roll Over Image to Zoom
Description
Jazz up your Halloween or Fall decorations with a painted pumpkin! Crayola Pumpkin Paint offers six classic colors of our acrylic paint – perfect for turning your gourd into a work of art. Six 2-ounce bottles in assorted colors including Deep Red, Brilliant Blue, Brilliant Yellow, Burnt Umber, Ivory Black and Titanium White
For best results, pumpkins decorated with Crayola Pumpkin Paint should be displayed indoors.
Features
PUMPKIN PAINTING: Scary or not, this acrylic paint set will turn any pumpkin into a work of art. The set features 6 acrylic colors including Deep Red, Brilliant Blue, Brilliant Yellow, Ivory Black, Burnt Umber, and Titanium White.
ACRYLIC PAINT: Acrylic paint is a multi-surface paint perfect for pumpkin crafts.
CRAFT PAINT: Not just for pumpkin painting! Great for painted ornaments, plastic Easter egg crafts, and more.
FOR BEST RESULTS: Pumpkins decorated with Crayola Pumpkin Paint should be displayed indoors.
SAFE & NON TOXIC: Safe for ages 5 & up
Pour Painting Pumpkins With Craft Paint
I’m not really sure if this is called a pour paint craft. a paint pour craft or even a drip paint craft. But whatever you want to call it, it’s a quick and easy way to decorate a pumpkin!
For years I have gone very traditional with my fall decor. Team Orange & Rust here.
But this year I wanted to stretch a little out of my comfort zone and try something a little less predictable. A little more modern.
And what’s more modern than a paint splattered pumpkin.
Here’s how you can make your own.

(This post contains some affiliate links for your convenience. You can read my full disclosure policy here.)
How To Drip Paint A Pumpkin

- Faux Pumpkin*
- Blue Acrylic Paint (DecorArt Americana Blue Harbor)
- Gold Acrylic Paint (Folk Art Treasure Gold – 5535 Gold Or)
- Painters Tarp or Newspaper to cover table
- Small Bowl, Book or Pedestal to raise pumpkin
- Syringe (optional)
Time needed: 1 day
Pour Painting Pumpkins The Easy Way
-
Prepare Your Area Lay down a painter’s tarp, newspapers or old shopping bags to cover your surface. This can get messy.
Put a small dish or book on your protected surface and then cover that with a bit more of your newspapers or shopping bags. Place your pumpkin on top of your tiny man-made pedestal.
This is to elevate your pumpkin so the “drips” don’t just sit and pool at the bottom of the pumpkin. It’s not a good look.

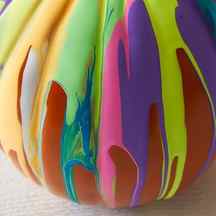
Apply First Paint Color In the indentation around the stem, add a heaping amount of your first paint color (in my case the blue). I used a full 2 oz. bottle of craft paint.

Make Your Drips Once you have lots of your primary paint color by the stem you will want to tilt, rotate and tap your pumpkin on the table in order to continue the drips rolling down the sides.
When you do a typical pour paint technique on a flat canvas you add a pouring medium to the paint to make it pour more fluidly and smoothly. Since we are not doing a traditional pour paint technique here, we are not using a special pouring additive and the paint will be thicker.

Allow 1st Color To Dry Once you get the desired look for the 1st color, allow it to air dry. This is going to be a thicker coat of paint than you probably have ever painted with before, so it will take quite a bit of time to dry.
I let mine dry 4 hours.
The paint on the sides was dried in about an hour, but the paint by the stem took a full 4 hours.

Apply 2nd Color Repeat with your second color of paint.
I used a tiny syringe to place my gold color, since the bottle it came in was much larger and did not come with a squeeze top like typical craft paint. I have these readily available in my house since my son takes lots of medication using syringes, so if you don’t own a syringe I probably wouldn’t bother buying one just for this project.
The same amount of each color paint was used, but I just took this photo early in the “gold” process.

Allow 2nd Color To Dry Just like the first color, the 2nd color will take about 4 hours to dry. To be safe, I would leave the pumpkin to set up overnight before your start decorating with it or touching it too much.
You’ll notice in the time listed for the project it says it takes 1 day to make, but that’s including the 23 hours & 45 minutes of dry time. The actual fun part of the project is 15 minutes max.

I have to say I was VERY pleased with how to gold color came out. It is very shiny and metallic looking which is not the case for all “gold” paint out there.
And the pumpkin looks fantastic with my wicker covered wine bottle and my Repurposed Yard Stick Craft fall vignette. Not an orange pumpkin or leaf in sight!

Frequently Asked Questions
Where Can I Buy A Faux (Fake) Pumpkin?
I found my medium sized fake white pumpkin at Walmart for $5.98. It’s about 6″ tall (8″ inches if you include the stem). You can also find fake pumpkins at Joann’s, Michaels, Target and Amazon.
What Kind Of Paint Do You Use To Paint A Pumpkin?
Acrylic craft paint is the easiest to work with. It dries quickly, cleans up easily (soap and water) and it comes in 14,582 colors. It’s also fairly inexpensive if you buy it at the craft stores ($1-$2 a small bottle).
Oil based paint is very smelly, takes forever and a day to dry and you’ll need paint thinner, turpentine or mineral spirits to clean up the brushes. If you are doing this project with children, you should definitely use acrylic and not oil based.
Of course you could use a can of spray paint if you just wanted to paint a whole pumpkin an entirely different color. That’s not what we’re doing in this project, but it’s a thought if you just want an all over shiny gold pumpkin.
Can You Paint A Real Pumpkin?
If you use a real pumpkin, pick out a pumpkin with a smooth surface area and not a lot of deep indents, warts and wrinkles. Make sure you wash off the pumpkin with soap and water and allow to dry thoroughly before painting.
I personally did not use a real pumpkin, because I wanted to use it again and again.
And really wanted to store the pumpkin for 10 months out of the year (said no one ever). Am I the only one with 10 fall decor storage bins in the basement?


