Award winning, best-selling author and sugarcraft artist, who loves to design beautiful colourful cakes, inspire and teach Read More…
Christmas Tree Cake Topper Set 2 per pack
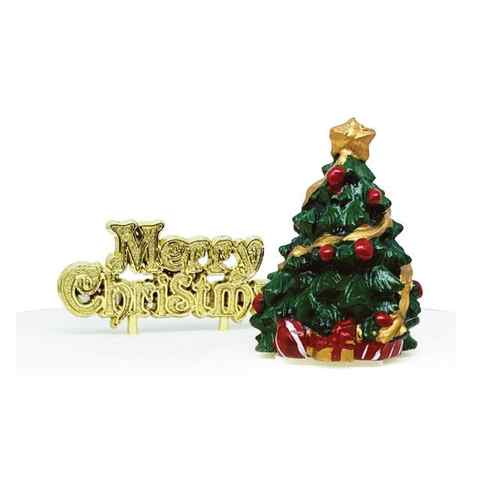
This two piece cake decorating set includes a beautifully hand-painted Christmas Tree resin figurine and gold ‘Merry Christmas’ motto, perfect for finishing Christmas cakes. No assembly required, simply remove from the box and plant firmly in the cake icing. Presented in a giftable, clear luxury box which can be used to store the Christmas cake decoration keepsakes year after year. Each topper is washable and reusable. Wipe clean with a damp cloth and let dry completely before storing.
Usage
Preparation and Usage
Wipe clean with a damp cloth after use.
Brand details
Brand
Anniversary House is one of the UK’s leading manufacturers and distributors of Cake Decorations, offering simple decorating solutions and quality, innovative designs since 1953.
Product details
Specifications
Material: 100% unsaturated polyester resin.
Size: 5.5 x 4cm
Categories
- Occasions & Entertaining
- Cakes, Candles & Cake Decorations
- Cake Toppers
- Food Cupboard
- Ready, Set, Bake!
- Decorating
- Cake Sprinkles & Toppers
- Christmas
- All Things Sweet
- Home Baking
No reviews, yet. Why not be the first?
Leave a review
Disclaimer
This page serves as a summary for information purposes only, and are designed to enhance your shopping experience on the Ocado website. While we have taken care in preparing this summary and believe it is accurate, it is not a substitute for your reading the product packaging and label prior to use. You should note that products and their ingredients are subject to change. If you do require precise ingredient information you should consult the manufacturer, whose contact details will appear on the packaging or label. Ocado is therefore unable to accept liability for any incorrect information. Where this description contains a link to another party’s website for further information on the product, please note that Ocado has no control over and no liability for the contents of that website. You should also note that the picture images show only our serving suggestions of how to prepare your food – all table accessories and additional items and/or ingredients pictured with the product you are purchasing are not included. This data is supplied for personal use only. It may not be reproduced in any way whatsoever without Ocado Limited’s prior consent, nor without due acknowledgement.
- Ocado Facebook page
- Ocado Twitter page
- Ocado Pinterest page
- Ocado Instagram page
- Ocado Youtube channel
- Ocado blog
Download our Apps
- Download our app for iPhone and iPad
- Download our app for Android
Help Centre
- Frequently asked questions
- Terms & Conditions
- Privacy & Cookie Policy
- Security Policy
- Bag Recycling Information
- Accessibility Statement
Corporate
- ocadoretail.com
- marksandspencer.com
- Sustainability
- Modern Slavery Statement
- Contact Us
- Alcohol Policy
Careers
If we don’t stock what you are looking for, try sending us a product request
© 2023 All rights reserved. Ocado Retail Limited
Front Cover Christmas tree cake – how to make

I was really pleased with the cake itself, which is decorated using the Patchwork cutters swirl cutter set and my curled leaf set together with piped dots of royal icing – not difficult! The board was embossed with patchwork cutter snowflakes, stippled with blue paste colour and then stencilled with jewelled snowflake stencils using blue royal icing.

Instructions to cake this Christmas tree cake
It’s been quite a few years since I wrote this article for the Dutch magazine. So I thought it time to share my instructions in English with you
Covering the cake board
- Roll out 1.4kg of the blue sugarpaste, ideally between spacers. TIP: Rolling out the sugarpaste onto a surface smeared with white fat rather than icing sugar will ensure that there are no unwanted white marks on the paste.
- Lift up the paste, using a rolling pin for support, and place it over the board.
- Take a smoother and using a circular motion, smooth the paste to give a level surface. Using a pallet knife, trim the edges flush with the sides of the board, taking care to keep the cut vertical.
- Make a tree template from greaseproof/baking paper and place onto the covered board to allow sufficient space for both the trunk and the star on top of the tree and scribe around and outside of the template using a scriber or glass headed pin.
- Take one of the snowflake embossers and press it gently into the soft sugarpaste, repeat using the different sizes of snowflake to create a background snow scene as shown. Tip: leave enough room between the snowflakes to allow the stencilled snowflakes to be added later.
- Place to one side to dry.

Painting the cake board
- Separately dilute the two blue paste colours with clear spirit or boiled water. Paint over one of the snowflakes, allowing the diluted paste colour to fill the indented snowflake shape.
- Take a dry large stippling and stipple over and around the snowflake, as shown in the step, to spread the colour.
- Continue painting the snowflakes varying the colour used and depth of colour as you go. There is no need to paint over the area where the cake will rest.
- Place to one side to dry

Stencilling the snowflakes
- Colour a little royal icing blue then adjust the consistency to make a reasonably firm icing by adding a little icing sugar or boiled water as appropriate.
- Place a snowflake stencil onto a space between the embossed snowflakes. Pick up some blue royal icing with a pallet knife then carefully spread the icing across to top of the stencil, holding the stencil in position with your other hand. TIP: experiment and practice on a piece of spare sugarpaste first, then you’ll know how thickly you wish to apply the icing.
- Once the icing is an even thickness, remove the stencil, taking care not to smudge the pattern.
- Wash and dry the stencil then repeat as desired.

Carving the cake
- Remove the crust from the cake and split and fill the cake with jam, buttercream or chocolate ganache, if desired. Level the cake.
- Cut your tree template in half down the middle. Place the halves on top of the cake, so that they fit, note, the tip of the tree template will not fit onto the cake at this stage. With a sharp knife, cut vertically through the cake around both templates. Remove the templates and excess cake.
- Stick the two halves of the tree together using jam, buttercream or chocolate ganache. Add a small piece of cake to the top of the tree to create the tip and cut to shape.
- Shape the tree by slicing up from the tip of the tree to the lower edge, the widest section of cake.
- Next, curve the side edges to give a more rounded appearance to the tree. Tip, if you’ve not carved a cake before do this slowly removing a little cake at a time, you are aiming for a nice smooth finish with no obvious knife cuts!
Covering the cake
- Place the cake on waxed paper and spread buttercream or chocolate ganache over the underside of the tree. Roll out some blue sugarpaste and cut one edge straight. Cover the base of the tree by placing the straight edge against the base of the cake, smooth and cut the paste flush with the top of the cake, using a pallet knife.
- Spread a thin layer of buttercream or chocolate ganache over the top of the cake. Roll out the remaining blue sugarpaste into a triangular shape and place over the cake.
- Smooth to shape, using a smoother and the heat from your hand. Next, take the smoother and place it against one side of the cake and run it along the side of the tree pressing down into the excess paste at the same time to create a cutting line in the sugarpaste. Repeat for the second side.
- Next cut the paste flush with the underside of the tree using a pallet knife and a smoother as demonstrated.
- Place to one side to dry.
Painting the cake
- Dilute the dark blue paste colour with clear spirit or boiled water. Then using a stippling brush, stipple the cake with the diluted paste colour.
- Once this has dried, stipple over the cake with confectioners glaze to seal in the colour.
- Place to one side to dry.
Assembling the cake
- Transfer the cake to the covered board, being careful to place the tree so there is enough room for the trunk and star.
- To make the trunk, take some of the off cuts of sugarpaste and roll them into a cylinder and place in position. Tip, use a smoother to help roll the paste, you will get a more uniform finish.
- Paint over the trunk with diluted blue paste colour using sweeping strokes and a large brush.
Decorating the Christmas tree cake
- Thinly roll out some white modelling pastes between narrow spacers.
- To create the scrolls, take one of the scroll cutters and press it firmly onto the rolled out paste. Then, to ensure the edges of the shape are cut cleanly take a craft knife and cut around the indented lines. Repeat, then remove the excess paste, leaving the shape in position on your work board to firm up slightly.
- Cut curled leaf shapes using the three curled leaf cutters, using both sides of the cutters. Tip, press the cutting edges of the cutters through the paste and give them a little wiggle to make sure the cut is clean, then remove the paste from the cutter with a soft paintbrush. Leave the shapes to firm up slightly
- Cut circles using the suggested circle cutters and piping tubes, removing the centres of the larger circles to create paste rings.
- Finally cut out a selection of small stars.
- Once you have a collection of different shapes attach them to the cake with sugar glue, using the photos as a guide.

Adding Royal Iced detail
- To pipe the dots, add a little superwhite dust to the royal icing to make a true white colour. Check the consistency of the icing and adjust as necessary, by adding more sugar or boiled water, you need to be able to pipe round dots not pointed cones.
- Place the coupler into the reusable piping bag, fit the No 2 tube and half fill with royal icing. Then use to pipe dots as required around the shapes and patterns on the cake, see the finished cake for reference. TIP: if some of your dots are slightly pointed, quickly knock the point back into the dot with a damp brush before the icing sets.

Finishing touches
Using the non-toxic glue stick attaché the ribbon to the outside edges of the cake board.
Hope you like it!
If you speak Dutch these instructions plus all the step by step photos are in the magazine – enjoy!
‘Bringing world-class sugarcraft into your kitchen’
You may also Like.
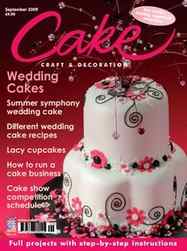
I heard on the grapevine last week that my Pink Fizz cake jewellery cake was on the cover of Cake Craft and Decoration magazine this month, still not received my…

Christmas pudding cookies, what a wonderfully festive sweet treat. Every Christmas I bake and decorate cookies in all shapes and sizes. So imagine my delight when I discovered the Christmas…

Shush. don’t tell anyone. but there are less than 4 weeks until Christmas! Now I love Christmas, I love the excitement of my young nieces and nephews, I’m very partial to…
About Lindy Smith
Award winning, best-selling author and sugarcraft artist, who loves to design beautiful colourful cakes, inspire, teach and supply you with gorgeous products.
Gingerbread Velvet Cake Slice Christmas Tree Decoration
- Buy 2 for $17.25 each and save 9 %
- Buy 5 for $15.50 each and save 18 %

SHARE: Share on facebook Pin it Share on Twitter Google Plus
If you love to create sweet-as-can-be Christmas displays, look no further than this Gingerbread Velvet Cake Slice Christmas Tree Decoration.
Crafted from lightweight material with a sleek velvet finish, this Gingerbread Cake slice decoration features sparkling glitter icing, striped ribbon trim and candy and red berry embellishments. Complete with a string attached for easy placement.
The perfect decoration to sweeten up your Christmas tree display. Use to embellish your Christmas tree or to create an exciting, festive vignette on any surface in your home. This decoration is perfect for a Peppermint Candy Christmas decor theme paired with vibrant red, white, and green elements, candy-themed decor, and glitter galore.
Weight: Lightweight, easy to hang and suitable for any standard Christmas tree.
Packaging: Packaged with care to ensure the item arrives safely.
Care: Indoor use only.
If you are looking for ideas and inspiration for your Christmas decorating be sure to check out our Inspiration Gallery. With creative craft projects, helpful decorating videos, beautiful look books and stunning free Christmas printables, you are sure to inspired.
Despite every effort to provide accurate images of each product’s colour and design, actual colours and design may vary slightly, due to different device screen settings, the lighting in the installation location, slight differences in product finishes over time and other factors.
Write Your Own Review
Current delivery times
Currently dispatching in 2-5 business days
As the majority of our gifts and keepsakes require personalisation we require time to allow our talented artists to create. Orders are currently leaving our Sydney Studio in 2-5 business days then allow 1-5 days for delivery depending on your location. If your order does not require personalisation we will endeavour to send it out within 2 business days.
Need it Faster? Choose Australia Wide Express Service (Only Available in October-December)
Left your shopping until the last minute and need it in a hurry? For a flat rate of $22.95* we will move your order to the head of the queue and use an Express Delivery service to deliver any where in Australia. For orders with heavy or bulky items the cost will be flat rate of $26.95* for Express Delivery. Your order will be personalised and dispatched from our warehouse within 48 hours (weekends excluded). Delivery time and delivery provider will vary depending on your location, as a guide metropolitan areas are likely to be the next business however regional and country areas may take longer.
*Please note, a shipping surcharge maybe applicable for orders over 1kg. If a shipping surcharge is applicable we will contact you. If after being advised of the shipping cost you wish to cancel your order we will refund your payment immediately.
Australia-Wide Flat Rate Standard Delivery
We charge a flat rate of either $12.95 or $16.95 (bulky goods) to ship orders of up to 1kg in cubic weight anywhere in Australia. Please note, a shipping surcharge maybe applicable for orders over 1kg. If a shipping surcharge is applicable we will contact you. If after being advised of the shipping cost you wish to cancel your order we will refund your payment immediately. This excludes corporate and bulk orders which we will quote at time of ordering.
FREE Click & Collect from our Studio & Warehouse
When placing your online order you can select to Click & Collect from our Studio & Warehouse location in Ingleburn, New South Wales during the times listed below.
Please note that we do not have a physical retail facility available to shop, inspect product and make purchases in person. All orders must be placed online and shipped to you or collected from our warehouse.
Studio & Warehouse Location:
Unit 2, 17 Heald Road
Ingleburn NSW 2565
Australia
Studio Opening Hours:
January – August: By appointment only
September: Tue – Thurs 9am-3pm
October – December: Mon-Fri 9am-5pm
If you would like more information on any of the products you have seen on our website or something you can’t find send us an email, give us a call on 1300 72 47 10 or fill out the form on our contact page.
International Delivery
We can send goods to any country that is within Australia Post’s International network. Our international orders are sent using Australia Post service at a flat fee of AUD$25.95 for orders that weigh under 1kg. If your order weighs over 1kg we will contact you if an additional payment is required for postage. If, due to the additional postage costs, you don’t want to proceed then we will refund your payment immediately. To view postage times for countries visithttp://austpost.com.auapps/international-post-guide.html
Free Shipping over $150
Receive Free Shipping Australia wide on orders over $150. Excludes orders with bulky items, corporate orders and promotional offers. Is not available on Express Service or International Deliveries. Excludes some regional or remote areas. You will be contacted if your order falls within these locations.
If you have placed an order with items that are on PREORDER, we will hold you order and ship all your items together.


