Process art is a fancy way of saying: there is no expectation for how this project should look at the end and children have complete artistic license over it.
Painting Pumpkins Halloween Art
Author: Susie Published: 10/10/2018 Updated: 09/07/2022
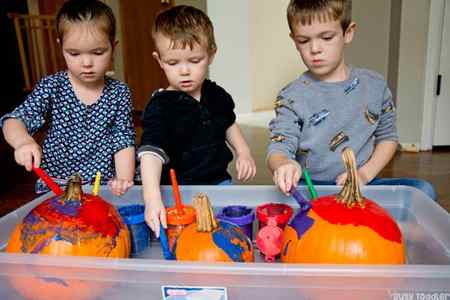
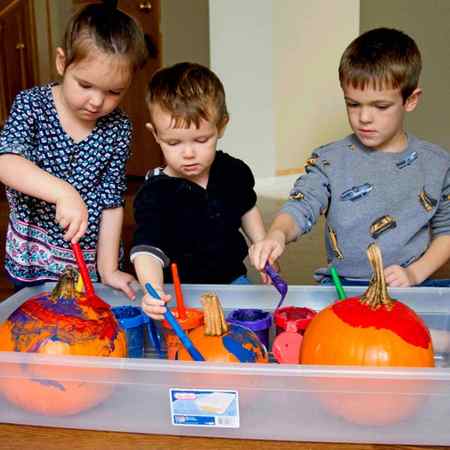
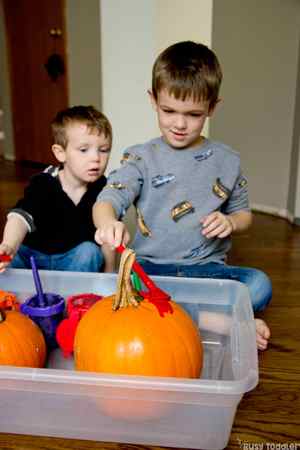
Need an absolutely perfect kids activity: meet painting pumpkins. This cross between process art and celebrating fall/Halloween is a magical moment for kids. Plus (don’t worry) this washable paint rinses right off in the second part of the activity.
What is painting pumpkins?
It may not look like much, but painting pumpkins is the reigning Halloween activity champion in my house.
That’s not a title that people can come by easily – considering we do A LOT of Halloween activities… but this one reigns supreme.
The basics: washable paint plus pumpkins. But of course, there’s a little more to it than just that.
RELATED: Looking for more Fall-themed ideas? Check out my FREE Fall Bucket List.
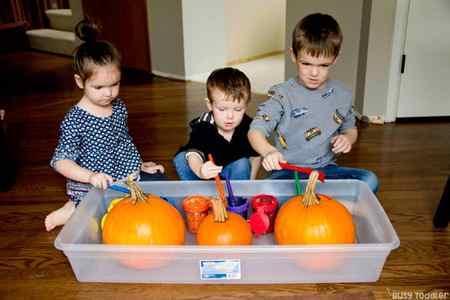
The Supplies
Busy Toddler is a participant in the Amazon Services LLC Associates Program, an affiliate advertising program. As an Amazon Associate, I earn from qualifying purchases. Read more about these links in my disclosure policy.
- Washable tempera paint – this kind of paint is key and very washable
- Pumpkins
- Storage container / sensory bin (I used our 41qt bin for this activity)
- Large paint brushes
- Optional: paint cups
You Will Need
- Washable children’s paint (orange, green and black or brown)
- Paintbrushes
- Construction paper
- Baby wipes, paper towels, or hand towel (to clean off little hands quickly!)
- Have your child pick out a piece of paper. I would give them a choice of two or three colors and and ask “What color paper would you like?” (Working on receptive language, expressive language, and color ID)
- The first step will be painting your child’s palm only (or having your child paint their own palm) with orange paint. As you do this, tell your child what you are doing. Talk about how the paint feels on the skin. (for example: “We are going to paint your hand with orange paint with the paintbrush! Here, let me have your hand. Great job! Keep your hand open for me. How does the paint feel? Is it cold or hot?”)
- After the palm is painted, take your child’s hand and place it on the paper and lightly press down, creating a print of your child’s palm. This will be the pumpkin! Be sure to talk about each step as you do it. (i.e. “Now I am going to put your hand on the paper! Wow look at that! We just made a pumpkin with your hand! Let’s make another one!”)
- Repeat step three as many times as you would like to make several pumpkins. We did three for each child.
- Allow the pumpkins to dry. It took ours about 10 minutes.
- When the pumpkins are dry, it is time to paint some faces! This is a great time to work on body part vocabulary and shapes as you and your child paint faces on your pumpkins. (i.e. eyes, nose, mouth, circles, triangles, crescent, squares). We also painted on stems. Be creative…you can also paint a scarecrow or vines, whatever you want! I painted vines on Ev’s.

Other ideas for your hand-print pumpkins
- Make a pumpkin family! Have each member of the family make a pumpkin on one sheet of paper. You can frame it and hang it as a fall decoration!
- Make Halloween Party invites or Halloween cards to send to the grandparents!
- Make sure to talk to your child about each step. First, next, then, last.
- Talk about how the paint feels. Is it cold? Wet? Sticky?
- Talk about pumpkins. Their color, shape, feel. Where do they grow? What do we do with them?
- Talk about how paint goes from wet to dry. Why does this happen?
- Check out my post HERE for more tips on using
Please let me know if you try this at home. I would love to hear how they turned out! Remember to talk about each step of your project with your child and give him/her opportunities to answer questions about what he/she is doing. After you are done, can your child tell you the steps to how to make the pumpkins?
About Katie
Katie is a licensed, credentialed and certified pediatric speech-language pathologist and mom to four (8, 6, 3 and 6 months). Her passion for educating, inspiring and empowering parents of children with all abilities led her to start her blog playing with words 365 where she shares information about speech & language development & intervention strategies, parenting, photography and a little about her family life too. Katie has been working in the field of speech pathology for 12 years and is certified in The Hanen Centre’s It Takes Two to Talk ® and Target Word ® programs and holds a certificate in Applied Behavior Analysis (ABA). In addition to blogging and being a mommy, Katie works part time in her small private practice in the San Francisco Bay Area. You can follow her on Facebook, Pinterest and Twitter.
Comments
- Andrea says October 23, 2011 at 7:17 pm
Very cute idea! I am looking forward to trying this with my kiddos! Thanks for sharing – I found you from Mom to 2 Posh Lil Divas Sunday Showcase.
- Katie says October 23, 2011 at 7:26 pm
Hi Andrea! Thanks for coming by! This really was so much fun. My almost three year old loved it and even my 9 1/2 month old got a kick out of his hand being painted
How cute are those?! I love simple projects!
I would love for you to link up at Living Life Intentionally’s Linky party – http://livinglifeintentionally.blogspot.com/search/label/Linkey%20Parties ~Beth
- Katie says October 24, 2011 at 8:58 am
Hi Beth! Yes…sometimes the most simple projects are the best! Thanks for stopping by, I’d love to link up!
This is so cute! Thank you for linking to Halloween Traditions and sharing your idea with my readers!
- Katie says October 24, 2011 at 12:36 pm
Thanks for stopping by! Glad you liked them!
Those are really, really cute! They turned out very well. Love the little pumpkins!
- Katie says October 24, 2011 at 7:28 pm
Michelle thanks so much! Thanks for stopping by!
What a cute craft for little hands! Thank you for sharing your ideas with us on The Sunday Showcase
- Katie says October 28, 2011 at 5:50 pm
Instructions
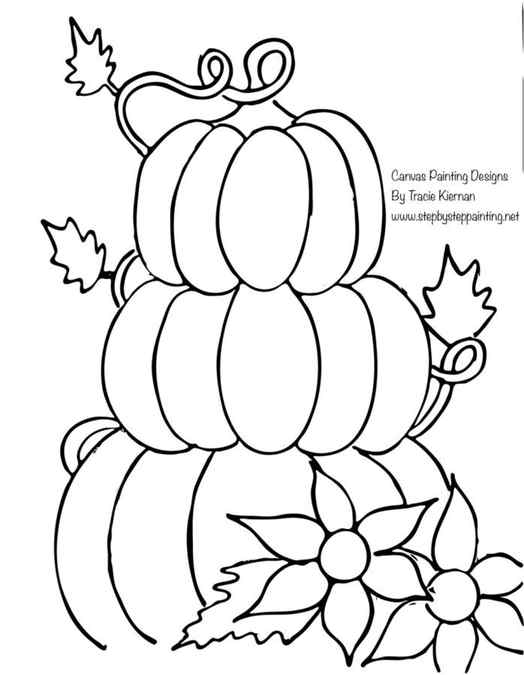
- Use traceable to transfer design onto the canvas or lightly draw the pumpkin topiary.
- Paint the background payne’s grey and let the painting dry.
- Use foam pouncers and gold paint to paint the polka dots.
- Paint the pumpkins starting from the bottom and going upwards.
- Paint the white pumpkin with unbleached titanium and titanium white. Use a 12 brigh brush for the pumpkins and paint each pumpkin bump one at a time.
- Paint the green pumpkin with light olive green and deep green permenent.
- Paint the orange pumpkin with cadmium orange hue and titanium white.
- Paint the stem and pumpkin leaf vine.
- Paint the sunflowers.
- Paint the words.
© Tracie Kiernan All Rights Reserved
Project Type: Acrylic Painting / Category: Fall

Color Palette

You can get the PDF downloads in my traceable library or scroll up to the materials section.
If you do not prefer using the traceable, lightly draw the pumpkin topiary with pencil onto the blank canvas first.
Directions At A Glance


The traceable is on multiple sheets to tape together. Cut off some of the dotted lines and position it so it fits on the 11 x 14 canvas. Note that I also have a traceable for an 8×10 canvas! You can find that over in my traceable library.
Place a sheet of graphite paper below the pumpkin and trace the design. It will transfer to the canvas.
2. Paint the background around the pumpkin *payne’s grey
*Note: if you do not have payne’s grey, you can use mars black or any black.
To do the background, I used a 3/4″ flat wash brush and the color payne’s grey. Water it down SLIGHTLY to let it flow well.

Paint all around the pumpkin drawing and on the sides of the canvas. If you have to paint over the stem and some of the sunflower petals that is fine!

Let this dry before going on to the next step.
3. Use pouncers and gold paint to paint the polka dots
For the polka dots, I used the Martha Stewart Foam Pouncers! These are a lot of fun to use! I mainly use them for doing polka dot circles or wherever else you would like a perfect circle to be.

Load the foam pouncer in the gold paint. Then press and twist as you paint each circle. Try not to overload the sponge when you are loading the paint.


I used two different size circles, both medium/ small sized. Make your dots everywhere! Some dots are going off the canvas, some overlapping behind the topiary and some on the side of the canvas.

4. Paint the white pumpkin
The pumpkin was done with unbleached titanium, titanium white and a #12 bright flat brush. When I paint pumpkins, I like to do one bump at a time. For this one, I started with the bump in the middle.

Use the full width of the brush, start from the top of the pump and stroke all the way down. The stroke should curve and contour with the shape. Fill in the entire middle bump area.

Then wipe your brush off and load your brush in some titanium white. Make more curved strokes with the white so it blends with the unbleached titanium.

Then paint the next two bumps. This time I used more white and a small amount of unbleached titanium. You will make the bumps on the pumpkin stand out simply by changing the amount of beige to white you are using.
Also, make sure you are curving your stroke so it forms the shape of the pumpkin.

Continue painting each bump of the pumpkin. I also added a few more white strokes in the middle.

Then switch to your #4 round brush and load some burnt umber onto your palette. Load the tip of your brush into the brown. Paint the lines that are in between the bumps but you do not have to completely outline the line. I did mine from the top and I stroked down until my stroke ran dry and I stopped.

Lightly paint this brown line in between each of the bumps.
5. Paint the green pumpkin
Next use your 12 bright brush and the color light olive green, deep green permanent.
This time I did all the bumps with light olive green starting from the far right bump (note you do not have to always start with the center bump, sometimes I start with the far right or left).

Start from the top of each bump and stroke down. Note: the green pumpkin is overlapping the white pumpkin so you should paint the bottom bumps so they overlap.

Then go back over your light green color with green deep permanent (darker green). Let that darker green blend with the lighter green. You do not have to completely cover the lighter green up, just let the colors sort of blend and do their thing.

Then add some strokes of white onto the green pumpkin. Just a few strokes!
Also, use your 4 round and burnt umber to lightly and thinly paint the brown lines between the bumps.

6. Paint the orange pumpkin
The orange pumpkin was done with cadmium orange hue and titanium white. Do this pumpkin the same way you did the other pumpkins.
Start by painting one of the bumps cadmium orange hue.

Then add white to your brush and paint the next few bumps so the orange and white blend together. Each bump can be different variations of orange and white. Also note that the orange pumpkin bottom bumps overlap the green pumpkin.

Then add some strokes of white onto the orange pumpkin.

And do those same brown lines again with your 4 round brush. I also outlined the bottom bumps lightly with the brown.

7. Paint the stem, curly vine and leaves
The stem was painted using the 4 round brush and burnt umber. I also added a whole bunch of green to the stem and had it curl and transition into a green vine.

Basically after I painted the stem that attaches to the orange pumpkin, I loaded green deep permanent to my brush and had the vine curl.

To get that green to show up better against the dark background, add titanium white to it. Have your vine curl around the pumpkin and come back in front of the bottom white pumpkin.

You can add various amounts of olive green to this vine too and titanium white! That white is what is going to make the green show up better versus if you just painted the vine with green and no white mixed into it.

Then paint the leaves. If you feel more comfortable, you can retrace the leaves onto your canvas or lightly draw them with pencil before you paint them in. I used my #4 round brush and the same greens to paint the leaves.

8. Paint the sunflowers
First I painted the middle circles of the sunflowers. I used my #4 round brush and burnt umber.

Then I did the petals with primary yellow mixed with some titanium white. Mixing the white in the yellow is key to getting that yellow to be opaque. I did have to still add a few coats to the petals so they showed up more solid.

Add a few streaks of brown into the petals. Also, paint white and brown dots over the middle circle using your 4 round brush.

Then paint the next sunflower using the same color combo of the yellow and the white with a few streaks of brown.

For the leaf, I used light olive green and green deep permanent. Use your round brush to outline the leaf shape and then fill it in. You can also lightly draw your leaf first and then fill it in.

To get your sunflowers to “pop” a bit, use your round brush and slightly outline the petals with cadmium orange hue.
The topiary is done! Note that if any of your gold spots are showing through the pumpkin (if you look closely some of my dots still show on the white and green pumpkin edges), you can simply paint a second or third coat of paint over them so the pumpkin is completely covering the dots.
9. Paint the words (optional)
To sketch out my word, I used a white chalk pencil! You can also get super fancy and print out a font and a word/quote. See my post about how to do that here.

I trusted my handwriting this time around and wrote in “Happy Fall Y’all” in cursive.

Then I used a #0 round brush to paint over the letters with payne’s grey. After the paint dries, the white chalk pencil lines will erase.

That’s it! Sign your name and show it off!


